
Installation Instructions


8
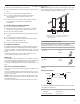
7. Push on the blower motor to disengage the two spring tabs
from the keyhole slots in the top of the range hood housing.
8. Remove the blower motor from the range hood housing and
set it aside.
9. Reinstall the 2 insulation retainers and 2 screws to the range
hood housing. Use the T20
®
Torx
®
adapter with a long
extension.
10. Reinstall the blower motor cover plate and bottom panel. Use
the T10 Torx
®
adapter and the screws previously removed.
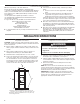
Assemble the In-Line Smart Kit
1. Using the T20
®
Torx
®
adapter, remove the 3 screws from the
terminal box cover on the in-line housing. Set the screws and
cover aside.
2. Disassemble the in-line housing from the in-line base. Using
the T20
®
Torx
®
adapter, remove the 2 screws from inside the
terminal box near the top and the 2 screws located on the
opposite side. Lift the housing off the base and mounting
bracket.
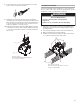
3. Install the vent transition without a backdraft damper to the
bottom of the in-line base. Use the T10 Torx
®
adapter and
install 2 - 3.5 x 9.5 mm mounting screws to secure the
transition to the base.
4. Place the blower motor inside the in-line housing.
5.
Engage the blower motor spring tabs into the keyhole slots
located at the top of the in-line housing. Push the motor so the
spring tabs are secured into the small neck of the keyhole slots.
6. Locate the 4 screws removed from the blower motor. Use
these 4 screws to secure the motor to the in-line housing.
Tighten with the T20
®
Torx
®
adapter.
7. Place the in-line housing (with blower motor installed) near
the in-line base.
A. Keyhole slots
A. Terminal box cover
B. Screws (3)
A. In-line housing
B. In-line base
C. Screws (4)
A
A
B
A
B
C
C
A. In-line base
B. Vent transition (without backdraft damper)
C. 3.5 x 9.5 mm screws (2)
A. Keyhole slots
A. In-line housing
B. Blower motor
C. Screws (4)
A
B
C
A
B
C
A