
Instruction manual


2
INSTALLATION REQUIREMENTS
These instructions are intended as a general guide only for use by
qualified persons and do not supersede any national or local
codes in any way. Compliance with all local, state, or national
codes pertaining to this type of equipment should be determined
prior to installation.
Read this entire instruction manual, as well as the instructions
supplied in separate equipment, before starting the installation.
All models are designed for indoor installation only.
The installation of the air handler, field wiring, warm air ducts, etc.
must conform to the requirements of the National Electrical
Code, ANSI/NFPA No. 70 (latest edition) in the United States, and
any state laws, and local ordinances (including plumbing or
wastewater codes). Local authorities having jurisdiction should
be consulted before installation is made. Such applicable
regulations or requirements take precedence over the general
instructions in this manual.
Install the conditioned air plenum, ducts and air filters (not
provided) in accordance with NFPA 90B Standard for the
Installation of Warm Air Heating and Air-Conditioning Systems
(latest edition).
The air handler is provided with flanges for the connection of the
plenum and ducts.
Air filters (not provided) must be listed as Class 2 furnace air
filters.
The air handler can be used with R-22 or R410A from the factory.
The air handler is shipped from the factory completely
assembled. Some models are configured for upflow air discharge
only, and some models are configured for upflow or horizontal
left-hand air discharge. The air handler cabinet conforms to
2 percent or less air leakage.
Do not remove the cabinet knockouts until it has been
determined which knockouts will need to be removed for the
installation.
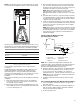
Select the final installation position which best suits the site
conditions. Consider required clearances, space, routing
requirements for refrigerant line, condensate disposal, filters,
ductwork, wiring, and accessibility for service. Refer to the air
handler rating plate on the air handler for specific information.
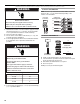
Tools and Parts
Gather the required tools and parts before starting installation.
Read and follow the instructions provided with any tools listed
here.
Tools Needed
Parts Needed
Check local codes, check existing electrical supply, and read
“Ductwork Requirements,” and “Electrical Requirements,” before
purchasing parts.
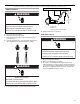
System Requirements
The air handler is designed to match, and must be used with
outdoor units as rated. The indoor units are manufactured with an
interchangeable refrigerant metering orifice to provide optimum
refrigerant control and system performance with a variety of
different capacities of outdoor units.
In some cases, the rating of the outdoor unit may require that the
air handler coil assembly orifice be changed to obtain rated
performance.
Location Requirements
NOTE: When used on cooling applications, excessive sweating
may occur when the air handler is installed in a very humid
space.
■ If installed in an unconditioned space, sealant should be
applied around the electrical wires, refrigerant tubing, and
condensate lines where they enter the cabinet.
■ Electrical wires should be sealed on the inside where they exit
the conduit opening. Sealant is required to prevent air
leakage into and condensate from forming inside the air
handler, control box, and on electrical controls.
■ The air handler must be installed in such a way as to allow
free access to the coil/filter compartment and blower/control
compartment.
■ The air handler must be installed in a level position to ensure
proper condensate drainage.
■ ¹⁄₄" nut driver
■ Level
■ Screwdriver
■ Adjustable wrench
■ Tape measure
■ Hammer
■ Sealant
■ UL listed wire nuts
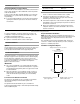
■ Replacement orifice (if needed). See “Verify Orifice Size.”
The correct orifice size may be contained in the
replacement orifice package located inside the control box
of the outdoor unit. If this package does not contain the
correct orifice for your air handler, you must purchase the
correct orifice size.
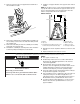
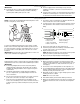
Explosion Hazard
Keep flammable materials and vapors, such as
gasoline, away from air handler.
Place air handler so that heating elements are at least
18 inches (46 cm) above the floor for a garage
installation.
Failure to follow these instructions can result in death,
explosion, or fire.
WARNING