
Owner's Manual-1


5
5. Stand dryer up and slide to front
of washer
Rear of dryer and
washer
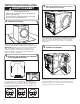
6. Place dryer on washer
Using two or more people, lift the dryer up and set it securely
on top of the washer. Position the dryer so the front and sides
are ush with those of the washer. The rear of the dryer will
overhang the rear of the washer.
Rear of dryer and
washer
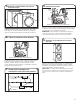
Fasten
to dryer
last.
Fasten
to
washer
rst.
Fasten
to dryer
last.
Fasten
to
washer
rst.
8. Install brackets
Remove the Washer lid screws as well as the torx screws on
the dryer cabinet. Fasten the brackets as shown, one on each
side, with the screws provided.
NOTE: Fasten the brackets to the washer before fastening
to the dryer. This ensures the brackets align correctly with
the holes in the dryer.
Lift the dryer back to an upright position, keeping it on the
covering. Use the covering to slide the dryer to the front of
the washer to avoid damaging the rubber feet.
Rear of dryer and washer
Front View
Rubber
Pad
Side View
7. Verify rubber pads are in proper
position
Rear of dryer and washer
8. Install brackets
Move the stacked pair into position for nal installation. Follow
the installation instructions in the Owner's Manuals that came
with the washer and dryer to complete the installation of each
appliance.
IMPORTANT: When moving the stacked washer/dryer into
its nal location, hold onto both the washer and the dryer
to ensure the brackets remain secure.
9. Install or reinstall washer/dryer