
Instruction Sheet


6
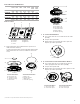
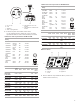
9. To Convert Torch Burner
■ Remove the spring that is shown in the following
illustration (C).
■ Use 7.0 mm wrench to loosen and remove the inner
orifice spud (A) and the outer orifice spud (B).
■ Set gas orifice spuds aside.
■ Replace with correct Propane gas orifice spud. See the
Propane gas orifice spud charts.
■ Return the spring to its original location.
IMPORTANT: Place Natural gas orifice spuds in
plastic parts bag for future use and keep with package
containing literature.
10. Replace sheet of insulation.
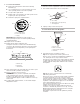
11. Replace burner bases and burner caps.
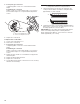
The igniter electrode is ceramic and could break during
conversion. Be sure that the electrode comes through the
hole in the burner smoothly while you are replacing the
burner base.
12. Open shutoff valve in the gas supply line. The valve is open
when the handle is parallel to the gas pipe.
13. Plug in cooktop or reconnect power.
REMEMBER: Once you have completed converting all
of the cooktop burners, test the cooktop for leaks by
brushing on an approved noncorrosive leak-detection
solution. If bubbles appear, a leak is indicated. Correct any
leaks found.
14. To adjust single and dual valves, see the “Flame Height
Adjustment” section.
Convert from Propane Gas to Natural Gas
1. Turn manual shutoff valve to the closed position.
2. Unplug cooktop or disconnect power.
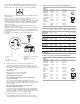
To Convert Gas Pressure Regulator
3. Determine the type of regulator you have:
Style 1: The cap has a slot and “LP” printed on it.
Remove access cap by using a flat-blade screwdriver or
coin, turning the access cap counterclockwise.
The gas pressure regulator has 2 settings that are stamped
on either side of the cap. Turn the cap and reinstall into
regulator with the stamp “NAT” visible from the outside of
the regulator.
Style 2: The access cap has a slot in it or a hex shape,
without any printed text.
Remove the access cap by using a flat - blade screwdriver
or wrench turning the access cap counter clockwise.
If Seven Universe is printed on the regulator, unthread the
spring retainer by rotating it counter clockwise. If Maxitrol
is printed on the regulator then apply force to the flat side
of the spring retainer to remove it.
Turn over the spring retainer to place the disk on the spring
retainer close to the access cap.
Install the Seven Universe spring retainer by turning it
clockwise to thread it fully into the access cap, or for the
Maxitrol spring retainer by applying pressure to snap the
spring retainer into the access cap.
Reinstall the cap and seal onto the regulator by turning
clockwise.
A. To cooktop
B. Shutoff valve (closed position)
C. Gas supply line
A. Access cap
B. Rear of cooktop
C. Gas pressure regulator
D. Gas flow
A
B
C
A. Inner orifice spud
B. Outer orifice spud
C. Spring
B
C
A
A. Burner cap
B. Electrode
C. Burner base
A
B
C
A
B
C
D
NAT