
Specification


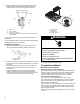
Table Of Contents
- COOKTOP SAFETY
- Cooktop Safety
- COOKTOP MAINTENANCE AND CARE
- General Cleaning
- INSTALLATION INSTRUCTIONS
- REQUIREMENTS
- Tools and Parts
- Location Requirements
- Electrical Requirements
- Gas Supply Requirements
- INSTALLATION
- Install Cooktop
- Make Gas Connection
- Complete Installation
- GAS CONVERSIONS
- Convert from Natural Gas to Propane Gas
- Convert from Propane Gas to Natural Gas
- Lighting the Electronic Igniters
- Low Flame Height Adjustment
- Complete Burner Adjustment
- Moving the Cooktop
- SÉCURITÉ DE LA TABLE DE CUISSON
- Sécurité de la table de cuisson
- ENTRETIEN ET RÉPARATION DE LA TABLE DE CUISSON
- Nettoyage général
- INSTRUCTIONS D’INSTALLATION
- SPÉCIFICATIONS
- Outils et pièces
- Exigences d’emplacement
- Spécifications électriques
- Spécifications de l’alimentation en gaz
- INSTALLATION
- Installation de la table de cuisson
- Raccordement au gaz
- Achever l’installation
- CONVERSIONS POUR CHANGEMENT DE GAZ
- Conversion du gaz naturel au propane
- Conversion pour changement de gaz propane au gaz naturel
- Allumeurs électroniques – allumage
- Réglage pour le débit thermique minimum
- Achever le réglage des brûleurs
- Déplacement de la table de cuisson

5
Cleaning Method:
� Soap and water:
Pull knobs straight away from control panel to remove.
� Dishwasher Safe
CONTROL PANEL
To avoid damage to the control panel, do not use abrasive
cleaners, steel wool pads, gritty washcloths or abrasive paper
towels.
Cleaning Method:
� Glass cleaner and soft cloth or sponge: Apply glass cleaner to
soft cloth or sponge, not directly on panel.
� Affresh
®
Kitchen and Appliance Cleaner (not included): Order
Part Number W10355010
PORCELAIN-COATED GRATES AND CAPS
Food spills containing acids, such as vinegar and tomato, should
be cleaned as soon as the cooktop, grates and caps are cool.
These spills may affect the finish.
To avoid chipping, do not bang grates and caps against each
other or hard surfaces such as cast iron cookware.
Do not reassemble caps on burners while wet.
Cleaning Method:
� Nonabrasive plastic scrubbing pad and mildly abrasive
cleanser:
Clean as soon as cooktop, grates and caps are cool.
� Dishwasher (grates only, not caps):
Use the most aggressive cycle.
� Gas Grate and Drip Pan Cleaner Part Number 31617 (not
included):
Refer to the Quick Start Guide for contact information.
SURFACE BURNERS
Sealed Burner models
See the “Sealed Surface Burners” section in the online Control
Guide.
SIMMER PLATE (on some models)
Do not clean in dishwasher.
Cleaning Method:
� Liquid detergent and water:
Wipe with damp cloth or sponge then rinse with clean water
and wipe dry.
� Mild-abrasive cleanser:
Rub in the direction of the grain lines with a damp cloth.
GRIDDLE (on some models)
To avoid damaging the nonstick surface, do not clean the griddle
with abrasive cleaners.
Cleaning Method:
� Use soap and water or mild detergent.
INSTALLATION INSTRUCTIONS
REQUIREMENTS
Tools and Parts
Tools Needed
� Tape measure
� Flat-blade screwdriver
� Phillips screwdriver
� 15/16" (24 mm) combination
wrench
� Pipe wrench
� Wrench or pliers
� Marker or pencil
� Pipe-joint compound
resistant to Propane gas
� Noncorrosive leak-detection
solution
Parts Supplied
� Gas pressure regulator
� Burner grates
� Burner caps
� Burner base
� Clamping brackets (2)
� Bracket attachment screws
(2)
For Propane/Natural Gas Conversions
Tools Needed
� Flat-blade screwdriver
� T20
®
TORX
®✝
screwdriver
� Adjustable wrench
� 7.0 mm nut driver
� Masking tape
� 7.0 mm wrench
Parts Supplied
� Propane orifice package
� Conversion instructions
� Conversion label
Parts needed
Check local codes and consult gas supplier. Check existing gas
supply and electrical supply. See “Electrical Requirements” and
“Gas Supply Requirements” sections.
NOTE: Be sure to purchase only Whirlpool factory-certified parts
and accessories for your appliance. Your installation may require
additional parts. To order, refer to the contact information
referenced in your Quick Start Guide.
Location Requirements
IMPORTANT: Observe all governing codes and ordinances. Do
not obstruct flow of combustion and ventilation air.
� It is the installer’s responsibility to comply with installation
clearances specified on the model/serial/rating plate. The
model/serial/rating plate is located on the underside of the
cooktop base.
A. Model/serial/rating plate
✝TORX
®
and T20
®
are registered trademarks of Acument Intellectual Properties, LLC.