Instructions for use WASHER-DRYER ! GB English,1 NL Nederlands,37 TR Türkçe,73 F Français,13 ES Español,49 DE Deutsch,25 PT Português,61 This symbol reminds you to read this instruction manual.
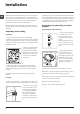
Installation GB ! This instruction manual should be kept in a safe place for future reference. If the washer-dryer is sold, transferred or moved, make sure that the instruction manual remains with the machine so that the new owner is able to familiarise himself/herself with its operation and features. Levelling the machine correctly will provide it with stability, help to avoid vibrations and excessive noise and prevent it from shifting while it is operating.
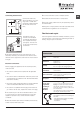
! Do not use extension cords or multiple sockets. Connecting the drain hose 65 - 100 cm Connect the drain hose, without bending it, to a drainage duct or a wall drain located at a height between 65 and 100 cm from the floor; GB ! The cable should not be bent or compressed. ! The power supply cable must only be replaced by authorised technicians. Warning! The company shall not be held responsible in the event that these regulations are not respected.
Description of the washer-dryer GB Control panel CLEANING ACTION ON/OFF button button DRYING button DISPLAY Detergent dispenser drawer WASH CYCLE SELECTOR MEMORY button START/PAUSE button with indicator light FUNCTION buttons buttons ANTI ALLERGY RINSE button DELAY TIMER button TEMPERATURE button CHILD LOCK button Detergent dispenser drawer: used to dispense detergents and washing additives (see “Detergents and laundry”).
Display GB Z B A X D C E Y F The display is useful when programming the machine and provides a great deal of information. The upper two strings A and B are used to display the selected wash cycle or the type of drying selected, the current wash cycle phase (the selected dryness level or drying time) and all the indications relating to the progress status of the cycle.
How to run a wash cycle or a drying cycle GB 1. SWITCH THE MACHINE ON. Press the On/Off button ; the text POWER ON will appear on the display and the START/ PAUSE indicator light will flash slowly in a green colour. 2. LOAD THE LAUNDRY. Open the porthole door. Load the laundry, making sure you do not exceed the maximum load value indicated in the table of programmes on the following page. 3. MEASURE OUT THE DETERGENT.
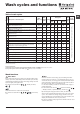
Wash cycles and functions Wash cycles Table of wash cycles Detergents Max. Max. Cycle Max. speed Drying load temp. (°C) (rpm) Pre- Wash Bleach Fabric (kg) duration Wash softener Description of the wash cycle 1400 - - 5 1400 - 9 1400 - 9 1400 - 9 800 - 4 800 - 4 30° 0 - - 1 40° 800 - - 2 30° 800 - - 3.
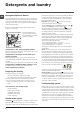
Detergents and laundry GB Detergent dispenser drawer Good washing results also depend on the correct dose of detergent: adding too much detergent will not necessarily result in a more efficient wash, and may in fact cause a build up on the inside of your appliance and contribute to environmental pollution. ! Do not use hand washing detergents because these create too much foam. A B MAX 4 Open the detergent dispenser drawer and pour in the detergent or washing additive, as follows.
Precautions and tips ! This washer-dryer was designed and constructed in accordance with international safety regulations. The following information is provided for safety reasons and must therefore be read carefully.
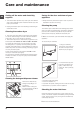
Care and maintenance GB Cutting off the water and electricity supplies Caring for the door and drum of your appliance • Turn off the water tap after every wash cycle. This will limit wear on the hydraulic system inside the washer-dryer and help to prevent leaks. • Always leave the porthole door ajar in order to prevent unpleasant odours from forming. • Unplug the washer-dryer when cleaning it and during all maintenance work.
Troubleshooting Your washer-dryer could fail to work. Before contacting the Technical Assistance Centre (see “Assistance”), make sure that the problem cannot be 0solved easily using the following list. GB Problem: Possible causes / Solutions: The washer-dryer does not switch on. • The appliance is not plugged into the socket fully, or is not making contact. • There is no power in the house. The wash cycle does not start. • • • • • The washer-dryer door is not closed properly.
Service GB Before calling for Assistance: • Check whether you can solve the problem alone (see “Troubleshooting”); • Restart the programme to check whether the problem has been solved; • If this is not the case, contact an authorised Technical Assistance Centre using the telephone number provided on the guarantee certificate. ! Always request the assistance of authorised technicians. Have the following information to hand: • the type of problem; • the appliance model (Mod.); • the serial number (S/N).
Mode d’emploi LAVANTE SÉCHANTE ! FR Français Ce symbole vous rappelle de lire ce mode d’emploi.
Installation FR ! Conserver ce mode d’emploi pour pouvoir le consulter à tout moment. En cas de vente, de cession ou de déménagement, veiller à ce qu’il suive toujours le lavante-séchante pour que son nouveau propriétaire soit informé sur son mode de fonctionnement et puisse profiter des conseils correspondants. Une bonne mise à niveau garantit la stabilité de l’appareil et évite qu’il y ait des vibrations, du bruit et des déplacements en cours de fonctionnement.
Raccordement du tuyau de vidange 65 - 100 cm Raccorder le tuyau d’évacuation, sans le plier, à un conduit d’évacuation ou à une évacuation murale placés à une distance du sol comprise entre 65 et 100 cm; ! N’utiliser ni rallonges ni prises multiples. FR ! Le câble ne doit être ni plié ni trop écrasé. ! Le câble d’alimentation ne doit être remplacé que par des techniciens agréés. Attention! Nous déclinons toute responsabilité en cas de non-respect des normes énumérées ci-dessus.
Description du lavante-séchante FR Bandeau de commandes Touche Touche INTENSITE DE LAVAGE ON/OFF Touche SÉCAHGE Écran Touches Tiroir à produits lessiviels SÉLECTEUR PROGRAMMES MEMO ANTIALLERGIES Touche ON/OFF : appuyer brièvement sur la touche pour allumer ou éteindre l’appareil. Le voyant vert START/ PAUSE clignotant lentement indique que la machine est allumée.
Écran FR Z B A X D C E Y F L’écran est utile pour programmer la machine et fournit de multiples renseignements. Les deux chaînes supérieures A et B affichent le programme de lavage ou le type de séchage sélectionné, la phase de lavage en cours (le niveau de séchage ou le temps de séchage sélectionné) ainsi que toutes les indications sur le stade d’avancement du programme.
Comment effectuer un cycle de lavage ou un séchage FR 1. METTRE L’APPAREIL SOUS TENSION. Appuyer sur la touche , l’inscription BONJOUR s’affiche à l’écran ; le voyant de START/PAUSE passe au vert et clignote lentement. 2. CHARGER LE LINGE. Ouvrir la porte hublot. Charger le linge en faisant attention à ne pas dépasser la quantité indiquée dans le tableau des programmes de la page suivante. 3. DOSER LE PRODUIT LESSIVIEL.
Programmes et fonctions Programmes Tableau des programmes FR Temp. maxi. (°C) Description du Programme Produits lessiviels Vitesse Charge Durée maxi Séchage maxi (tours PrélaAssou- (Kg) cycle Lavage Javel minute) vage plissant 40° 1400 - - 5 Coton Prélavage (1° pression de la touche): blancs extrêmement sales. 90° 1400 - 9 60° Coton Blanc (1) (2° pression de la touche): blancs et couleurs résistantes très sales. (Max.
Produits lessiviels et linge FR Tiroir à produits lessiviels Un bon résultat de lavage dépend aussi d’un bon dosage de produit lessiviel: un excès de lessive ne lave pas mieux, il incruste l’intérieur du lavante-séchante et pollue l’environnement. ! Ne pas utiliser de lessives pour lavage à la main, elles moussent trop. Sortir le tiroir à produits A B lessiviels et verser la lessive 4 ou l’additif comme suit.
Précautions et conseils ! Ce lavante-séchante a été conçu et fabriqué conformément aux normes internationales de sécurité. Ces consignes sont fournies pour des raisons de sécurité, il faut les lire attentivement.
Entretien et soin FR Coupure de l’arrivée d’eau et du courant Entretien du hublot et du tambour • Fermer le robinet de l’eau après chaque lavage. Cela réduit l’usure de l’installation hydraulique du lavanteséchante et évite tout danger de fuites. • Débrancher la fiche de la prise de courant lors de tout nettoyage du lavante-séchante et pendant tous les travaux d’entretien. • Il faut toujours laisser le hublot entrouvert pour éviter la formation de mauvaise odeurs.
Anomalies et remèdes Il peut arriver que le lavante-séchante ne fonctionne pas bien. Avant d’appeler le Service de dépannage (voir “Assistance”), contrôler s’il ne s’agit pas par hasard d’un problème facile à résoudre à l’aide de la liste suivante. Anomalies: Causes / Solutions possibles: Le lavante-séchante ne s’allume pas. • La fiche n’est pas branchée dans la prise de courant ou mal branchée. • Il y a une panne de courant. Le cycle de lavage ne démarre pas.
Assistance FR Avant d’appeler le service après-vente: • Vérifier si on ne peut pas résoudre l’anomalie par ses propres moyens (voir “Anomalies et Remèdes”); • Remettre le programme en marche pour contrôler si l’inconvénient a disparu; • Autrement, contacter le Centre d’Assistance technique agréé au numéro de téléphone indiqué sur le certificat de garantie. ! Ne jamais s’adresser à des techniciens non agréés. Communiquer: • le type de panne; • le modèle de l’appareil (Mod.); • son numéro de série (S/N).
Bedienungsanleitungen WASCHTROCKNER ! DE Deutsch Dieses Symbol erinnert Sie daran, das vorliegende Handbuch zu lesen.
Installation DE ! Es ist äußerst wichtig, diese Bedienungsanleitung sorgfältig aufzubewahren, um sie jederzeit zu Rate ziehen zu können. Sorgen Sie dafür, dass sie im Falle eines Umzugs oder einer Übergabe an einen anderen Benutzer das Gerät stets begleitet, damit auch der neue Inhaber die Möglichkeit hat, diese zu Rate zu ziehen. ! Lesen Sie die Hinweise bitte aufmerksam durch, sie liefern wichtige Informationen hinsichtlich der Installation, des Gebrauchs und der Sicherheit.
Anschluss des Ablaufschlauches 65 - 100 cm Schließen Sie den Ablaufschlauch ohne ihn dabei abzuknicken an einen geeigneten Abfluss an. Die Mindestablaufhöhe beträgt 65 - 100 cm (gemessen vom Boden), oder hängen Sie diesen mittels des Schlauchhalters gesichert in ein Becken oder Wanne ein; Befestigen Sie diesen mittels des mitgelieferten Schlauchhalters z.B. an einen Wasserhahn (siehe Abbildung). Das freie Ablaufschlauchende darf nicht unter Wasser positioniert werden.
Beschreibung Ihres Waschtrockner DE Bedienblende Taste Taste ON/OFF WASCHINTENSITÄT Taste TROCKNEN DISPLAY Tasten Waschmittelschublade PROGRAMMWAHL FUNKTIONEN MY CYCLE Taste SPÜLINTENSITÄT Taste STARTZEITVORWAHL Waschmittelschublade: für Waschmittel und Zusätze (siehe „Waschmittel und Wäsche“). Taste ON/OFF : Drücken Sie kurz auf die Taste, um das Gerät ein- bzw. auszuschalten. Die Kontrollleuchte START/ PAUSE, die langsam grün blinkt, zeigt an, dass das Gerät eingeschaltet ist.
Display Z B DE A X D C E Y F Das Display dient nicht nur zur Programmierung des Gerätes, sondern liefert auch zahlreiche Informationen. In den beiden oberen Zeilenreihen A und B werden das ausgewählte Wasch- oder Trockenprogramm, die laufende Waschphase (bzw. die ausgewählte Trocknungsart oder -zeit) und alle Angaben zum Programmfortschritt angezeigt.
Durchführung eines Wasch- oder Trockenzyklus DE 1. EINSCHALTEN DES GERÄTES. Drücken Sie auf die Taste , woraufhin auf dem Display die Meldung POWER EIN erscheint; die Kontrollleuchte START/PAUSE blinkt langsam grün. 2. EINFÜLLEN DER WÄSCHE. Öffnen Sie die Gerätetür. Füllen Sie die Wäsche ein. Achten Sie hierbei bitte darauf, die in der Programmtabelle (auf der nächsten Seite) angegebene Wäschemenge nicht zu überschreiten. 3. DOSIERUNG DES WASCHMITTELS.
Programme und Funktionen Waschprogramme Programmtabelle Beschreibung des Programms Max. Waschmittel SchleuMax.
Waschmittel und Wäsche DE Waschmittel und Wäsche Ein gutes Waschergebnis hängt auch von einer korrekten Waschmitteldosierung ab: Eine zu hohe Dosierung bedeutet nicht unbedingt reinere Wäsche, sie trägt nur dazu bei, die Maschineninnenteile zu verkrusten und die Umwelt zu belasten. ! Verwenden Sie keine Handwaschmittel, sie verursachen eine zu hohe Schaumbildung.
Vorsichtsmaßregeln und Hinweise ! Der Waschtrockner wurde nach den strengsten internatio- nalen Sicherheitsvorschriften entworfen und gebaut. Nachstehende Hinweise werden aus Sicherheitsgründen geliefert und sollten aufmerksam gelesen werden. Allgemeine Sicherheit • Dieses Gerät wurde ausschließlich für den Einsatz im privaten Haushalt konzipiert.
Reinigung und Pflege DE Abstellen der Wasser- und Stromversorgung • Drehen Sie den Wasserhahn nach jedem Waschvorgang zu. Hierdurch wird der Verschleiß der Wasseranlage verringert und Wasserlecks vorgebeugt. • Ziehen Sie den Netzstecker aus der Steckdose, bevor Sie Ihren Waschtrockner reinigen. Reinigung des Gerätes • Die Gehäuseteile und die Teile aus Gummi können mit einem mit warmer Spülmittellauge angefeuchteten Tuch gereinigt werden. Vermeiden Sie Löse- und Scheuermittel.
Störungen und Abhilfe Bei Funktionsstörung: Bevor Sie sich an den Technischen Kundendienst wenden (siehe „Kundendienst“), vergewissern Sie sich zuerst, ob es sich nicht um eine Kleinigkeit handelt, die Sie selbst beheben können. Ziehen Sie hierzu nachstehendes Verzeichnis zu Rate. Störungen: Mögliche Ursachen / Lösungen: Der Waschtrockner schaltet sich nicht ein. • Der Stecker steckt nicht in der Steckdose, oder nicht so, dass der Kontakt hergestellt wird. • Der Strom ist ausgefallen.
Kundendienst DE Bevor Sie sich an den Kundendienst wenden: • Sollten einige Kontrollen vorab selbst durchgeführt werden (siehe „Störungen und Abhilfe“); • Starten Sie daraufhin das Programm erneut, um sicherzustellen, dass die Störung auch wirklich behoben wurde; • Ist dies nicht der Fall, dann kontaktieren Sie den autorisierten Kundendienst unter der auf dem Garantieschein befindlichen Telefonnummer. ! Wenden Sie sich auf keinen Fall an nicht autorisierte Techniker.
Gebruiksaanwijzing WASDROOGMACHINE ! Dit symbool herinnert u eraan om deze gebruikshandlei- ding te lezen.
Installatie NL ! Het is belangrijk deze handleiding te bewaren voor latere raadpleging. In het geval u het apparaat verkoopt, of u verhuist, moet het boekje bij de wasdroogmachine blijven zodat de nieuwe gebruiker de functies en betreffende raadgevingen kan doornemen. Een correcte nivellering geeft de machine stabiliteit en voorkomt trillingen, lawaai en het zich verplaatsen van de automaat tijdens de werking.
Aansluiting van de afvoerbuis 65 - 100 cm Verbind de buis, zonder hem te buigen, aan een afvoerleiding of aan een afvoer in de muur tussen de 65 en 100 cm van de grond ! Gebruik geen verlengsnoeren of dubbelstekkers. NL ! Het snoer mag niet gebogen of samengedrukt worden. ! De voedingskabel mag alleen door een bevoegde installateur worden vervangen. Belangrijk! De fabrikant kan niet aansprakelijk worden gesteld wanneer deze normen niet worden nageleefd.
Beschrijving van de wasdroogmachine NL Bedieningspaneel SCHOONMAAK ACTIE ON/OFF toets toets DROGEN toets DISPLAY Toetsen Wasmiddelbakje PROGRAMMAKEUZE MY CYCLE toets SOORT SPOELING toets UITGESTELDE START toets Wasmiddelbakje: voor wasmiddelen en wasversterkers (zie “Wasmiddelen en wasgoed”). Toets ON/OFF : druk even op de toets om de wasdroogmachine aan of uit te zetten. Het groene START/PAUSE controlelampje dat langzaam knippert geeft aan dat de wasdroogmachine aanstaat.
Display Z B NL A X D C E Y F Het display is nodig om de wasdroogmachine te programmeren en geeft meerdere soorten informatie. In de twee bovenste vakken A en B verschijnen het geselecteerde was- of droogprogramma, de lopende wasfase (het droogniveau of de geselecteerde droogtijd) en alle aanwijzingen met betrekking tot het verloop van het wasprogramma. In het vak C verschijnt de resterende tijd tot het einde van de wascyclus.
Het uitvoeren van een wascyclus NL 1. DE Wasdroogmachine AANZETTEN. Druk op de toets , op het display verschijnt de tekst AANZETTEN. Het groene controlelampje START/PAUSE zal langzaam knipperen. 2. HET WASGOED INLADEN. Open de deur. Laad het wasgoed in en zorg ervoor nooit de laadhoeveelheid te overschrijden aangegeven in de programmatabel op de volgende bladzijde. 3. WASMIDDEL DOSEREN. Trek het bakje naar buiten en doe het wasmiddel in de speciale bakjes, zoals aangegeven in “Wasmiddelen en wasgoed”. 4.
Programma’s en functies Programma’s Programmatabel NL Maximale Temp (°C) Beschrijving van het Programma Vlekkenverwijdering Katoen Voorwas (1 druk op de toets): e zeer vuile witte was. 1400 - 90° 1400 1400 - 1400 - Synthetisch Resistent (1 Fijn Synthetisch (2 e 5 - 9 9 9 zeer vuile kleurvaste bonte was. 60° 800 - 4 niet zo vuile kleurvaste bonte was.
Wasmiddelen en wasgoed NL Wasmiddelbakje Een goed wasresultaat hangt ook af van de juiste dosis wasmiddel: te veel wasmiddel maakt het wassen niet beter. Het wasmiddel blijft aan de binnenzijde van de wasdroogmachine zitten en zorgt voor het vervuilen van het milieu. ! Gebruik nooit wasmiddelen voor handwas aangezien die te veel schuim vormen.
Voorzorgsmaatregelen en advies ! De wasmachine is ontworpen en geproduceerd volgens de internationale veiligheidsnormen. Deze aanwijzingen zijn voor uw eigen veiligheid geschreven en moeten aandachtig worden doorgenomen. Algemene veiligheid • Dit apparaat is uitsluitend ontworpen voor huishoudelijk niet-professioneel gebruik.
Onderhoud en verzorging NL Afsluiten van water en stroom Reinigen van de pomp • Sluit na iedere wasbeurt de kraan af. Hiermee beperkt u slijtage van de waterinstallatie van de wasmachine en voorkomt u lekkage. • Sluit altijd eerst de stroom af voordat u de wasdroogmachine gaat schoonmaken en gedurende onderhoudswerkzaamheden. De wasdroogmachine is voorzien van een zelfreinigende pomp en hoeft dus niet te worden onderhouden.
Storingen en oplossingen Het kan gebeuren dat de wasdroogmachine niet werkt. Voor u contact opneemt met de Servicedienst (zie “Service”) moet u controleren of het niet een storing betreft die u zelf makkelijk kunt verhelpen met behulp van de volgende lijst. Storingen: NL Mogelijke oorzaken / Oplossing: De wasdroogmachine gaat niet aan. • De stekker zit niet in het stopcontact of niet ver genoeg om contact te maken. • Het hele huis zit zonder stroom. De wascyclus start niet.
Service NL Voordat u de Servicedienst inschakelt: • Controleer eerst of u het probleem zelf kunt oplossen (zie “Storingen en oplossingen”). • Start het programma opnieuw om te controleren of de storing is verholpen; • Als dit niet het geval is moet u contact opnemen met de erkende Technische Servicedienst via het telefoonnummer dat op het garantiebewijs staat. ! Wendt u nooit tot een niet erkende installateur. Vermeld: • het type storing; • het model van de machine (Mod.); • het serienummer (S/N).
Manual de instrucciones LAVASECADORA ! Este símbolo te recuerda que debes leer este manual de ES instrucciones.
Instalación ES ! Es importante conservar este manual para poder consultarlo en cualquier momento. En caso de venta, de cesión o de traslado, verifique que permanezca junto con la lavasecadora para informar al nuevo propietario sobre el funcionamiento y brindar las correspondientes advertencias. Una cuidadosa nivelación brinda estabilidad a la máquina y evita vibraciones, ruidos y desplazamientos durante el funcionamiento.
Conexión del tubo de descarga 65 - 100 cm Conecte el tubo de descarga, sin plegarlo, a una tubería de descarga o a una descarga de pared colocadas a una altura del piso entre 65 y 100 cm; ! El cable de alimentación debe ser sustituido sólo por técnicos autorizados. ES ¡Atención! La empresa fabricante declina toda responsabilidad en caso de que estas normas no sean respetadas.
Descripción de la lavasecadora ES Panel de control Botón Botón de ON/OFF ACCIÓN DE LIMPIEZA Botón SECADO PANTALLA Botones Contenedor de detergentes Botón con piloto Botón START/PAUSE Botones SELECTOR DE MY PROGRAMAS CYCLE FUNCIÓN Botón TIPO DE ACLARADO Botón Botón TEMPERATURA Botón BLOQUEO DE BOTONES COMIENZO RETRASADO Contenedor de detergentes: para cargar detergentes y aditivos (ver “Detergentes y ropa”).
Pantalla Z B A ES X D C E Y F La pantalla es útil para programar la máquina y brinda múltiple información. En las dos series superiores A y B se visualizan: el programa de lavado o el tipo de secado seleccionado, la fase de lavado en curso (el nivel de secado o el tiempo de secado seleccionado) y todas las indicaciones correspondientes al estado de avance del programa.
Cómo efectuar un ciclo de lavado o de secado ES 1. ENCENDER LA MÁQUINA. Presione el botón , en la pantalla aparecerá la palabra ELEVACIÓN EN CURSO; el piloto START/PAUSE centelleará lentamente de color verde. 2. CARGAR LA ROPA. Abra la puerta. Cargue la ropa, cuidando no superar la cantidad de carga indicada en la tabla de programas de la página siguiente. 3. DOSIFICAR EL DETERGENTE. Extraiga el contenedor y vierta el detergente en las cubetas correspondientes como se explica en “Detergentes y ropa”. 4.
Programas y funciones Programas Tabla de programas Descripción del Programa ES Temp. max. (°C) Suavizante Carga Duración máx. del ciclo (Kg.) 1400 - - 5 1400 - 9 1400 - 9 1400 - 9 800 - 4 800 - 4 30° 0 - - 1 Woolmark Platinum (Lana): para lana, cachemira, etc.
Detergentes y ropa ES Contenedor de detergentes El buen resultado del lavado depende también de la correcta dosificación del detergente: si se excede la cantidad, no se lava de manera más eficaz, sino que se contribuye a encostrar las partes internas de la lavasecadora y a contaminar el medio ambiente. ! No use detergentes para el lavado a mano porque producen demasiada espuma.
Precauciones y consejos ! La lavasecadora fue proyectada y fabricada en confor- midad con las normas internacionales de seguridad. Estas advertencias se suministran por razones de seguridad y deben ser leídas atentamente. Seguridad general • Este aparato ha sido fabricado para un uso de tipo doméstico exclusivamente.
Mantenimiento y cuidados ES Interrumpir el agua y la corriente eléctrica Limpiar la bomba • Cierre el grifo de agua después de cada lavado. De este modo se limita el desgaste de la instalación hidráulica de la lavasecadora y se elimina el peligro de pérdidas. • Desenchufe la máquina cuando la debe limpiar y durante los trabajos de mantenimiento. La lavasecadora posee una bomba autolimpiante que no necesita mantenimiento.
Anomalías y soluciones Puede suceder que la lavasecadora no funcione. Antes de llamar al Servicio de Asistencia Técnica (ver “Asistencia”), controle que no se trate de un problema de fácil solución utilizando la siguiente lista. Anomalías: Posibles causas / Solución: La lavasecadora no se enciende. • El enchufe no está introducido en la toma de corriente, o no hace contacto. • En la casa no hay corriente. El ciclo de lavado no comienza. • • • • • La puerta no está correctamente cerrada.
Asistencia ES Antes de llamar al Servicio de Asistencia Técnica: • Verifique si la anomalía la puede resolver Ud. solo (ver “Anomalías y soluciones”); • Vuelva a poner en marcha el programa para controlar si el inconveniente fue resuelto; • Si no es así, llame al Servicio de Asistencia técnica autorizado, al número de teléfono indicado en el certificado de garantía. ! No recurra nunca a técnicos no autorizados. Comunique: • el tipo de anomalía; • el modelo de la máquina (Mod.
Instruções para utilização MÁQUINA DE LAVAR E SECAR ROUPA ! PT Português Este símbolo serve para lembrar-te de ler este manual de instruções.
Instalação PT ! É importante guardar este manual para poder consultá-lo a qualquer momento. Se a máquina for vendida, cedida ou transferida, certifique-se que este manual permaneça com a máquina para informar o novo proprietário acerca do seu funcionamento e das respectivas advertências. Um cuidadoso nivelamento dá estabilidade à máquina e evita vibrações, ruídos e deslocamentos durante o funcionamento.
Ligação do tubo de descarga 65 - 100 cm Ligue o tubo de descarga, sem dobrá-lo, a um conduto de descarga ou a uma descarga de parede colocados entre 65 e 100 cm do chão; ! O cabo de alimentação deve ser substituído somente por técnicos autorizados. Atenção! O fabricante declina toda a responsabilidade se estas regras não forem respeitadas. Primeiro ciclo de lavagem Depois da instalação, antes de usar, efectue um ciclo de lavagem com detergente mas sem roupa, defina o programa “Auto Limpeza”.
Descrição da máquina de lavar roupa PT Painel de comandos Tecla INTENSIDADE LAVAGEM Tecla de ON/OFF Tecla SECAGEM VISOR Teclas Gaveta dos detergentes Tecla SELECTOR MY PROGRAMAS CYCLE Tecla com indicador luminoso Teclas FUNÇÕES Tecla TIPO DE ENXAGUAMENTO START/PAUSE Tecla TEMPERATURA Tecla Tecla INÍCIO POSTERIOR BLOQUEIO DAS TECLAS Gaveta dos detergentes: para colocar detergentes e aditivos (veja “Detergentes e roupa”).
Visor PT Z B A X D C E Y F O visor é útil para programar a máquina e fornece muitas informações. Nas duas linhas superiores A e B são visualizados o programa de lavagem ou o tipo de secagem seleccionada, a fase de lavagem a decorrer (o nível de secagem ou o tempo de secagem seleccionado) e todas as indicações relativas ao estado do programa.
Como efectuar um ciclo de lavagem ou secagem PT 1. LIGAR A MÁQUINA. Carregue no botão , no visor aparecerá a escrita LIGAÇÃO EM CURSO; o indicador luminoso START/ PAUSE irá piscar lentamente com a cor verde. 2. COLOCAR A ROUPA. Abrir a porta de vidro. Coloque a roupa dentro da máquina prestando atenção para não superar a carga máxima indicada na tabela dos programas na página seguinte. 3. DOSAGEM DO DETERGENTE.
Programas e funções Programas Tabela dos programas Descrição do Programa PT Velocità Detergentes max. Carga Temp. max. Duração (rotações Secagem max. (°C) ciclo Préla- LavaAmacia- (Kg) por Lixívia vagem gem dor minuto) 1400 - - 5 1400 - 9 1400 - 9 1400 - 9 800 - 4 800 - 4 0 - - 1 30° Delicados M Memo (My Cycle): possibilita guardar na memória qualquer tipo de lavagem.
Detergentes e roupa PT Gaveta dos detergentes O bom resultado da lavagem depende também do emprego da dose certa de detergente: com excessos não se lava de maneira mais eficaz, mas contribui-se para formar crostas nas peças internas da máquina de lavar roupa e poluir o meio ambiente. ! Não use detergentes para lavagem à mão, porque formam espuma demais.
Precauções e conselhos ! Esta máquina de lavar roupa foi projectada e fabricada em conformidade com os regulamentos internacionais de segurança. Estas advertências são fornecidas por razões de segurança e devem ser lidas com atenção. Segurança geral • Este aparelho foi projectado exclusivamente para um uso doméstico.
Manutenção e cuidados PT Interromper a alimentação de água e de corrente eléctrica • Feche a torneira da água depois de cada lavagem. Desta maneira diminuiu-se o desgaste do sistema hidráulico da máquina de lavar roupa e elimina-se o risco de inundação. • Tire a ficha da tomada eléctrica quando for limpar a máquina de lavar roupa e durante os trabalhos de manutenção. Limpar a máquina de lavar roupa • A parte externa e as peças em borracha podem ser limpas com um pano molhado com água morna e sabão.
Anomalias e soluções Pode acontecer que a máquina de lavar roupa não funcione. Antes de telefonar para a Assistência Técnica (veja “Assistência”), verifique se não se trata de um problema fácil de resolver com ajuda da seguinte lista. Anomalias: Possíveis causas / Solução: A máquina de lavar roupa não liga. • A ficha não está colocada na tomada eléctrica, ou não o suficiente para haver contacto. • Em casa não há corrente. O ciclo de lavagem não inicia. • • • • • A porta de vidro não está bem fechada.
Assistência PT Antes de contactar a Assistência Técnica: • Verifique se consegue resolver a anomalia sozinho (veja “Anomalias e soluções”); • Reinicie o programa para verificar se o inconveniente foi resolvido; • Em caso negativo, contacte a o Centro de Assistência técnica autorizada no número de telefone indicado no certificado de garantia. ! Nunca recorra a técnicos não autorizados. Comunique: • o tipo de anomalia; • o modelo da máquina (Mod.); • o número de série (S/N).
Kullanma Kılavuzu ÇAMAŞIR MAKİNESİ ! TR Türkçe Bu sembol size bu talimatlar kılavuzunu okumayı hatırlatır.
Montaj TR ! Bu kitapçığı gerektiği her an danışabilmeniz için özenle saklayınız. Çamaşır makinesinin satılması, devri veya nakli durumlarında da, yeni sahibinin faydalanabilmesi için bu kılavuz makineyle beraber saklanmalıdır. ! Talimatları dikkatlice okuyunuz; montaj, kullanım ve güvenliğe ilişkin önemli bilgiler içermektedir. Ambalajın çıkartılması ve aynı seviyeye getirilmesi Ambalajdan çıkartılması 1. Çamaşır makinesinin ambalajdan çıkartılması. 2.
Tahliye hortumunun takılması 65 - 100 cm ! Kablonun ezilmemesi ve katlanmaması gerekir. Tahliye hortumunu, katlanmasını önleyerek, zemindeki veya yerden 65 ile 100 cm yükseklik arasındaki bir duvar tahliyesine takınız TR ! Beslenme kablosunun yalnızca yetkili teknisyenler tarafından değiştirilmelidir. Dikkat! Bu kurallara uyulmaması halinde firma hiç bir sorumluluk kabul etmemektedir. İlk yıkama veya mevcut olan kılavuzu çeşmeye bağlayarak lavabo ya da küvet kenarına yaslayınız (bkz. şekil).
Çamaşır makinesinin tanımı TR Kontrol paneli TEMİZLEME ŞEKLİ ON/OFF tuşu tuşu KURUTMA tuşu Ekran Deterjan Bölmesi PROGRAM SEÇIM tuşları HAFIZA DURULAMA ŞEKLİ tuşu GECIKMELI BAŞLAMA tuşu Deterjan Bölmesi: ve diğer katkıları koyunuz (“Deterjanlar bölümüne” bakınız). ON/OFFtuşu : makineyi açmak ya da kapatmak için bu tuşa kısa süreli basınız. Yeşil renkte yanıp sönen START/ PAUSE uyarı lambası makinenin açık olduğunu gösterir.
Ekran Z B TR A X D C E Y F Makineyi programlamak için yararlı bir gereç olmasının yanı sıra ekranda değişik bilgiler verilmektedir. A ve B olmak üzere üst iki sırada, yıkama programı veya seçilen kurutma tipi, gerçekleşmekte olan yıkama fazı (kurutma seviyesi veya seçilen kurutma süresi) ve programın ilerleme durumuna ilişkin tüm bilgiler görüntülenir C satırında programın bitmesine ne kadar süre kaldığı ve GECIKMELI BAŞLATMA ayarlandıysa yıkamanın başlamasına ne kadar süre kaldığı görüntülenir.
Bir yıkama devri nasıl yapılır TR 1. MAKINENIN ÇALIŞTIRILMASI. tuşuna bastıktan sonra ekranda AÇMA yazısı görüntülenecek ve START/PAUSE uyarı lambası yeşil renkte yanıp sönmeye başlayacaktır. 2. MAKİNANIN DOLDURULMASI. Kapağı açınız. Sonraki sayfada bulunan program tabelasında belirtilen yük miktarını geçmeyecek şekilde tamburu çamaşırlarınızla doldurunuz. 3. DETERJAN KONULMASI. Deterjan haznesini açınız ve deterjanı “Deterjan ve çamaşır” bölümünde açıklandığı gibi koyunuz. 4. MAKINE KAPAĞININ KAPATILMASI.
Programlar ve işlevler Programlar Program tablosu Maks. Isı derecesi (°C) Program açıklaması LEKE ÇIKARMA Maks Hız (Dakikada Kurutma devir) TR Deterjan ve katkı maddeleri Maks Devir yük süresi Yık- Çamaşır YumuÖn (Kg) yıkama ama suyu şatıcı 1400 - - 5 90° 1400 - 9 60° (Max.
Deterjanlar ve çamaşır TR Deterjan haznesi Yıkamanın iyi sonuç vermesi doğru dozda deterjan kullanılmasına da bağlıdır: aşırı deterjan kullanmak suretiyle daha temiz çamaşırlar elde edilemeyeceği gibi makinenin aksamına zarar verilerek, çevre kirliliğine sebebiyet verilir. ! Elde yıkama deterjanları kullanmayınız, çünkü aşırı köpük yaparlar. Deterjan haznesini açınız A B ve deterjan ile katkı mad4 delerini aşağıdaki şekilde koyunuz.
Önlemler ve öneriler ! Çamaşır makinesi uluslararası güvenlik standartlarına uygun olarak projelendirilmiş ve üretilmiştir. Bu uyarılar güvenlik amaçlı olup dikkatlice okunmalıdır. Genel güvenlik uyarıları • Makine meskenlerde kullanılmak üzere tasarlanmış olup profesyonel kullanım amaçlı değildir.
Bakım ve özen TR Su ve elektrik kesilmesi Pompanın temizlenmesi • Su musluğunu her yıkamadan sonra kapatınız. Böylece çamaşır makinesinin su tesisatının eskimesi engellenir, su kaçağı tehlikesi ortadan kalkar. Çamaşır makinesinin pompası kendini temizleyen bir özelliğe sahip olup, ayrıca temizlik gerektirmez. Ancak, bazı küçük cisimler (madeni para, düğme) pompanın alt kısmındaki koruyucu bölmeye düşebilirler. • Bakım ve temizlik işlemleri esnasında çamaşır makinesinin fişini çekiniz.
Arızalar ve onarımlar Çamaşır makinesi çalışmıyor olabilir. Teknik Servise başvurmadan önce (Teknik Servis bölümüne bakınız) aşağıdaki liste yardımıyla kolay çözülebilecek bir problem olup olmadığını kontrol ediniz. Arızalar: Olası nedenler / Çözümler: Çamaşır makinesi çalışmıyor. • Fiş prize takılı değil veya tam temas etmiyor. • Evde elektrik yok. Yıkama işlemi başlamıyor. • • • • • Makinanın kapağı tam kapanmamış. ON/OFFdüğmesine basılmamış. START/PAUSE düğmesine basılmamış. Su musluğu açık değil.
Teknik Servis 195097592.03 06/2014 - Xerox Fabriano TR Servise başvurmadan önce: • Servise başvurmadan çözülebilecek bir ariza olup olmadığını kontrol ediniz (“Arızalar ve onarımlar” bölümüne bakınız); • Programı tekrar başlatarak, sorunun çözülüp çözülmediğini görünüz; • Aksi takdirde, garanti belgesinde belirtilen telefon numaralarından teknik servisi arayınız. ! Kesinlikle, yetkili olmayan tamircilere müracaat etmeyiniz. Şunları bildiriniz: • arıza tipini; • cihazın modeli (Mod.