DISHWASHER USER INSTRUCTIONS THANK YOU for purchasing this high-quality product. If you should experience a problem not covered in TROUBLESHOOTING, please visit our website at www.whirlpool.com for additional information. If you still need assistance, call us at 1-800-253-1301. In Canada, visit our website at www.whirlpool.ca or call us at 1-800-807-6777. You will need your model and serial numbers located near the door on the right-hand or left-hand side of the dishwasher interior.
IMPORTANT SAFETY INSTRUCTIONS WARNING: When using the dishwasher, follow basic precautions, including the following: ■ ■ ■ ■ ■ ■ ■ Read all instructions before using the dishwasher. Use the dishwasher only for its intended function. Use only detergents or rinse agents recommended for use in a dishwasher, and keep them out of the reach of children.
What’s New in Your Dishwasher Energy Congratulations on purchasing your water and energy efficient dishwasher! This dishwasher cleans by spraying the dishes with water and pauses to allow the detergent to soak into and release the soils on the dishes. The cycles are longer due to the soak and pauses for exceptional cleaning. Several models contain an optical water sensor. The optical water sensor is used to determine the optimum water and energy consumption for great cleaning performance.
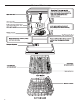
Parts and Features 4
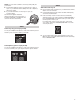
Quick Steps 1 Prepare and load dishwasher. 4 Start dishwasher. 5 Unload and clean the filter. Spin the spray arms. They should turn freely. 2 Add detergent and rinse aid. Push door firmly closed. The door latches automatically. Select the wash cycle options and press START/RESUME or press START/RESUME to repeat the same cycle and options as in the previous wash cycle. NOTE: If the Start/Resume button is located on the top of door, push door firmly closed within 4 seconds of pressing Start/Resume.
Dishwasher Use STEP 1 STEP 2 Prepare and Load the Dishwasher Add Detergent IMPORTANT: Remove leftover food, bones, toothpicks, and other hard items from the dishes. Remove labels from containers before washing. NOTE: If you do not plan to run a wash cycle soon, run a rinse cycle. Do not use detergent. ■■ Fresh automatic dishwasher detergent results in better cleaning. Store tightly closed detergent container in a cool, dry place. Make sure nothing keeps spray arm(s) from spinning freely.
NOTE: For most water conditions, the factory setting will give good results. ■■ Check water hardness level to ensure there are no rings or spots on your dishware before adding rinse aid or adjusting the factory setting. If you have hard water or notice rings or spots, try a higher setting. Turn the arrow adjuster inside the dispenser by either using your fingers or -ll fi inserting a flat-blade screwdriver into the center of the arrow and turning.
Cycle and Option Descriptions This information covers several different models. Your dishwasher may not have all of the cycles and options described. Estimated cycle times may increase or decrease depending on water temperature, soil conditions, dish load size, and options selected. You can customize your cycle by selecting an option. See option selections. If you change your mind, press the option again to turn off the option or select a different option.
OPTION SELECTIONS OPTIONS CAN BE SELECTED WITH Runs dishwasher at a later time. Select a wash cycle and options. Each time you press the Delay button, it will display the next available delay time. Press 4 HR DELAY. Press START/RESUME. Close door firmly. NOTES: ■■ The dishwasher remembers the last Delay you selected. To reset the Delay time to something other than what is displayed, continue to press the Delay button until the desired delay time is reached.
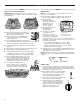
Top Rack Loading Loading Recommendations Place cups and glasses in the rows between tines. Placing them over the tines can lead to breakage and water spots. To avoid damage to your delicate items, be sure china, crystal, stemware and other similar items do not touch during dishwasher operation. Load lightweight and dishwasher-safe plastic items only in the top rack.
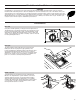
Filtration System Your dishwasher has the latest technology in dishwasher filtration. This triple filtration system minimizes sound and optimizes water and energy conservation while providing superior cleaning performance. Throughout the life of your dishwasher, the filter will require maintenance to sustain peak cleaning performance. The triple filter system consists of two parts, an upper filter assembly and a lower filter.
Filter Reinstallation Instructions 3. Slowly rotate the filter clockwise until it drops into place. Continue to rotate until the filter is locked into place. If the filter is not fully seated PUS HD (still turns freely), continue OW to turn the filter clockwise until it drops and locks into place. NOTE: The upper filter assembly arrow does not have to align with the arrow in the lower filter as To replace upper filter assembly long as the filter is locked.
Troubleshooting First try the solutions suggested here. If you need further assistance or more recommendations that may help you avoid a service call, refer to the warranty page in this manual and scan the code with your mobile device, or visit www.whirlpool.com/product_help. In Canada, visit www.whirlpool.ca. Contact us by mail with any questions or concerns at the address below: In the U.S.A.
■■ Bottom rack does not fully slide into the dishwasher Check to see if items loaded for Target Clean™ wash option have shifted. Reload to keep items from interfering with spray jets or spray arm. ■■ White spots on cookware with nonstick finish Has the dishwasher detergent removed cookware seasoning? Reseason cookware after washing it in the dishwasher.
Dishes are not completely clean ■■ Food soil left on the dishes Is the dishwasher loaded correctly? Check and clean your filters regularly. See the table in the “Filtration System” section for “Recommended Time Interval to Clean Your Filter.” Did you choose the cycle that describes the most difficult soil in your dishwasher? If you have some items with heavier soils, use a heavier cycle.
WHIRLPOOL MAJOR APPLIANCE LIMITED WARRANTY ® ATTACH YOUR RECEIPT HERE. PROOF OF PURCHASE IS REQUIRED TO OBTAIN WARRANTY SERVICE. Please have the following information available when you call the Customer eXperience Center: ■ Name, address and telephone number ■ Model number and serial number ■ A clear, detailed description of the problem ■ Proof of purchase including dealer or retailer name and address IF YOU NEED SERVICE: 1.
INSTRUCCIONES PARA EL USUARIO DE LA LAVAVAJILLAS LE AGRADECEMOS la compra de este producto de alta calidad. Si usted experimenta un problema que no se haya cubierto en SOLUCIÓN DE PROBLEMAS, visite nuestro sitio de internet en www.whirlpool.com para obtener información adicional. Si considera que aún necesita ayuda, llámenos al 1-800-253-1301. En Canadá, visite nuestro sitio de internet en www.whirlpool.ca o llámenos al 1-800-807-6777.
INSTRUCCIONES IMPORTANTES DE SEGURIDAD ADVERTENCIA: Cuando use la lavavajillas siga precauciones básicas, incluyendo las siguientes: ■ Lea todas las instrucciones antes de usar la lavavajillas. ■ Use la lavavajillas únicamente para las funciones que fue diseñada. Use únicamente detergentes o agentes de enjuague recomendados para ser usados en las lavavajillas y manténgalos fuera del alcance de los niños.
Qué hay de nuevo en su lavavajillas Energía ¡Felicitaciones por haber comprado la lavavajillas con bajo consumo de agua y energía! Esta lavavajillas limpia rociando la vajilla con agua y hace pausas para permitir que el detergente remoje y afloje la suciedad de los platos. Para obtener una limpieza excepcional, los ciclos se hacen más largos debido al remojo y las pausas. Varios modelos tienen un sensor óptico de agua.
Piezas y características Rejillas 20
Pasos rápidos 1 Prepare y cargue la lavavajillas. 4 Empuje la puerta hasta que cierre con firmeza. La puerta queda asegurada automáticamente. Seleccione el ciclo y las opciones de lavado y presione START/ RESUME (Inicio/Reanudar) o bien presione START/RESUME (Inicio/ Reanudar) para repetir el mismo ciclo y opciones que en el ciclo anterior de lavado.
Uso de la lavavajillas PASO 1 PASO 2 Prepare y cargue la lavavajillas Agregue detergente IMPORTANTE: Quite los restos de alimentos, huesos, palillos y otros artículos duros de los platos. Quite las etiquetas de los recipientes antes de lavarlos. NOTA: Si no va a hacer funcionar un ciclo de lavado de inmediato, ponga un ciclo de enjuague. No use detergente. ■■ ■■ Canasta superior ■■ Canasta inferior Asegúrese de que nada impida que el (los) brazo(s) rociador(es) gire(n) libremente.
Para agregar el agente de enjuague, gire Lock la tapa del depósito 1/4 de vuelta hacia la izquierda y sáquela. Vierta el agente -6 5 4 -de enjuague en la abertura hasta que el indicador esté en “Full” (Lleno). Vuelva a colocar la tapa del depósito y gírela hacia “Lock” (Seguro). Asegúrese de que la tapa esté asegurada por completo. NOTA: Para casi todos los tipos de agua, el ajuste de fábrica dará buenos resultados.
Descripción de ciclos y opciones Esta información cubre varios modelos diferentes. Puede ser que su lavavajillas no cuente con todos los ciclos y opciones descritas. Es posible que los tiempos estimados de los ciclos aumenten o disminuyan según la temperatura del agua, las condiciones de suciedad, el tamaño de la carga y las opciones seleccionadas. Puede personalizar su ciclo seleccionando una opción. Vea las selecciones de opciones.
SELECCIONES DE OPCIONES OPCIONES PUEDE SELECCIONARSE CON LO QUE HACE Hace funcionar la lavavajillas a una hora programada. Seleccione un ciclo y opciones de lavado. Cada vez que presione el botón Delay (Retraso), se mostrará en pantalla la siguiente hora de retraso disponible. Oprima 4 HR DELAY (4 horas de retraso). Presione START/ RESUME (Inicio/Reanudar). Cierre la puerta con firmeza. NOTAS: Disponible con cualquier ciclo Retrasa 4 horas ■■ La lavavajillas recuerda el último retraso que seleccionó.
Carga en la canasta superior Recomendaciones para cargar Coloque las tazas y los vasos en las hileras entre las puntas. Si los coloca sobre las puntas pueden romperse o terminar con manchas de agua. Para evitar que se dañen sus artículos delicados, asegúrese de que la porcelana, cristalería y otros objetos similares no se toquen durante el funcionamiento de la lavavajillas. Coloque los objetos livianos y de plástico aptos para lavavajillas sólo en la canasta superior.
Sistema de filtración Su lavavajillas cuenta con lo último en tecnología de filtración para lavavajillas. Este sistema de filtración triple minimiza los sonidos y optimiza el ahorro de agua y energía mientras proporciona una limpieza superior. Durante la vida útil de su lavavajillas, el filtro necesitará mantenimiento para conservar el rendimiento óptimo de limpieza. El sistema de tres filtros consta de dos piezas, un ensamblaje de filtro superior y un filtro inferior.
Instrucciones para reinstalar los filtros 3. Rote lentamente el filtro hacia la derecha hasta que caiga en su lugar. Continúe rotando hasta que el filtro quede trabado en su lugar. Si el filtro no PUS HD encaja completamente OW (sigue girando libremente), continúe girando el filtro hacia la derecha hasta que caiga y quede trabado en su lugar.
Solución de problemas Pruebe primero las soluciones sugeridas aquí. Si necesita asistencia adicional o más recomendaciones que pueden ayudarle a evitar una llamada de servicio técnico, consulte la página de la garantía de este manual y escanee el código con su dispositivo móvil o visite www.whirlpool.com/product_help. En Canadá, visite www.whirlpool.ca. Contáctenos por correo con sus dudas o preguntas a la dirección que se detalla a continuación: En los EE.UU.
■■ Olor en la lavavajillas ¿Se lavan los platos sólo cada 2 o 3 días? Revise y limpie los filtros periódicamente. Consulte los intervalos recomendados para la limpieza del filtro en la tabla en la sección “Sistema de filtración”. ¿Tiene la lavavajillas un olor a plástico nuevo? Haga un enjuague con vinagre como se describe en “Cuidado de la lavavajillas”.
Ruidos ■■ Sonidos de gorgoteo Se pueden escuchar periódicamente sonidos de gorgoteo a lo largo del ciclo, mientras se desagua la lavavajillas. ■■ Silbido de la válvula Puede escucharse periódicamente el silbido normal de la válvula de agua durante el llenado con agua. ■■ Sonido de chasquido Puede escucharse un sonido normal de chasquido cuando se abre el depósito de detergente durante el ciclo y cuando se abre la puerta al final del mismo.
GARANTÍA LIMITADA DE LOS ELECTRODOMÉSTICOS PRINCIPALES DE WHIRLPOOL® ADJUNTE SU RECIBO AQUÍ. SE REQUIERE LA PRUEBA DE COMPRA PARA OBTENER SERVICIO BAJO LA GARANTÍA. Tenga a mano la siguiente información cuando llame al Centro para la eXperiencia del cliente: ■ Nombre, dirección y número de teléfono ■ Número de modelo y de serie ■ Una descripción clara y detallada del problema ■ Prueba de compra incluido el nombre y la dirección del distribuidor o vendedor SI NECESITA SERVICIO TÉCNICO: 1.
INSTRUCTIONS D’UTILISATION DU LAVE-VAISSELLE Nous vous REMERCIONS d’avoir acheté ce produit de haute qualité. Si vous rencontrez un problème non mentionné dans la section DÉPANNAGE, veuillez visiter notre site Web www.whirlpool.com pour des informations supplémentaires. Si vous avez toujours besoin d’assistance, veuillez nous téléphoner au 1 800 253-1301. Au Canada, visitez notre site Web www.whirlpool.ca ou téléphonez-nous au 1 800 807-6777.
IMPORTANTES INSTRUCTIONS DE SÉCURITÉ AVERTISSEMENT : Lors de l’utilisation du lave-vaisselle, suivre les précautions élémentaires dont les suivantes : ■ ■ ■ ■ ■ ■ Lire la totalité des instructions avant d’utiliser le lave-vaisselle. N’utiliser le lave-vaisselle que pour laver la vaisselle. Utiliser uniquement les détersifs ou agents de rinçage recommandés pour lave-vaisselle et les garder hors de la portée des enfants.
Quoi de neuf dans votre lave-vaisselle Énergie Félicitations pour l’achat de votre lave-vaisselle éconergique à faible consommation d’eau! Pour nettoyer les articles, ce lave-vaisselle asperge la vaisselle d’eau, puis fait une pause pour permettre au détergent d’imprégner et de dissoudre les saletés. Les périodes de trempage et de pause prolongent la durée des programmes pour un nettoyage exceptionnel. Plusieurs modèles comportent un capteur optique d’eau.
Pièces et caractéristiques Les jets puissants Target Clean™ (sur certains modèles) dirigent l’eau vers les plats, poêles ou casseroles placés à l’arrière du lave-vaisselle pour décoller la saleté tenace. Lavage au niveau supérieur Tube d’alimentation en eau Plaque signalétique des numéros de modèle et de série Le bras d’aspersion inférieur comporte des jets d’aspersion pressurisé pour un nettoyage efficace.
Étapes rapides 1 Préparer et charger le lave-vaisselle. 4 Bien fermer la porte. Le verrou de la porte s’engage automatiquement. Sélectionner les options du programme de lavage, puis appuyer sur START/ RESUME (mise en marche/reprise) ou appuyer sur START/RESUME (mise en marche/reprise) pour utiliser le même programme et les mêmes options que pour le programme de lavage précédent.
Utilisation du lave-vaisselle ÉTAPE 1 ÉTAPE 2 Préparation et chargement du lave-vaisselle Verser le détergent IMPORTANT : Enlever les restes alimentaires, les os, les cure-dents et les autres articles durs de la vaisselle. Enlever les étiquettes des récipients avant de les laver. REMARQUE : Si vous n’avez pas l’intention d’effectuer un programme de lavage dans l’immédiat, exécuter un programme de rinçage. Ne pas utiliser de détergent.
■■ Contrôler l’indicateur d’agent de rinçage. Ajouter l’agent de rinçage lorsque l’indicateur arrive au niveau “Add” (ajouter). Pour ajouter l’agent de rinçage, Lock tourner le bouchon du distributeur 1/4 de tour vers la gauche et le -6 5 soulever. Verser l’agent de rinçage 4 -dans l’ouverture jusqu’à ce que l’indicateur soit sur “Full” (plein). Remettre en place le bouchon du distributeur et le tourner jusqu’à ce qu’il soit sur “Lock” (verrouillage). S’assurer que le bouchon est bien verrouillé.
Description des programmes et opions Ces renseignements couvrent plusieurs modèles différents. Votre lave-vaisselle peut ne pas comporter tous les programmes et toutes les options indiqués. Les durées maximales de lavage dépendent de la température de l’eau, du degré de saleté, de la taille de la charge de vaisselle, ainsi que des options sélectionnées. On peut personnaliser chaque programme en sélectionnant une option. Voir les sélections d’options.
SÉLECTION D’OPTIONS OPTIONS Diffère le fonctionnement du lave-vaisselle. Choisir un programme de lavage et des options. À chaque pression du bouton Delay (mise en marche différée), le démarrage différé suivant apparaît sur l’afficheur. Appuyer sur 4 HR DELAY (mise en marche différée de 4 heures). Appuyer sur START/ RESUME (mise en marche/ reprise). Bien fermer la porte. REMARQUES : ■■ Le lave-vaisselle garde en mémoire la dernière mise en marche différée sélectionnée.
Chargement du panier supérieur Recommandations concernant le chargement Placer les tasses et verres dans les rangées entre les tiges. Le fait de placer ces articles sur les tiges peut entraîner des dommages et l’apparition de taches d’eau. Pour éviter d’endommager les articles délicats comme les articles en porcelaine, en cristal, les verres à pied ou autres articles similaires, veiller à ce qu’ils ne se touchent pas pendant le fonctionnement du lave-vaisselle.
Système de filtration Ce lave-vaisselle est équipé de la plus récente technologie en matière de filtration. Ce système de triple filtration minimise le niveau sonore et optimise l’économie d’eau et d’énergie tout en offrant une performance de nettoyage supérieure. Le filtre doit être entretenu tout au long de la durée de vie du lave-vaisselle pour pouvoir continuer à fonctionner au mieux de sa performance. Le système de triple filtre comporte deux parties, un filtre supérieur et un filtre inférieur.
Instructions de réinstallation du filtre 3. Faire pivoter lentement le filtre dans le sens horaire jusqu’à ce qu’il s’insère dans le logement. Continuer à faire pivoter le filtre jusqu’à ce qu’il s’emboîte. Si le filtre PUS HD n’est pas complètement OW installé (continue de tourner librement), continuer à tourner le filtre dans le sens horaire jusqu’à ce qu’il s’insère dans le logement et s’emboîte.
Dépannage Essayer d’abord les solutions suggérées ici. Pour obtenir de l’aide ou des conseils qui permettront peut-être d’éviter une intervention de dépannage, consulter la page de garantie de ce manuel et balayer le code avec votre appareil intelligent ou consulter le site internet www.whirlpool.com/product_help ou www.whirlpool.ca.
■■ ■■ Condensation sur le comptoir de la cuisine (modèles encastrés) Le lave-vaisselle est-il aligné avec le dessus du comptoir? L’humidité sortant de l’évent de la console du lave-vaisselle peut se former sur le comptoir. Voir les instructions d’installation pour plus de renseignements. REMARQUE : Pour éliminer les taches et films sur la vaisselle, retirer tous les couverts et articles métalliques et effectuer un rinçage avec de l’eau vinaigrée tel que décrit dans “Entretien du lave-vaisselle”.
Le lave-vaisselle s’arrête puis redémarre ■■ Arrêts et reprises fréquents Vous entendrez l’appareil effectuer de nombreux arrêts et reprises tout au long du programme. Ces arrêts et reprises sont indispensables pour pouvoir réaliser un maximum d’économies d’énergie et pour une performance de nettoyage optimale.
GARANTIE LIMITÉE DES GROS APPAREILS MÉNAGERS WHIRLPOOL® ATTACHEZ ICI VOTRE REÇU DE VENTE. UNE PREUVE D’ACHAT EST OBLIGATOIRE POUR OBTENIR L'APPLICATION DE LA GARANTIE.