
Use and Care Guide


10
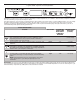
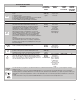
CONTROLS AND CYCLE STATUS
CONTROL PURPOSE COMMENTS
Press to start or resume a wash cycle.
If the door is opened during a cycle or the power is interrupted, the Start/Resume button LED ashes. Cycle
will not resume until door is closed and Start/Resume is pressed.
Press to cancel wash cycle.
Close the door rmly. Press and hold START/RESUME or 3 seconds. The dishwasher starts a 2-minute drain (if
needed). Let dishwasher drain completely.
To follow progress of your
dishwasher cycle.
NOTE: Indicators shown
are not available on all
models.
The Clean indicator glows when a cycle is nished.
If you select the Sani Rinse option, when the cycle is nished, the “Sanitized”
indicator glows. If your dishwasher did not properly sanitize your dishes, the light
ashes at the end of the cycle. This can happen if the cycle is interrupted, or
water could not be heated to required temperature. The light goes off when you
open and close door or when you cancel the cycle.
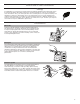
Dishwasher Features
Your Whirlpool dishwasher may have some or all of these features.
Removable Top Rack
The removable top rack allows you to wash larger items, such as pots, roasters, and cookie sheets in the bottom rack.
IMPORTANT: Remove dishes prior to removing the top rack from dishwasher.
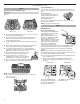
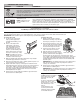
To remove the rack:
1. To gain access to the track
stops, pull the upper rack
forward about halfway out of
the tub.
2. Press on the edge of the
ridged area on the track
stop while tipping the track
stop toward the center of
the dishwasher. This action
releases a small retaining tab
that locks the track stop to the
track. (See “Track stop - Left.”)
NOTE: It is helpful to use two
hands. Take special note of the
orientation of the track stops.
3. With the retaining tab released, pull the track stop straight
toward the opposite track to remove it.
4. After removing both track stops, carefully pull the top rack out
of the tracks by rolling it toward you.
5. Replace the track stops by coming up from under the track
and slipping the track stop into the lower slot of the track (See
“Track stop - Right.”) and rotate the track stop into place.
Then press on the edge of the ridged area while pushing the
track stop straight toward the track. This action locks the
retaining tab back into place.
6. Test the track stop by pulling it toward the opposite track to
ensure that it is locked in place.
To replace the rack
1. Gently pull the tracks forward in
dishwasher until they stop. Remove
track stops. (See steps 1-3 above.)
2. Place the back wheels on each side
of the rack into the track and roll the
rack into the tracks, but do not push
the rack all the way into the tub.
3. Insert front rack wheels on each
side of the rack into the track.
4. Slide the rack into the dishwasher.
5. Replace the track stops by coming
up from under the track and slipping
the track stop into the lower slot of the track (See “Track
stop - Right.”) and rotate the track stop into place. Then press
on the edge of the ridged area while pushing the track stop
straight toward the track. This action locks the retaining tab
back into place.
IMPORTANT: Be sure that the track stops are locked in place
and cannot be easily removed. They keep the rack from
coming out of the track.
6. Test the track stop by pulling it toward the opposite track to
ensure that it is locked in place.
IMPORTANT: Be sure that the track stops are locked in place
and cannot be easily removed. They keep the rack from
coming out of the track.
Easy-to-Remove Third Level Rack (on some models)
If additional space is needed
in the upper rack, the third
level rack can easily be
removed.
To remove, fully extend rack
until it stops. Then, open
the track stops on each side
and slide the rack out to
remove.
Low prole items such
as serving utensils and
silverware, may be loaded
on the third level rack.
Track stop – left
Track stop – right
A. Track stop B. Track