INSTALLATION INSTRUCTIONS UNDERCOUNTER DISHWASHER STAINLESS STEEL TUB LAVAVAJILLAS EMPOTRADA CON TINA DE ACERO INOXIDABLE INSTRUCTIONS D’INSTALLATION LAVE-VAISSELLE ENCASTRÉ AVEC CUVE EN ACIER INOXYDABLE Table of Contents .............................................................. 2 Indice ..............................................................................25 Table des matières ..........................................................
TABLE OF CONTENTS DISHWASHER SAFETY............................................................................... 2 INSTALLATION REQUIREMENTS ............................................................. 3 Tools and Parts......................................................................................... 3 Location Requirements............................................................................. 4 Drain Requirements ..............................................................................
INSTALLATION REQUIREMENTS Optional Accessory Parts Available: Tools and Parts Gather the recommended tools and parts before starting installation. Read and follow the instructions provided with any tools listed here. All Installations Tools Needed: First-time Installations: Check local codes. Check existing electrical supply. See the “Electrical Requirements” section. It is recommended that electrical connections be made by a licensed electrical installer.
Location Requirements Dishwasher must be fully enclosed (top, sides, back, and floor) upon installation. A side panel kit is available from your dealer for installing your dishwasher at the end of your cabinetry. An optional moisture barrier accessory is also available for installing underneath a wooden countertop. See the “Tools and Parts” section at the front of the guide for part details and orders. Check location where dishwasher will be installed.
(6023 " .6 cm ) " 24 cm) 2 . (62 B A. Insulation may be compressed (not used on all models). B. For panel-ready models, dishwasher depth is 24" (60 cm) not including the " (1.9 cm) custom door panel. C (7630" .2 c C. Door handles may protrude forward of the face of the dishwasher; varies by model. " (1.9 cm) A m) " ) 33 cm 1 h , t i (85n. w ls mi hee d w ove rem " 21 ) cm 3 . 3 2 (61 4 " cm E ) (5 3 "-4 " (8.8 cm - 10.6 cm) For 4" (10 cm) toe kick, height of cabinet opening is 34 " (86.3 cm).
Drain Requirements ■ A new drain hose is supplied with your dishwasher. If drain hose is not long enough, use a new drain hose with a maximum length of 12 ft (3.7 m) that meets all current AHAM/ IAPMO test standards, is resistant to heat and detergent, and fits the 1" (2.5 cm) drain connector of the dishwasher. See the “Tools and Parts” section at the front of the guide for part details and orders.
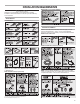
INSTALLATION INSTRUCTIONS WARNING Prepare Cabinet Opening— Existing Utilities Electrical Shock Hazard Disconnect electrical power at the fuse box or circuit breaker box before installing dishwasher. Failure to do so can result in death or electrical shock. When removing a previous dishwasher, be sure to avoid damaging the existing power cord, drain line, and water line connected to the dishwasher. If the water line and the cable extend to the locations shown, proceed to the “Install Drain Hose” section.
Wood cabinet: Sand the hole until smooth. Metal cabinet: Cover edges of hole with grommet included with power cord kit. See the “Tools and Parts” section at the front of the guide for part details. Option B, Direct Wire Route cable from power supply through cabinet hole (cable must extend to the right front side of cabinet opening). Tape cable to the floor in area shown. This will prohibit cable from moving when dishwasher is moved into cabinet opening.
NOTE: If using a flexible braided hose, replace inlet hose after 5 years to reduce the risk of hose failure. Record hose installation or replacement dates on the hose for future reference. Attach the water supply line (copper tubing or flexible braided line) to the hot water line using a connection configuration that is in compliance with local codes and ordinances. The water supply to the dishwasher should have a manual shutoff valve located under the sink.
Option B, No Waste Disposer – No Air Gap IMPORTANT: The drain hose connection of the disposer or a waste tee must be made before the drain trap and at least 20" (50.8 cm) above the floor where the dishwasher will be installed. Helpful Tip: To reduce vibration of the hose, keep the hose away from the floor. 1. Fit rubber end of drain hose to waste tee and cut if needed. NOTE: Do not cut ribbed section. Option A, Waste Disposer – No Air Gap 2.
Helpful Tip: Remove disposer knockout plug. 1. Using a hammer and screwdriver, knock plug into disposer. Install Optional Moisture Barrier 2. Use needle-nose pliers to remove plug. 3. Connect rubber end of drain hose to air gap and cut if needed. NOTE: Do not cut ribbed section. 4. Attach drain hose to air gap with large drain hose clamp (provided). Use pliers to squeeze clamp open and move into position. If the drain hose was cut, use a 1¹⁄₂" to 2" (3.8 to 5 cm) screw-type clamp (not provided). 5.
Prepare Dishwasher WARNING Tip Over Hazard Do not use dishwasher until completely installed. Do not push down on open door. Doing so can result in serious injury or cuts. WARNING Excessive Weight Hazard Remove and discard the plastic rail cover on each side of the dishwasher frame. To remove the plastic rail cover, push upward and back to unsnap it from the dishwasher frame. Option A, Remove Access Panel - Plastic Panel Use two or more people to move and install dishwasher.
NOTE: If using Option B, proceed to “Determine Cabinet Opening,” to continue with more of the installation of your dishwasher before making the direct wire connection. Make Power Cord Connection Option A, Power Cord Route cord so that it does not touch dishwasher motor or lower part of dishwasher tub. Pull cord through strain relief in terminal box.
Select UL Listed/CSA Approved twist-on wire connectors of the proper size. See the “Tools and Parts” section at the front of the guide for part details. Connect wires, black to black and white to white, using the twist-on wire connectors. NOTE: Do not pre-twist stranded wire. Twist on wire connector. Gently tug on wires to be sure both are secured. Place wires inside terminal box.
NOTE: If the minimum cabinet opening height is less than 34" (86.4 cm), the rear wheels can be removed for additional clearance. This will allow the dishwasher and perforated section of the insulation blanket to fit into a 33¹⁄₂" (85.1 cm) high cabinet opening, but the dishwasher will be more difficult to move. Measurements are approximate. Wheels and legs are preset at the factory for 34¹⁄₂" (87.6 cm).
WARNING Excessive Weight Hazard Use two or more people to move and install dishwasher. Failure to do so can result in back or other injury. Using a pair of pliers, bend the tab down to secure the bracket in place. Repeat this step for the other side. NOTE: Do not attach the dishwasher. This will be done later. Option B, Dishwasher Side Attachment NOTE: Remove the brackets from the parts package. Using 2 or more people, stand the dishwasher up. NOTE: Do not install kick plate until instructed to do so.
Push bracket into slot on the side of dishwasher, and bend tab in toward the side of the dishwasher so that it keeps the bracket in place. Repeat this step for the other side of the dishwasher. NOTE: Do not attach the dishwasher. This will be done later. Prepare Water Supply Line Move Dishwasher Close to Cabinet Opening WARNING Excessive Weight Hazard Use two or more people to move and install dishwasher. Failure to do so can result in back or other injury.
When door is unlatched, if door opens by itself, move the tensioner to a higher-numbered hole and replace the screw. Reattach door spring to rear leg. NOTE: Tensioners on both sides of dishwasher should be secured at same holes. With another person holding the dishwasher to keep it from tipping, open and close the door a few times. If the door closes or falls open under its own weight, the door tension will need to be adjusted. IMPORTANT: If wheels were removed, cover the floor when moving the dishwasher.
Connect to Water Supply Check that leveling legs are firmly against the floor. Close and latch the door, and place level against the front panel. Check that dishwasher is centered from front to back in the opening. If needed, adjust leveling leg until dishwasher is plumb. Repeat for other side of dishwasher. Helpful Tip: Push up on front of dishwasher to raise dishwasher off the ground to adjust front legs.
Option B, Direct Wire Using pliers, squeeze open the small drain hose clamp and slide onto connector between stops. Install a UL Listed/CSA Approved metallic strain relief. See the “Tools and Parts” section at the front of the guide for part details and orders. After hose is connected, remove towel. Make Direct Wire Electrical Connection NOTE: If the power cord was connected earlier, proceed to “Secure Dishwasher in Cabinet Opening” section.
WARNING Electrical Shock Hazard Electrically ground dishwasher. Connect ground wire to green ground connector in terminal box. Do not use an extension cord. Failure to follow these instructions can result in death, fire, or electrical shock. Tighten strain relief screws to secure cable. Make sure screw heads are facing up when tightening conduit nut. Form bare ground wire into a U-shaped hook.
Secure Dishwasher in Cabinet Opening Open door and check that space between dishwasher cabinet opening and tub is equal on both sides. If spacing is not equal, loosen bracket screws and shift tub. Tighten bracket screws Check that dishwasher is still level front-to-back and side-to-side in cabinet opening. Open dishwasher door to prepare for securing the dishwasher to the cabinet. NOTES: ■ The dishwasher must be secured to keep it from shifting when the door is opened.
Complete Installation Option B, Install Access Panel - Metal Panel Check that power supply wire or cord does not touch dishwasher motor or lower part of dishwasher tub. Option A, Install Access Panel - Plastic Panel Place the plastic access panel against the dishwasher leg. Check that grounding clip is attached to the lower panel. Position the lower panel behind the access panel. On some models there is insulation on the access panel that must fall behind the insulation on the lower panel.
Reconnect Power Check Operation Tighten access panel screws. WARNING ■ Read the Dishwasher User Guide that came with your dishwasher. ■ Check that all parts have been installed and no steps were skipped. Check that you have all tools used. ■ Start dishwasher and allow it to complete the shortest wash cycle. After the first 2 minutes, unlatch door, wait 5 seconds, then open door. Check that there is water in the bottom of the dishwasher tub. Check that dishwasher is working properly.