
Owner's Manual


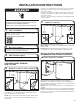


Table Of Contents
- DISHWASHER MAINTENANCE
- Dishwasher Loading Tips
- DISHWASHER care
- Dishwasher Setting Menu:
- ERROR CODES
- INSTALLATION REQUIREMENTS
- Installation Instructions
- Prepare cabinet opening— new utilities
- INSTALL OPTIONAL Moisture barrier - recommended for wood countertops
- ELECTRICAL CONNECTION
- PREPARE DISHWASHER
- Remove access panel and insulation
- DISCONNECT AND REMOVE DRIP tray ASSEMBLY
- CONNECT WATER LINE TO FILL VALVE
- CONNECT FILL HOSE TO FILL VALVE
- DRAIN HOSE CONNECTION
- Power cord Connection
- install DOOR HANDLE (ON SOME MODELS)
- PLACE DISHWASHER IN CABINET
- CUSTOM PANEL INSTALLATION (CUSTOM PANEL MODELS ONLY)
- Choose Anchor Attachment Method
- FINAL INSTALLATION CHECK
- SECURE DISHWASHER IN CABINET OPENING
- CONNECT WATER LINE TO HOUSE SHUT-OFF VALVE
- CONNECT DRAIN HOSE
- Complete Installation
- Check operation
- Install Access Panels
- if dishwasher does not operate
- ENTRETIEN DU LAVE-VAISSELLE
- Conseils de chargement du lave-vaisselle
- ENTRETIEN DU LAVE-VAISSELLE
- Menu de réglage du lave-vaisselle :
- CODES D’ANOMALIES
- EXIGENCES D’INSTALLATION
- Instructions d’installation
- Préparation de l’ouverture d’encastrement de l’armoire – nouveaux raccordements de service
- Installer la barrière anti-humidité en option – recommandée pour les comptoirs en bois
- RACCORDEMENT ÉLECTRIQUE
- PRÉPARATION DU LAVE-VAISSELLE
- Retrait du panneau d’accès et de l’isolation
- DÉBRANCHER ET ENLEVER LE PLATEAU D’ÉCOULEMENT
- BRANCHEMENT DE L’ARRIVÉE D’EAU À LA VALVE DE DISTRIBUTION
- BRANCHEMENT DU TUYAU DE REMPLISSAGE À LA VALVE DE DISTRIBUTION
- RACCORD DU TUYAU DE VIDANGE
- Branchement du cordon d’alimentation
- INSTALLER LA POIGNE DE PORTE (SUR CERTAINS MODÈLES)
- PLACER LE LAVE-VAISSELLE DANS L’ARMOIRE
- INSTALLATION DU PANNEAU PERSONNALISÉ (MODÈLES AVEC PANNEAU PERSONNALISÉ SEULEMENT)
- Choix de l’option de fixation
- VÉRIFICATION FINALE DE L’INSTALLATION
- FIXATION DU LAVE-VAISSELLE DANS L’OUVERTURE D’ENCASTREMENT DE L’ARMOIRE
- BRANCHEMENT DE L’ARRIVÉE D’EAU AU ROBINET D’ARRÊT DE LA MAISON
- RACCORDEMENT DU TUYAU DE VIDANGE
- Terminer l’installation
- Contrôle du fonctionnement
- Installation des panneaux d’accès
- Si le lave-vaisselle ne fonctionne pas
- MANTENIMIENTO DE LA LAVAVAJILLAS
- Consejos para cargar la lavavajillas
- Cuidado DE LA LAVAVAJILLAS
- Menú de ajustes de la lavavajillas:
- CÓDIGOS DE ERROR
- REQUISITOS DE INSTALACIÓN
- Instrucciones de instalación
- Preparación de la abertura del gabinete: instalaciones nuevas
- INSTALACIÓN OPCIONAL de la barrera contra la humedad (recomendado para los mostradores de madera)
- CONEXIÓN ELÉCTRICA
- PREPARE LA LAVAVAJILLAS
- Retire el panel de acceso y el aislante
- DESCONECTE Y RETIRE EL ENSAMBLAJE DE LA BANDEJA DE GOTEO
- CONECTE LA TUBERÍA DE AGUA A LA VÁLVULA DE LLENADO
- CONECTE LA MANGUERA DE LLENADO A LA VÁLVULA DE LLENADO
- CONEXIONES DE LA MANGUERA DE DESAGÜE
- Conexión del cable de alimentación
- instale LA MANIJA DE LA PUERTA (EN ALGUNOS MODELOS)
- COLOQUE LA LAVAVAJILLAS EN EL GABINETE
- INSTALACIÓN DEL PANEL A LA MEDIDA (EN MODELOS CON PANELES A LA MEDIDA SOLAMENTE)
- Selección del método de sujeción de anclaje
- VERIFICACIÓN FINAL DE LA INSTALACIÓN
- ASEGURE LA LAVAVAJILLAS EN LA ABERTURA DEL GABINETE
- CONEXIÓN DE TUBERÍA DE AGUA A MANGUERA DE VÁLVULA DE CIERRE DEL HOGAR
- CONECTE LA MANGUERA DE DESAGÜE
- Complete la instalación
- Verifique el funcionamiento
- Instale los paneles de acceso
- si la lavavajillas no funciona

20
INSTALL DOOR HANDLE
(ON SOME MODELS)
IMPORTANT: Do not scratch the front panel during this
procedure. If door panel has a protective lm, peel lm back past
the point of the handle studs before installing handle. Handle is
easiest to install while unit is on its back.
Remove the door handle and hex key from the packaging.
Setscrews are already installed in the handle. Place handle on
mounting studs with the setscrews facing down. Push the door
handle tightly against the door. Insert the short end of the hex key
into the setscrews. Tighten the setscrews 1/4 turn past snug.
Retain hex key with Installation Instructions.
PLACE DISHWASHER IN CABINET
WARNING
Excessive Weight Hazard
Use two or more people to move and install
dishwasher.
Failure to do so can result in back or other injury.
26. Stand dishwasher upright
Using two or more people, stand the dishwasher up.
NOTE: Do not install kick plate until instructed to do so.
Dishwasher may t tightly into cabinet opening. Do not remove
insulation blanket—the blanket reduces the sound level.
IMPORTANT: Do not kink or pinch water line, drain hose, power
cord, or direct wire between dishwasher and cabinet. Remove
cardboard from under dishwasher (if used).
25. Install door handle
Mounting stud
Setscrew
(in bottom
of handle)
Handle
Hex key
Install Foam Side Shields (on some models)
Install the foam side shields on both the right and left sides of
the dishwasher. There are three attachment points on each side.
■ Attachment 1: Locate the slit on the side shield and attach it
to the hook on the side of the dishwashwe. (See gure 1)
■ Attachment 2: Use the other slit on the side shield and
attach it to the hook on the front of the dishwasher. (See
gure 2)
■ Attachment 3: Align the rectangular hole in the side shield
with the toe panel screw hole. Insert the Toe Panel
Screw(see gure 3) and Loosely tighten it to hold it in place
until the Toe Panel is installed.
■ Tuck the lower ends of the side shields under the
dishwasher. (See fugures 4 and 5)
Figure: 1
Figure: 2
Figure: 3
Figure: 4
Figure: 5