
Owner's Manual

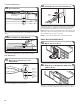


Table Of Contents
- DISHWASHER MAINTENANCE
- Dishwasher Loading Tips
- DISHWASHER care
- Dishwasher Setting Menu:
- ERROR CODES
- INSTALLATION REQUIREMENTS
- Installation Instructions
- Prepare cabinet opening— new utilities
- INSTALL OPTIONAL Moisture barrier - recommended for wood countertops
- ELECTRICAL CONNECTION
- PREPARE DISHWASHER
- Remove access panel and insulation
- DISCONNECT AND REMOVE DRIP tray ASSEMBLY
- CONNECT WATER LINE TO FILL VALVE
- CONNECT FILL HOSE TO FILL VALVE
- DRAIN HOSE CONNECTION
- Power cord Connection
- install DOOR HANDLE (ON SOME MODELS)
- PLACE DISHWASHER IN CABINET
- CUSTOM PANEL INSTALLATION (CUSTOM PANEL MODELS ONLY)
- Choose Anchor Attachment Method
- FINAL INSTALLATION CHECK
- SECURE DISHWASHER IN CABINET OPENING
- CONNECT WATER LINE TO HOUSE SHUT-OFF VALVE
- CONNECT DRAIN HOSE
- Complete Installation
- Check operation
- Install Access Panels
- if dishwasher does not operate
- ENTRETIEN DU LAVE-VAISSELLE
- Conseils de chargement du lave-vaisselle
- ENTRETIEN DU LAVE-VAISSELLE
- Menu de réglage du lave-vaisselle :
- CODES D’ANOMALIES
- EXIGENCES D’INSTALLATION
- Instructions d’installation
- Préparation de l’ouverture d’encastrement de l’armoire – nouveaux raccordements de service
- Installer la barrière anti-humidité en option – recommandée pour les comptoirs en bois
- RACCORDEMENT ÉLECTRIQUE
- PRÉPARATION DU LAVE-VAISSELLE
- Retrait du panneau d’accès et de l’isolation
- DÉBRANCHER ET ENLEVER LE PLATEAU D’ÉCOULEMENT
- BRANCHEMENT DE L’ARRIVÉE D’EAU À LA VALVE DE DISTRIBUTION
- BRANCHEMENT DU TUYAU DE REMPLISSAGE À LA VALVE DE DISTRIBUTION
- RACCORD DU TUYAU DE VIDANGE
- Branchement du cordon d’alimentation
- INSTALLER LA POIGNE DE PORTE (SUR CERTAINS MODÈLES)
- PLACER LE LAVE-VAISSELLE DANS L’ARMOIRE
- INSTALLATION DU PANNEAU PERSONNALISÉ (MODÈLES AVEC PANNEAU PERSONNALISÉ SEULEMENT)
- Choix de l’option de fixation
- VÉRIFICATION FINALE DE L’INSTALLATION
- FIXATION DU LAVE-VAISSELLE DANS L’OUVERTURE D’ENCASTREMENT DE L’ARMOIRE
- BRANCHEMENT DE L’ARRIVÉE D’EAU AU ROBINET D’ARRÊT DE LA MAISON
- RACCORDEMENT DU TUYAU DE VIDANGE
- Terminer l’installation
- Contrôle du fonctionnement
- Installation des panneaux d’accès
- Si le lave-vaisselle ne fonctionne pas
- MANTENIMIENTO DE LA LAVAVAJILLAS
- Consejos para cargar la lavavajillas
- Cuidado DE LA LAVAVAJILLAS
- Menú de ajustes de la lavavajillas:
- CÓDIGOS DE ERROR
- REQUISITOS DE INSTALACIÓN
- Instrucciones de instalación
- Preparación de la abertura del gabinete: instalaciones nuevas
- INSTALACIÓN OPCIONAL de la barrera contra la humedad (recomendado para los mostradores de madera)
- CONEXIÓN ELÉCTRICA
- PREPARE LA LAVAVAJILLAS
- Retire el panel de acceso y el aislante
- DESCONECTE Y RETIRE EL ENSAMBLAJE DE LA BANDEJA DE GOTEO
- CONECTE LA TUBERÍA DE AGUA A LA VÁLVULA DE LLENADO
- CONECTE LA MANGUERA DE LLENADO A LA VÁLVULA DE LLENADO
- CONEXIONES DE LA MANGUERA DE DESAGÜE
- Conexión del cable de alimentación
- instale LA MANIJA DE LA PUERTA (EN ALGUNOS MODELOS)
- COLOQUE LA LAVAVAJILLAS EN EL GABINETE
- INSTALACIÓN DEL PANEL A LA MEDIDA (EN MODELOS CON PANELES A LA MEDIDA SOLAMENTE)
- Selección del método de sujeción de anclaje
- VERIFICACIÓN FINAL DE LA INSTALACIÓN
- ASEGURE LA LAVAVAJILLAS EN LA ABERTURA DEL GABINETE
- CONEXIÓN DE TUBERÍA DE AGUA A MANGUERA DE VÁLVULA DE CIERRE DEL HOGAR
- CONECTE LA MANGUERA DE DESAGÜE
- Complete la instalación
- Verifique el funcionamiento
- Instale los paneles de acceso
- si la lavavajillas no funciona

21
NOTE: Route water supply, drain hose, and power cord out the
rear of the dishwasher. If your product has insulation around the
bottom, route these lines through the slits in that insulation in the
rear of the product.
27. Move dishwasher close
to cabinet opening
Route the utilities through the holes in the cabinet, and pull
the slack out at the same time as the dishwasher is pushed into
the cabinet.
28. Route power cord
If using a power cord, make sure to route the end through hole
in cutout before sliding dishwasher into the cabinet opening.
29. Secure insulation blanket
NOTE: Make sure insulation blanket is secured at both left and
right rear corners before pushing into cabinet opening to keep the
blanket from bunching up in a tight tting cabinet. The blanket
can be secured by pulling the insulation down toward the bottom
of the product and ensuring the hooks on the side members grab
onto the slots in the insulation blanket.
6"
(15.2 cm)
30. Move dishwasher all but 6" (15.2 cm)
into cabinet opening
■ Place Top Foam Sound Insulation (on some models)
• Snug the top foam into the slot on the top collar of the
dishwasher as shown in the gure.
NOTE: Leave unit about 6" (15.2 cm) out from cabinet in order
to install anchor brackets.
NOTE: Pull slack out of utilities at the same time the dishwasher
is pushed into the cabinet opening to avoid any kinks.
CUSTOM PANEL INSTALLATION
(CUSTOM PANEL MODELS ONLY)
For custom panel installation, refer to the Custom Panel
Installation Instruction Sheet included in the literature package.
Complete custom panel installation before proceeding to the
“Choose Anchor Attachment Method” section.
CHOOSE ANCHOR ATTACHMENT METHOD
IMPORTANT: The dishwasher must be secured to the cabinet
as one of the nal steps. Prepare the dishwasher for this by
attaching the 2 brackets found in the parts bag to the dishwasher.
– For countertops that are wood, laminate or another similar
surface: use Countertop Attachment and go to Step 32.
– For countertops that are marble, granite, or another hard
surface: use Side Attachment and go to Step 33.
NOTE: If the gap between the top of the door and the underside
of the counter top is tight (less than 1/4" [6.35 mm]), we suggest
using Side Attachment to keep from scratching the User Interface
or console with the anchor screws.
Water
line
Drain
hose
Cable
Secure
blanket
Insulation
blanket
31. Pull slack from utilities