
Owner's Manual

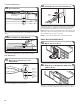


Table Of Contents
- DISHWASHER MAINTENANCE
- Dishwasher Loading Tips
- DISHWASHER care
- Dishwasher Setting Menu:
- ERROR CODES
- INSTALLATION REQUIREMENTS
- Installation Instructions
- Prepare cabinet opening— new utilities
- INSTALL OPTIONAL Moisture barrier - recommended for wood countertops
- ELECTRICAL CONNECTION
- PREPARE DISHWASHER
- Remove access panel and insulation
- DISCONNECT AND REMOVE DRIP tray ASSEMBLY
- CONNECT WATER LINE TO FILL VALVE
- CONNECT FILL HOSE TO FILL VALVE
- DRAIN HOSE CONNECTION
- Power cord Connection
- install DOOR HANDLE (ON SOME MODELS)
- PLACE DISHWASHER IN CABINET
- CUSTOM PANEL INSTALLATION (CUSTOM PANEL MODELS ONLY)
- Choose Anchor Attachment Method
- FINAL INSTALLATION CHECK
- SECURE DISHWASHER IN CABINET OPENING
- CONNECT WATER LINE TO HOUSE SHUT-OFF VALVE
- CONNECT DRAIN HOSE
- Complete Installation
- Check operation
- Install Access Panels
- if dishwasher does not operate
- ENTRETIEN DU LAVE-VAISSELLE
- Conseils de chargement du lave-vaisselle
- ENTRETIEN DU LAVE-VAISSELLE
- Menu de réglage du lave-vaisselle :
- CODES D’ANOMALIES
- EXIGENCES D’INSTALLATION
- Instructions d’installation
- Préparation de l’ouverture d’encastrement de l’armoire – nouveaux raccordements de service
- Installer la barrière anti-humidité en option – recommandée pour les comptoirs en bois
- RACCORDEMENT ÉLECTRIQUE
- PRÉPARATION DU LAVE-VAISSELLE
- Retrait du panneau d’accès et de l’isolation
- DÉBRANCHER ET ENLEVER LE PLATEAU D’ÉCOULEMENT
- BRANCHEMENT DE L’ARRIVÉE D’EAU À LA VALVE DE DISTRIBUTION
- BRANCHEMENT DU TUYAU DE REMPLISSAGE À LA VALVE DE DISTRIBUTION
- RACCORD DU TUYAU DE VIDANGE
- Branchement du cordon d’alimentation
- INSTALLER LA POIGNE DE PORTE (SUR CERTAINS MODÈLES)
- PLACER LE LAVE-VAISSELLE DANS L’ARMOIRE
- INSTALLATION DU PANNEAU PERSONNALISÉ (MODÈLES AVEC PANNEAU PERSONNALISÉ SEULEMENT)
- Choix de l’option de fixation
- VÉRIFICATION FINALE DE L’INSTALLATION
- FIXATION DU LAVE-VAISSELLE DANS L’OUVERTURE D’ENCASTREMENT DE L’ARMOIRE
- BRANCHEMENT DE L’ARRIVÉE D’EAU AU ROBINET D’ARRÊT DE LA MAISON
- RACCORDEMENT DU TUYAU DE VIDANGE
- Terminer l’installation
- Contrôle du fonctionnement
- Installation des panneaux d’accès
- Si le lave-vaisselle ne fonctionne pas
- MANTENIMIENTO DE LA LAVAVAJILLAS
- Consejos para cargar la lavavajillas
- Cuidado DE LA LAVAVAJILLAS
- Menú de ajustes de la lavavajillas:
- CÓDIGOS DE ERROR
- REQUISITOS DE INSTALACIÓN
- Instrucciones de instalación
- Preparación de la abertura del gabinete: instalaciones nuevas
- INSTALACIÓN OPCIONAL de la barrera contra la humedad (recomendado para los mostradores de madera)
- CONEXIÓN ELÉCTRICA
- PREPARE LA LAVAVAJILLAS
- Retire el panel de acceso y el aislante
- DESCONECTE Y RETIRE EL ENSAMBLAJE DE LA BANDEJA DE GOTEO
- CONECTE LA TUBERÍA DE AGUA A LA VÁLVULA DE LLENADO
- CONECTE LA MANGUERA DE LLENADO A LA VÁLVULA DE LLENADO
- CONEXIONES DE LA MANGUERA DE DESAGÜE
- Conexión del cable de alimentación
- instale LA MANIJA DE LA PUERTA (EN ALGUNOS MODELOS)
- COLOQUE LA LAVAVAJILLAS EN EL GABINETE
- INSTALACIÓN DEL PANEL A LA MEDIDA (EN MODELOS CON PANELES A LA MEDIDA SOLAMENTE)
- Selección del método de sujeción de anclaje
- VERIFICACIÓN FINAL DE LA INSTALACIÓN
- ASEGURE LA LAVAVAJILLAS EN LA ABERTURA DEL GABINETE
- CONEXIÓN DE TUBERÍA DE AGUA A MANGUERA DE VÁLVULA DE CIERRE DEL HOGAR
- CONECTE LA MANGUERA DE DESAGÜE
- Complete la instalación
- Verifique el funcionamiento
- Instale los paneles de acceso
- si la lavavajillas no funciona

27
48. Power supply cord—Plug into
a grounded 3 prong outlet
Plug into a grounded 3 prong outlet.
49. Reconnect power
Reconnect electrical power at the fuse box or circuit
breaker box.
NOTE: With the access panel off, start the dishwasher and allow
it to complete the shortest Installation Cycle while checking unit
for leaks. See instructions on this manual under Check Operations
section.
CHECK OPERATION
■ Read the dishwasher Quick Start Guide that came with your
dishwasher.
■ Check that all parts have been installed and no steps were
skipped. Check that you have all tools used.
■ Run the Installation Cycles as follows (Note that it can be
benecial to run this with the access panel removed in order
to look for presence of water under the unit. If running in this
state, the oat switch wire MUST still be connected to the oat
switch.)
■ If the dishwasher is not working properly, disconnect power
or unplug dishwasher and refer to the “If Dishwasher Does Not
Operate” section.
■ Press any 3 keys (except Delay or Cancel) in the sequence
1-2-3-1-2-3-1-2-3 with no more than 1 second between key
presses to enter the Installation cycle then press button #2.
■ Close the door and the cycle will start.
■ All LEDs turn on immediately upon receiving entry sequence.
■ A tone may play depending on the model.
■ The cycle will pause when the door is opened and resume
when closed.
■ No Start/Resume key press required to resume.
■ The installation cycle may last several minutes.
■ Press Cancel key to exit installation cyle mode. The product
will exit this mode after 10 minutes or if power is removed from
the appliance.
■ If any error codes or blinking lights are found, see Error Code
section in this Manual prior to calling for service.
NOTE: It is normal for the drain pump to sound loud upon the
rst run since no water is present in the system.
Numeric
Display
All
LEDs
on 1 2 3 4
5
(Some
models 6 7
Approximate
interval
Time 0:01
0:30
(Maximum
5:00) 2:00 0:20 0:20 0:20 0:30
1:00
(Maximum
5:00)
Machine
Action
Pause
Initial
Drain
Fill 3.8
L+
Wash
motor
pulses
Wash+
Dispenser
(Middle
spray
pulses
arm)
Wash+
Fan
(Ceiling
spray
arm)
Wash+
Third
Level
Rack. If
present
in this
model
Wash+
Heater
(Lower
spray
arm)
Drain
Pracess
INSTALL ACCESS PANELS
Insulation
(on some models)
50. Reinstall access panels and fasteners
Place the toe panel behind the access panel against the
dishwasher leg. If insulation is included on this model, make sure
insulation does not interfere with the oat assembly. Push the
access panel up toward the top of the product so that it hangs on
the hooks on the plastic side members.
■ Reinstall the toe/access panel assembly, with side shield
between the toe/access panel assembly and the side member.
Align the rectangular slot in the foam and assemble the toe/
access panel assembly to the unit using the screw.
NOTE: Remove lm on door Score around door for easier
removal.
Check that the lower edge of the access panel touches the oor.
Adjust if necessary.
51. Check access panel edge