
Control Guide
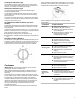
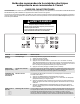
Table Of Contents
- Feature Guide_W11508786
- Cooktop Use_W11508786
- Cookware_EFSR_CG
- Home Canning_EFSR_CG
- Oven Use_EFSR_CG_W11508786D
- Electronic Oven Controls_W11333124
- Sabbath Mode_W10887092
- Keep Warm_EFSR_CG_W11508786D
- Racks and Bakeware_W10881063
- Baking and Roasting_EFSR_CG_W11508786D
- Broiling_EFSR_CG_W11508786D
- Cook Time_W11085357
- Guide des caractéristiques_W11508786
- Utilisation de la table de cuisson_W11508786
- Ustensiles_EFSR_CG
- Préparation de conserves à la maison_EFSR_CG
- Utilisation du four_EFSR_CG_W11508786D
- Commandes électroniques du four_W11333124
- Mode Sabbath (Sabbat)_W10887092
- Maintien au chaud_EFSR_CG_W11508786D
- Grilles et ustensiles de cuisson_W10881063
- Cuisson et rôtissage au four_EFSR_CG_W11508786D
- Broiling_EFSR_CG_W11508786D
- Durée de cuisson_W11085357
- Guía de funciones_W11508786
- Uso de la superficie de cocción_W11508786
- Utensilios de cocina_EFSR_CG
- Envasado casero_EFSR_CG
- Uso del horno_EFSR_CG_W11508786D
- Controles electrónicos del horno_W11333124
- Modo Sabbath (Sabbat)_W10887092
- Mantener caliente_EFSR_CG_W11508786D
- Parrillas y utensilios para hornear_W10881063
- Hornear y asar_EFSR_CG_W11508786D
- Asar a la parrilla_EFSR_CG_W11508786D
- Tiempo de cocción_W11085357

6
Before entering the Sabbath mode, it must be decided if the oven
light is to be ON or OFF for the entire Sabbath mode period. If the
light is ON when entering Sabbath mode, it will remain ON for the
entire time Sabbath mode is in use. If the light is OFF when
entering Sabbath mode, it will remain OFF for the entire time
Sabbath mode is in use. Opening the oven door or pressing the
Light keypad will not affect the oven light once Sabbath mode has
been entered.
On the Holiday, the oven temperature can be changed once the
oven is in Sabbath mode by pressing the Temp/Time “up” or
“down” arrow keypad. The oven temperature will change 25°F
(14°C) each time the Temp/Time “up” and “down” arrow keypads
are pressed. Press START to activate the new temperature. The
display will not change and there will be no sounds during this
adjustment.
To Bake Using Sabbath Mode:
1. Press BAKE.
2. To change the temperature : Press the Temp/Time “up” or
“down” arrow keypad.
3. Press START.
4. Press and hold the Timer Set/Off keypad for 5 seconds. “SAb”
will flash in the display.
5. Press START while “SAb” is flashing to enter Sabbath mode;
otherwise, the entire cycle cancels out. “SAb” will stop flashing
and remain ON in the display. The oven is now in Sabbath
mode and is Sabbath compliant.
Pressing the OFF/CANCEL keypad at any time returns the
oven to the normal cooking mode (not Sabbath compliant).
To Set a Timed Bake Using Sabbath Mode (on some models):
1. Press BAKE.
2. Press the Temp/Time “up” or “down” arrow keypad to enter a
temperature other than the one displayed.
3. Press COOK TIME. The Cook Time oven indicator light will
light up.
4. Press the Temp/Time “up” or “down” arrow keypad to enter a
cook time length.
5. Press START.
6. Press and hold the Timer Set/Off keypad for 5 seconds. “SAb”
will flash in the display.
7. Press START while “SAb” is flashing to enter Sabbath mode;
otherwise, the entire cycle cancels out. “SAb” will stop flashing
and remain on in the display. The oven is now in Sabbath
mode and is Sabbath compliant. The Bake, On, and Cook
Time indicator lights will be displayed.
When the set cook time ends, the oven will shut off
automatically and the indicator lights will turn off, indicating the
end of the cycle.
Pressing the Cancel keypad at any time cancels the cooking
cycle and returns the oven to the normal cooking mode (not
Sabbath mode compliant).
To Set a Delayed Timed Bake Using Sabbath Mode (on some
models):
1. Press BAKE.
2. Press the Temp/Time “up” or “down” arrow keypad to enter a
temperature other than the one displayed.
3. Press COOK TIME. The Cook Time oven indicator light will
light up.
4. Press the Temp/Time “up” or “down” arrow keypad to enter a
cook time length.
5. Press DELAY. The Delay indicator light will light up.
6. Press the Temp/Time “up” or “down” arrow keypad to enter a
start time.
7. Press START.
8. Press and hold the Timer Set/Off keypad for 5 seconds. “SAb”
will flash in the display.
9. Press START while “SAb” is flashing to enter Sabbath mode;
otherwise, the entire cycle cancels out. “SAb” will stop flashing
and remain on in the display. The oven is now in Sabbath
mode and is Sabbath compliant. The Delay indicator light will
be displayed.
When the start time is reached the Bake, On, and Cook Time
indicator lights will automatically turn on. When the set cook
time ends, the oven will shut off automatically and the
indicator lights will turn off, indicating the end of the cycle.
Pressing the Cancel keypad at any time returns the oven to
the normal cooking mode (not Sabbath mode compliant).
Keep Warm
NOTE: If the oven door remains open for too long, the heating
elements will shut off until the oven door is closed. All timers,
including any active Cook Time or Timed Cook functions, will
continue to count down.
IMPORTANT: Food must be at serving temperature before placing
it in the warmed oven. Food may be held up to 1 hour; however,
breads and casseroles may become too dry if left in the oven
during the Keep Warm or warm function. For best results, cover
food.
The Keep Warm feature allows hot cooked foods to stay at
serving temperature.
To Use:
1. Press WARM.
2. Press Temp/Time "up" or "down" arrow keypad until desired
temperature is reached. A tone will sound if the minimum or
maximum temperature is reached.
3. Press START.
4. Place food in the oven.
5. Press CANCEL when finished.
NOTE: The temperature may be changed at any time by pressing
the Temp/Time "up" or "down" arrow keypad to reach the desired
temperature and then pressing START.
Positioning Racks and Bakeware
To move a rack, pull it out to the stop position, raise the front edge,
and then lift out. Use the following illustration as a guide.
Rack Positions
Rack 5: Toasting bread or broiling thin, non-fatty foods
Rack 4: 2-rack baking and broiling
Rack 3: Most baked goods on a cookie sheet, muffin pan, or jelly
roll pan; layer cakes; broiling chicken pieces
Rack 2: Pies, casseroles, yeast bread, quick breads, frozen
convenience foods, 2-rack baking
Rack 1: Roasting large and small cuts of meat and poultry
Multiple Rack Cooking
2-rack: Use rack positions 2 and 4.
Bakeware
To cook food evenly, hot air must be able to circulate. Allow
2" (5 cm) of space around bakeware and oven walls. Make sure
that no bakeware piece is directly over another.