
Owner's Guide


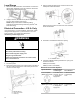


Table Of Contents
- Range Safety
- Self-Cleaning Cycle (on some models)
- General Cleaning
- Tools and Parts
- Location Requirements
- Electrical Requirements - U.S.A. Only
- Unpack Range
- Install Anti-Tip Bracket
- Adjust Leveling Legs
- Level Range
- Electrical Connection - U.S.A. Only
- Verify Anti-Tip Bracket Is Installed and Engaged
- Remove/Replace Drawer
- Oven Door
- Complete Installation

12
Install Using Direct Wire
WARNING
Electrical Shock Hazard
Disconnect power before servicing.
Use 8 gauge copper or 6 gauge aluminum wire.
Electrically ground range.
Failure to follow these instructions can result in death,
fire, or electrical shock.
Direct Wire Strain Relief
1. Disconnect power.
2. Remove the lower access cover screws located on the back of
the range. Pull the bottom of the cover toward you and out to
remove cover from range.
A. Mounting tabs (3)
B. Lower access cover
C. Screws (2)
3. Remove plastic tag holding three 10-32 hex nuts from the
middle post of the terminal block.
OR
Remove the top 10-32 hex nut from each of the 3 terminal
blocks and set aside.
4. Assemble a UL listed conduit connector in the opening.
A. Removable retaining nut
B. Conduit
5. Tighten strain relief screw against the flexible conduit.