
Owners Manual


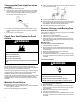


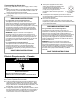
Table Of Contents
- DRYER SAFETY
- Dryer Safety
- Internet Connectivity Guide
- DRYER MAINTENANCE AND CARE
- Cleaning the Dryer Location
- Cleaning the Dryer Interior
- Removing Accumulated Lint
- Cleaning the Lint Screen
- Changing the Drum Light (on some models)
- Check Your Vent System for Good Airflow
- Maintain Good Airflow
- Nonuse, Storage, and Moving Care
- INSTALLATION REQUIREMENTS
- Tools and Parts
- Location Requirements
- Electrical Requirements – U.S.A.
- Electric Requirements – Canada
- INSTALLATION INSTRUCTIONS
- Install Leveling Legs
- Electrical Installation – U.S.A.
- Home Venting Requirements
- Plan Vent System
- Install Vent System
- Connect Inlet Hoses
- Connect Vent (Vented Models Only)
- Level Dryer
- Complete Installation Checklist
- SÉCURITÉ DE LA SÉCHEUSE
- Sécurité de la sécheuse
- Guide de connexion Internet
- ENTRETIEN ET RÉPARATION DE LA SÉCHEUSE
- Nettoyage de l’emplacement de la sécheuse
- Nettoyage de l’intérieur de la sécheuse
- Retrait de la charpie accumulée
- Nettoyage du filtre à charpie
- Changement de l’ampoule d’éclairage du tambour (sur certains modèles)
- Vérification d’une circulation d’air adéquate pour le système d’évacuation
- Pour maintenir une bonne circulation d’air
- Précautions à prendre avant une non-utilisation, un entreposage ou un déménagement
- EXIGENCES D'INSTALLATION
- Outils et pièces
- Exigences d’emplacement
- Spécifications électriques – É.-U.
- Spécifications électriques – Canada
- INSTRUCTIONS D'INSTALLATION
- Installation des pieds de réglage de l’aplomb
- Installation électrique – É.-U.
- Exigences concernant l’évacuation pour une maison
- Planification des circuits de conduits
- Installation du conduit d’évacuation
- Raccordement des tuyaux d’alimentation
- Raccordement du conduit d’évacuation (sur les modèles avec conduit seulement)
- Réglage de l’aplomb de la sécheuse
- Liste de vérification pour installation terminée

7
To winterize the dryer:
1. Unplug dryer or disconnect power.
2. Shut off water faucet.
3. Disconnect water inlet hose from faucet and drain.
To use the dryer again:
1. Flush water pipes. Reconnect water inlet hose to faucet. Turn
on water faucet.
2. Plug in dryer or reconnect power as described in the
Installation Instructions.
Reinstalling the Dryer
Follow the Installation Instructions to locate, level, and connect the
dryer.
Special Instructions for Steam Models
Install and store your dryer where it will not freeze. Because some
water may stay in the hose, freezing can damage your dryer. If
storing or moving your dryer during freezing weather, winterize it.
Water inlet hose
Replace inlet hose and hose screen after 5 years of use to reduce
the risk of hose failure. Periodically inspect and replace inlet hose
if bulges, kinks, cuts, wear, or leaks are found.
When replacing your inlet hose, record the date of replacement.
INSTALLATION REQUIREMENTS
Tools and Parts
NOTE: Install the clothes dryer according to the manufacturer’s
instructions and local codes.
Gather required tools and parts before starting installation. Read
and follow the instructions provided with any tools listed here.
Tools Needed for All Installations:
Flat-blade screwdriver
Wire stripper
1/4" Nut driver
Level
Pliers
Tape measure
Utility knife
Tin snips
Caulking gun and compound
Adjustable wrench that opens
to 1" (25 mm) or hex-head
socket wrench
Additional Tools Needed (on some models):
Putty knife
Parts Supplied (all models):
Leveling legs (4) (Length and appearance of legs may vary
according to model)
Parts package is located in dryer drum. Check that all parts are
included.
NOTE: Do not use leveling legs supplied with dryer if installing
with a pedestal or stack kit.
Parts Needed (steam models):
“Y” connector
Rubber washer
2' (0.6 m) inlet hose
5' (1.52 m) inlet hose