
User Manual
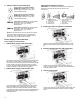
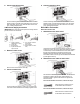

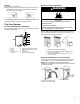

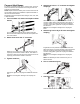
Table Of Contents
- DRYER SAFETY
- Dryer Safety
- DRYER MAINTENANCE AND CARE
- Cleaning the Dryer Location
- Cleaning the Dryer Interior
- Removing Accumulated Lint
- Cleaning the Lint Screen
- Changing the Drum Light (on some models)
- Check Your Vent System for Good Airflow
- Maintain Good Airflow
- Nonuse, Storage, and Moving Care
- INSTALLATION INSTRUCTIONS
- REQUIREMENTS
- Tools and Parts
- Location Requirements
- Electrical Requirements – U.S.A.
- Electric Requirements – Canada
- INSTALLATION
- Install Leveling Legs
- Electrical Installation – U.S.A.
- Home Venting Requirements
- Plan Vent System
- Install Vent System
- Connect Inlet Hoses
- Connect Vent (Vented Models Only)
- Level Dryer
- Complete Installation Checklist
- SECURITE DE LA SECHEUSE
- Sécurité de la sécheuse
- ENTRETIEN ET REPARATION DE LA SECHEUSE
- Nettoyage de l’emplacement de la sécheuse
- Nettoyage de l’intérieur de la sécheuse
- Retrait de la charpie accumulée
- Nettoyage du filtre à charpie
- Changement de l’ampoule d’éclairage du tambour (sur certains modèles)
- Vérification d’une circulation d’air adéquate pour le système d’évacuation
- Pour maintenir une bonne circulation d’air
- Précautions à prendre avant une non-utilisation, un entreposage ou un déménagement
- INSTRUCTIONS D'INSTALLATION
- SPECIFICATIONS
- Outils et pièces
- Exigences d’emplacement
- Spécifications électriques – É.-U.
- Spécifications électriques – Canada
- INSTALLATION
- Installation des pieds de réglage de l’aplomb
- Installation électrique – É.-U.
- Exigences concernant l’évacuation pour une maison
- Planification des circuits de conduits
- Installation du conduit d’évacuation
- Raccordement des tuyaux d’alimentation
- Raccordement du conduit d’évacuation (sur les modèles avec conduit seulement)
- Réglage de l’aplomb de la sécheuse
- Blank Page
- Blank Page
- Blank Page
- Blank Page

15
3-Wire Direct Wire Connection
IMPORTANT: Use where local codes permit connecting cabinet-
ground conductor to neutral wire.
3. Prepare your 3-wire cable for direct
connection
Direct wire cable must have 5 ft (1.52 m) of extra length so
dryer may be moved if needed.
Strip 3
1
/
2
" (89 mm) of outer covering from end of cable. Strip
insulation back 1" (25 mm). If using 3-wire cable with ground
wire, cut bare wire even with outer covering. Shape wire ends
into hooks.
4. Remove center screw
Remove center terminal block screw (B).
5. Connect neutral wire
Place hooked end of neutral wire (white or center) (C) of
direct wire cable under center terminal block screw (B).
Squeeze hooked end together. Tighten screw.
6. Connect remaining wires
Place hooked ends of remaining direct wire cable wires under
outer terminal block screws (hooks facing right). Squeeze
hooked ends together and tighten screws. Insert tab of
terminal block cover into slot of dryer rear panel. Secure
cover with hold-down screw. Now, go to “Venting
Requirements.”
Optional 3-Wire Connection (Power Supply Cord
Shown)
IMPORTANT: You must verify with a qualified electrician that this
grounding method is acceptable before connecting.
1. Prepare to connect neutral bond wire and
neutral wire
Install the correct strain relief for your electrical connection
method. Remove center terminal block screw (B). Remove
neutral bond wire (E) from green external ground conductor
screw (A).
2. Connect neutral bond wire and neutral wire
Connect neutral bond wire (E) and neutral wire (white or
center wire) (C) of power supply cord or cable under center
terminal block screw (B). Tighten screw.