® 240-VOLT ELECTRIC DRYER Use & Care Guide For questions about features, operation/performance, parts, accessories or service, call: 1-800-253-1301. or visit our website at...www.whirlpool.com Table of Contents .................................................
TABLE OF CONTENTS DRYER SAFETY..............................................................................3 INSTALLATION REQUIREMENTS ................................................4 Tools and Parts ............................................................................4 Options .........................................................................................4 Location Requirements ................................................................4 Electrical Requirements .....................
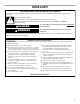
DRYER SAFETY Your safety and the safety of others are very important. We have provided many important safety messages in this manual and on your appliance. Always read and obey all safety messages. This is the safety alert symbol. This symbol alerts you to potential hazards that can kill or hurt you and others. All safety messages will follow the safety alert symbol and either the word “DANGER” or “WARNING.
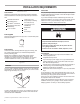
INSTALLATION REQUIREMENTS Tools and Parts Tools needed Gather the required tools and parts before starting installation. Read and follow the instructions provided with any tools listed here.
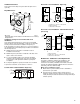
Installation Clearances Recessed or closet installation - Dryer only The location must be large enough to allow the dryer door to open fully. 3" (7.6 cm) 14" (35.6 cm) 48 in.2 (310 cm 2) Dryer Dimensions 39" (99.1 cm) 18"(45.7 cm) *23 ¼" (60.3 cm) 3" (7.6 cm) 33 ¼" (84.45 cm) 1" (2 . 5 cm) 24 in.2 (155 cm 2) 0" (0 cm) A 0" (0 cm) B 3" (7.6 cm) C A. Side view - closet or confined area B. Recessed area C.
Electrical Requirements It is your responsibility ■ To contact a qualified electrical installer. ■ To be sure that the electrical connection is adequate and in conformance with the National Electrical Code, ANSI/NFPA 70-latest edition and all local codes and ordinances. The National Electric Code requires a 4-wire supply connection for homes built after 1996, dryer circuits involved in remodeling after 1996 and all mobile home installations.
Venting Requirements WARNING ■ Do not install flexible metal vent in enclosed walls, ceilings or floors. Elbows 45° elbows provide better airflow than 90° elbows. Fire Hazard Use a heavy metal vent. Do not use a plastic vent. Do not use a metal foil vent. Failure to follow these instructions can result in death or fire. Good Better Clamps Use clamps to seal all joints. ■ WARNING: To reduce the risk of fire, this dryer MUST BE EXHAUSTED OUTDOORS.
INSTALLATION INSTRUCTIONS Electrical Connection Power Supply Cord Direct Wire WARNING WARNING Fire Hazard Fire Hazard Use a new UL listed 30 amp power supply cord. Use 10 gauge solid copper wire. Use a UL listed strain relief. Use a UL listed strain relief. Disconnect power before making electrical connections. Disconnect power before making electrical connections. Connect neutral wire (white or center wire) to center terminal (silver).
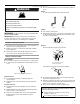
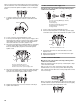
6. Replace strain relief (with power cord inserted) back into the terminal block cover. Do not tighten strain relief nut. 4-wire connection: Power supply cord B A A D C F E A. 4-wire receptacle (NEMA type 14-30R) B. 4-prong plug C. Ground prong D. Neutral prong E. Spade terminals with upturned ends F. Ring terminals B C D 1. Locate the neutral ground wire inside the dryer cabinet, behind the external ground conductor screw. Remove this wire. A. Terminal block cover B. Strain relief C.
When connecting to the terminal block, place the hooked end of the wire under the screw of the terminal block (hook facing right), squeeze hooked end together and tighten screw. See example below. 3-wire connection: Power supply cord Use where local codes permit connecting cabinet-ground conductor to neutral wire. B D A 1. Locate the neutral ground wire inside the dryer cabinet, behind the external ground conductor screw. Remove this wire. A E C F A. 3-wire receptacle (NEMA type 10-30R) B.
1. Loosen or remove center terminal block screw. 2. Place the hooked end of the neutral wire (white or center wire) of power supply cable under the center screw of terminal block (hook facing right). Squeeze hooked end together. Tighten screw. 3. Place the hooked ends of the other power supply cable wires under the outer terminal block screws (hooks facing right). Squeeze hooked ends together. Tighten screws. B 4. Replace the terminal block cover on the back of the dryer. 5. Tighten strain relief nut.
Determine vent path Install Vent System ■ Select the route that will provide the straightest and most direct path outdoors. ■ Plan the installation to use the fewest number of elbows and turns. ■ When using elbows or making turns, allow as much room as possible. ■ Bend vent gradually to avoid kinking. ■ Use the fewest 90° turns possible.
Level Dryer Check the levelness of the dryer. Check levelness first side to side, then front to back. If the dryer is not level, prop up the dryer using a wood block. Use a wrench to adjust the legs up or down and check again for levelness. Complete Installation 1. Check that all parts are now installed. If there is an extra part, go back through the steps to see which step was skipped. 2. Check that you have all of your tools. 3. Dispose of/recycle all packaging materials. 4.
DRYER USE Starting Your Dryer WARNING WARNING Explosion Hazard Keep flammable materials and vapors, such as gasoline, away from dryer. Do not dry anything that has ever had anything flammable on it (even after washing). Failure to follow these instructions can result in death, explosion, or fire. WARNING: To reduce the risk of fire, electric shock, or injury to persons, read the IMPORTANT SAFETY INSTRUCTIONS before operating this appliance.
Controls The control panel is simple to understand and easy to operate. The illustrations below define the knobs and buttons, and the paragraphs define the purpose of each. Power This button switches the power to the machine on and off. The indicator light will glow to indicate the power is on. Indicator Light This light indicates when the power is on or that a cycle has started. Stop Position Turn the cycle knob to the Stop position at any time.
See following table for recommended cycles and temperature settings. Fabric Type Cycle Temperature Setting REGULAR See following table for recommended cycles and temperature settings.
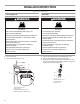
IMPORTANT: ■ Do not run the dryer with the lint screen loose, damaged, blocked or missing. Doing so can cause overheating and damage to both the dryer and fabrics. As needed cleaning Laundry detergent and fabric softener residue can build up on the lint screen. This buildup can cause longer drying times for your clothes, or cause the dryer to stop before your load is completely dry. The screen is probably clogged if lint falls off the screen.
TROUBLESHOOTING First try the solutions suggested here and possibly avoid the cost of a service call... Dryer Operation Dryer Results Dryer will not run Has a household fuse blown, or has a circuit breaker tripped? There may be 2 fuses or circuit breakers for the dryer. Make sure both fuses are intact and tight, or that both circuit breakers have not tripped. Replace the fuse or reset the circuit breaker. If the problem continues, call an electrician.
Loads are wrinkled WARNING ■ Was the load removed from dryer at the end of the cycle? ■ Was the dryer overloaded? Dry smaller loads that can tumble freely. Odors Explosion Hazard ■ Have you recently been painting, staining or varnishing in the area where your dryer is located? If so, ventilate the area. When the odors or fumes are gone from the area, rewash and dry the clothing. ■ Is the dryer being used for the first time? The new electric heating element may have an odor.
WHIRLPOOL CORPORATION MAJOR APPLIANCE WARRANTY ONE YEAR LIMITED WARRANTY For one year from the date of purchase, when this major appliance is operated and maintained according to instructions attached to or furnished with the product, Whirlpool Corporation or Whirlpool Canada LP (hereafter “Whirlpool”) will pay for Factory Specified Parts and repair labor to correct defects in materials or workmanship. Service must be provided by a Whirlpool designated service company.