
Troubleshooting guide

ACTIVATING THE DIAGNOSTIC
TEST MODE
FOR SERVICE TECHNICIAN ONLY - DO NOT REMOVE OR DESTROY
PAGE 2
1. Be sure the dryer is not currently running a cycle
(the in-progress screen should not be displayed).
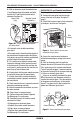
2. From the perimeter of the LCD,select the
Sound and Display option.
a. Make sure that sound volume level is
on“High”.
b. Select“Sales and Service Mode” from the
available options on the LCD.
c. Select“Enter Password”, then press 5, 6,
5,6 within 5 seconds.
d. If the service mode has been entered
correctly, a service notice will appear.
e. Continue by pressing Enter.
f. The Diagnostic Home screen willnow appear.
DIAGNOSTIC: Active Fault Codes
If there is an active fault code, it will be in the
display. Review the Display Fault/Error Codes
table,pages 5 and 6, for the recommended
procedure.
DIAGNOSTIC: Saved Fault Codes
The dryer will save up to 10 of the most recent
fault codes. Fault codes will be date and time
stamped and appear in the order in which they
occur. If there are saved fault codes (accessed
by selecting the Error Diagnostic selection from
the Diagnostic Home screen), a saved fault code
will be displayed and the LCD will show F
followed by XX, where XX is the fault code.
Pressing the arrow down button will display
the next saved fault code.
Pressing the arrow up button will display
the previous saved fault code.
Pressing the OK button will bring up the
Diagnostic Home screen.
NOTE: Fault codes are retained, after display
and/or interruption of power.
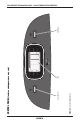
DIAGNOSTIC: Door Switch
Opening the door should cause a sound to be
played and the text in the center of the LCD to
display “Door Open”.
If opening the door fails to cause a sound
to be played and the “Door Open”text to be
displayed,go toTEST #7, page 16.
NOTE: Opening the door while in DiagnosticTest
Mode may not activate the drum light.The light
will come on when Start is pressed, or upon
opening the door after the Diagnostic Test Mode
has been canceled.
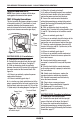
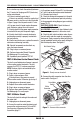
DIAGNOSTIC: Moisture Sensor
1. Open the door and locate two metal strips on
the inside of the dryer. Using a wet cloth or one
finger, jointly touch both strips.
If a tone is heard and the center of the LCD
screen displays “Moisture Sensor: Closed”, the
sensor is OK.
If a tone is not heard,or is heard before
touching both moisture strips, go to step 2.
2. Check to see if there is water in the dryer
around the moisture strips.
If no water is present, go to TEST #5, page 15.
If water is present, wipe the strips off with a
dry cloth and repeat step 1.
If wiping the strips does not stop the tone,
run a timed dry cycle for 2 minutes to dry out
the drum,then repeat this diagnostic test.
DIAGNOSTIC: Motor, Heater, Water,
and Drum Light
Close the door. Press the Start button.The motor,
heater, drum light,and water valve will turn on.
If the motor does not turn on, go toTEST #3,
page 10.
If no heat is detected, go to TEST #4,page 11.
If no water is detected,go toTEST #8, page 17.
NOTE: Press Power/Cancel when the test is
complete to turn off the dryer. If the dryer is
left running in DiagnosticTest Mode,water will
build up inthedrum.
MANUAL DIAGNOSTIC TEST MODE
Read and perform steps 1 and 2 of Activating
the Diagnostic Test Mode, above, and select the
Component Activation option from the Diagnostic
Home menu and select Ok. Next, scroll down the
list and select the “Diagnostic Test” from the list
of options and select “Ok”.