
Instruction Sheet


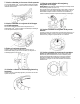

Table Of Contents

1
DDRRYYEERR DDOOOORR RREEVVEERRSSAALL IINNSSTTRRUUCCTTIIOONNSS
Round Doors with Electrical Wiring:
Tools Needed
Minimum 8" (203 mm) long TORX
®
, T20
®
, and T25
®
star drivers #2 Phillips screwdriver
WARNING
Electrical Shock Hazard
Disconnect power before servicing.
Replace all parts and panels before operating.
Failure to do so can result in death or electrical shock.
1. Disconnect wiring from door
Using a Phillips screwdriver, remove middle screw in hinge.
Disconnect wiring. Tuck wiring into opening.
2. Remove door from dryer
IMPORTANT: If the protective film has not yet been removed from
the dryer, peel the film from the dryer door before proceeding.
Using a T25
®
screwdriver, remove the four screws securing the
door hinge to the dryer and lift the door up and out to remove. Place
the door on a soft towel or other non-scratch surface.
3. Move the door strike
Using a T25
®
screwdriver, remove the two screws securing the
door strike to the door frame of the dryer. Rotate the strike 180°
and attach to the opposite side of dryer door frame with the two
screws removed earlier, as shown.
4. Remove inner door from outer door
Position the door with the inside of the door facing up. Using a
Phillips screwdriver, remove the 10 screws securing the inner door
to the outer door.
5. Remove hinge
Remove cover plate to reveal hinge assembly. Then, using a T20
®
screwdriver, remove the six screws holding the hinge assembly in
place.
6. Remove latch
Flip and rotate the inner door 180° so that the thin section is at the
top and the thick section is at the bottom. Using a T25
®
screwdriver, remove the four screws securing the latch plate in
place.
TORX, T20 and T25 are trademarks of Acument Intellectual Property, LLC.