
Troubleshooting guide


PAGE 10
FOR SERVICE TECHNICIAN’S USE ONLY
DO NOT REMOVE OR DESTROY
If +5VDC is still missing, replace the CCU.
If +5VDC returns, check harnesses and
connections between the CCU and user
interface (UI). If acceptable, replace the UI.
9. CCU +12VDC – with voltmeter set to DC,
connect black probe to CCU P5-3 (ground)
and red probe to P5-8 (+12VDC).
If +12VDC is present, go to step 10.
If +12VDC is not present, replace the CCU.
10. Unplug dryer or disconnect power.
11. Reassemble all parts and panels.
12. Perform steps under “Install Diagnostics”,
page 5, to verify repair.
TEST #2: Supply Connections
This test assumes that proper voltage is
present at the outlet, and for U.S. installations,
a visual inspection indicates that the power
cord is securely fastened to the terminal block
(electric dryer) or wire harness connection
(gas dryer).
ELECTRIC DRYER (U.S. Installations):
1. Unplug dryer or disconnect power.
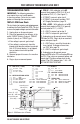
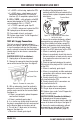
2. Remove the cover plate from the top right
corner of the back of the dryer. See figure 3.
3. With an ohmmeter, check for continuity
between the neutral (N) terminal of the plug
and the center contact on the terminal block.
See figure 4a.
If there is no continuity, replace the power
cord and test the dryer.
If there is continuity, go to step 4.
4. In a similar way, check which terminal of
the plug is connected to the left-most contact
on the terminal block and make a note of
it. This will be L1 (black wire) in the wiring
diagram. See figure 4a.
When this is found, go to step 5.
If neither of the plug terminals have
continuity with the left-most contact of the
terminal block, replace the power cord and
retest dryer.
5. Access the machine electronics without
disconnecting any wiring to the CCU (See
Dryer Disassembly Instructions, page 22).
6. With an ohmmeter, check for continuity
between the L1 terminal of the plug (found
in step 4) and P9-2 (black wire) on the CCU.
If there is continuity, go to step 7.
If there is no continuity, check that wires to
the terminal block are mechanically secure.
If so, replace the main wire harness and
test the dryer.
7. Check for continuity between the neutral
(N) terminal of the plug and P8-3 (white wire)
on the CCU.
If there is continuity, go to step 8.
If there is no continuity, and the mechanical
connections of the wire are secure, replace
the main wire harness.
8. Visually check that ALL connectors are
fully inserted into the CCU.
9. Visually check that ALL connectors are
fully inserted into the UI.
10. Reassemble all parts and panels.
11. Plug in dryer or reconnect power.
12. Perform steps under “Install Diagnostics”,
page 5, to verify repair.
ELECTRIC DRYER (Canadian Installations):
1. Unplug dryer or disconnect power.
2. Remove the cover plate from the top right
corner of the back of the dryer. See figure 3.
3. Access the machine electronics without
disconnecting any wiring to the CCU (see
Dryer Disassembly Instructions, page 22).
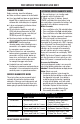
Figure 3 - Remove the cover plate.
CO M
N
L1
Figure 4a - Plug-to-terminal connections
for electric dryer.
Power Cord
Plug
Terminal Block
Cover Plate
Remove Screw