
Owner's Manual

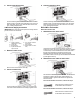
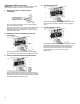

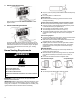
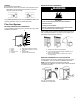
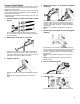
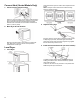
Table Of Contents
- DRYER SAFETY
- Dryer Safety
- DRYER MAINTENANCE AND CARE
- Cleaning the Dryer Location
- Cleaning the Dryer Interior
- Removing Accumulated Lint
- Cleaning the Lint Screen
- Changing the Drum Light (on some models)
- Check Your Vent System for Good Airflow
- Maintain Good Airflow
- Nonuse, Storage, and Moving Care
- INSTALLATION INSTRUCTIONS
- REQUIREMENTS
- Tools and Parts
- Location Requirements
- Electrical Requirements – U.S.A.
- Electric Requirements – Canada
- INSTALLATION
- Install Leveling Legs
- Electrical Installation – U.S.A.
- Home Venting Requirements
- Plan Vent System
- Install Vent System
- Connect Inlet Hoses
- Connect Vent (Vented Models Only)
- Level Dryer
- Complete Installation Checklist
- SECURITE DE LA SECHEUSE
- Sécurité de la sécheuse
- ENTRETIEN ET REPARATION DE LA SECHEUSE
- Nettoyage de l’emplacement de la sécheuse
- Nettoyage de l’intérieur de la sécheuse
- Retrait de la charpie accumulée
- Nettoyage du filtre à charpie
- Changement de l’ampoule d’éclairage du tambour (sur certains modèles)
- Vérification d’une circulation d’air adéquate pour le système d’évacuation
- Pour maintenir une bonne circulation d’air
- Précautions à prendre avant une non-utilisation, un entreposage ou un déménagement
- INSTRUCTIONS D'INSTALLATION
- SPECIFICATIONS
- Outils et pièces
- Exigences d’emplacement
- Spécifications électriques – É.-U.
- Spécifications électriques – Canada
- INSTALLATION
- Installation des pieds de réglage de l’aplomb
- Installation électrique – É.-U.
- Exigences concernant l’évacuation pour une maison
- Planification des circuits de conduits
- Installation du conduit d’évacuation
- Raccordement des tuyaux d’alimentation
- Raccordement du conduit d’évacuation (sur les modèles avec conduit seulement)
- Réglage de l’aplomb de la sécheuse
- Blank Page
- Blank Page
- Blank Page
- Blank Page

17
Clamps:
� Use clamps to seal all joints.
� Exhaust vent must not be connected or secured with screws or
other fastening devices that extend into interior of duct and
catch lint. Do not use duct tape.
Vent products can be purchased from your dealer. For contact and
ordering information, refer to your Quick Start Guide.
Plan Vent System
Recommended exhaust installations:
Typical installations vent the dryer from the rear of the dryer. Other
installations are possible.
A. Dryer
B. Elbow
C. Wall
D. Exhaust hood
E. Clamps
F. Rigid metal or flexible metal vent
G. Vent length necessary to connect
elbows
H. Exhaust outlet
I. Optional side exhaust outlet
Optional exhaust installations:
WARNING
Fire Hazard
Cover unused exhaust holes with a manufacturer’s
exhaust cover kit.
Contact your local dealer.
Failure to follow these instructions can result in death,
fire, electrical shock, or serious injury.
Some models can be converted to exhaust out the right side, left
side, or through the bottom. If you prefer, you may contact your
local dealer to have the dryer converted.
A B C
A. Standard rear offset exhaust installation
B. Left- or right-side exhaust installation (available only on
select 27"-wide models).
C. Bottom exhaust installation (available only on select
27"-wide models).
Alternate installations for close clearances
Venting systems come in many varieties. Select the type best for
your installation. Two close-clearance installations are shown.
NOTE: The following kits for close-clearance alternate
installations are available for purchase. Refer to Quick Start Guide
for contact information.
Over-The-Top installation (also
available with one offset elbow)
Periscope installation
B
C
D
E
A
F
G
B
I H E