User Guide Electric Range THANK YOU for purchasing this high-quality product. Register your range at www.whirlpool.com. In Canada, register your range at www.whirlpool.ca. For future reference, please make a note of your product model and serial numbers. These can be found on the label located on the oven frame behind the top right side of the oven door.
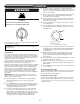
RANGE SAFETY Your safety and the safety of others are very important. We have provided many important safety messages in this manual and on your appliance. Always read and obey all safety messages. This is the safety alert symbol. This symbol alerts you to potential hazards that can kill or hurt you and others. All safety messages will follow the safety alert symbol and either the word “DANGER” or “WARNING.
IMPORTANT SAFETY INSTRUCTIONS WARNING: To reduce the risk of fire, electrical shock, Protective Liners – Do not use aluminum foil to line surface unit drip bowls or oven bottoms, except as suggested in the manual. Improper installation of these liners may result in a risk of electric shock, or fire.
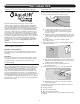
KEY USAGE TIPS AquaLift® Self-Cleaning Technology Ceramic Glass Cooktop Cleaning To avoid damaging the cooktop, do not use steel wool, abrasive powder cleansers, chlorine bleach, rust remover, or ammonia. 1. Remove food/residue with the Cooktop Scraper. AquaLift® Self-Cleaning Technology is a first-of-its-kind cleaning solution designed to minimize the time, temperature, and odors that ordinarily come with traditional self-cleaning methods.
FEATURE GUIDE This manual covers several models. Your model may have some or all of the items listed. Refer to this manual or the Product Help section of our website at www.whirlpool.com for more detailed instructions. In Canada, refer to the Product Help section at www.whirlpool.ca. WARNING Food Poisoning Hazard Do not let food sit in oven more than one hour before or after cooking. Doing so can result in food poisoning or sickness.
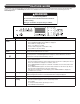
Keypad Feature Instructions FROZEN BAKE Prepackaged food 1. Position the food on a flat rack in the oven on rack position 4. See the “Positioning Racks and Bakeware” section. NOTE: Cook only 1 package of frozen food at a time when using Frozen Bake™ Technology. 2. Press FROZEN BAKE. 3. Press the number keypad to select the desired food option. 4. Press the number keypads to set the temperature as recommended on the food packaging. 5. Press COOK TIME. 6.
Keypad Feature Instructions RAPID PREHEAT Rapid oven preheating Provides the fastest preheat time for the Bake function. Rapid Preheat is preset to OFF, but it can be changed to ON. 1. Press RAPID PREHEAT. 2. The current setting will be displayed. 3. Press the “1” keypad to adjust the setting. 4. Press START or CANCEL to exit and display the time of day. IMPORTANT: This feature should only be used for one-rack baking. Unused racks should be removed prior to Rapid Preheat.
Electronic Oven Controls Control Display Fahrenheit and Celsius The display will flash when powered up or after a power loss. Press CANCEL to clear. When the oven is not in use, the time of day is displayed. If the range is in Energy Save mode, the display will be blank when not in use. Tones are audible signals, indicating the following: The temperature is preset to Fahrenheit but can be changed to Celsius. 1. Press SETTINGS/CLOCK until “TEMP UNIT” is displayed. 2. The current setting will be displayed.
Demo Mode Languages - Scrolling Display Text IMPORTANT: This feature is intended for use on the sales floor with 120 V power connection and permits the control features to be demonstrated without the oven turning on. If this feature is activated, the oven will not work. 1. Press SETTINGS/CLOCK until “DEMO MODE” is displayed. 2. The current setting will be displayed. 3. Press the “1” keypad to adjust the setting. 4. Press START or CANCEL to exit and display the time of day.
COOKTOP WARNING ■■ To avoid scratches, do not slide cookware or bakeware across the cooktop. Aluminum or copper bottoms and rough finishes on cookware or bakeware could leave scratches or marks on the cooktop. ■■ Do not cook popcorn in prepackaged aluminum containers on the cooktop. They could leave aluminum marks that cannot be removed completely. ■■ To avoid damage to the cooktop, do not allow objects that could melt, such as plastic or aluminum foil, to touch any part of the entire cooktop.
Triple Zone Cooking Element Melt Element The Triple Zone cooking element offers flexibility depending on the size of the cookware. Single size can be used in the same way as a regular element. The dual and triple sizes combine the single, dual, and outer elements and is recommended for larger cookware, larger quantities of food, and home canning. The Melt cooking element offers flexibility due to a wide range of settings between Hi and Melt.
Cookware IMPORTANT: Do not leave empty cookware on a hot surface cooking area, element, or surface burner. Ideal cookware should have a flat bottom, straight sides, and a well-fitting lid, and the material should be of medium-to-heavy thickness. Rough finishes may scratch the cooktop or coils. Aluminum and copper may be used as a core or base in cookware. However, when used as a base, they can leave permanent marks on the surfaces.
OVEN Odors and smoke are normal when the oven is used the first few times or when it is heavily soiled. IMPORTANT: The health of some birds is extremely sensitive to the fumes given off by the oven. Exposure to the fumes may result in death to certain birds. Always move birds to another closed and well-ventilated room. Aluminum Foil A IMPORTANT: To avoid permanent damage to the oven bottom finish, do not line the oven bottom with any type of foil or liner.
Oven Vent Baking and Roasting Preheating A When beginning a Bake, Convect Bake, or Convect Roast cycle, the oven will begin preheating after Start is pressed. The oven will take approximately 12 to 15 minutes to reach 350°F (177°C) with all of the oven racks provided with your oven inside the oven cavity. Higher temperatures will take longer to preheat. The preheat cycle rapidly increases the oven temperature.
Broiling Cook Time When broiling, preheat the oven for 2 minutes before putting food in, unless recommended otherwise in the recipe. Position food on grid in a broiler pan, and then place it in the center of the oven rack. IMPORTANT: Close the door to ensure proper broiling temperature. Changing the temperature when broiling allows more precise control when cooking. The lower the broil setting is, the slower the cooking.
RANGE CARE Clean Cycle 6. Remove the residual water and loosened soils with a sponge or cloth immediately after the Clean cycle is complete. Much of the initial 2 cups (16 oz [500 mL]) of water will remain in the oven after the cycle is completed. If additional soils remain, leave a small amount of water in the oven bottom to assist with the cleaning. AquaLift® Technology is an innovative cleaning solution that utilizes heat and water to release baked-on spills from the oven in less than 1 hour.
General Cleaning IMPORTANT: Before cleaning, make sure all controls are OFF and the oven and cooktop are cool. Always follow label instructions on cleaning products. For additional information, you can visit our website at www.whirlpool.com. In Canada, visit our website at www.whirlpool.ca. Soap, water, and a soft cloth or sponge are suggested first, unless otherwise noted. 2. Apply a few dime-sized drops of affresh® Cooktop Cleaner to the affected areas.
CONTROL PANEL AND OVEN DOOR EXTERIOR STORAGE DRAWER OR WARMING DRAWER (on some models) To avoid damage to the control panel, do not use abrasive cleaners, steel-wool pads, gritty washcloths, or abrasive paper towels. Check that storage drawer or warming drawer is cool and empty before cleaning. Cleaning Method: Cleaning Method: ■■ Glass cleaner and soft cloth or sponge: Apply glass cleaner to soft cloth or sponge, not directly on panel.
TROUBLESHOOTING First try the solutions suggested here. If you need further assistance or more recommendations that may help you avoid a service call, refer to the warranty page in this manual and scan the code there with your mobile device, or visit http://www.whirlpool.com/product_help. In Canada, visit http://www.whirlpool.ca. Contact us by mail with any questions or concerns at the address below: In the U.S.A.
Problem Possible Causes and/or Solutions Oven cooking results not what expected Range is not level: Level the range. See the Installation Instructions. The set temperature was incorrect: Double-check the recipe in a reliable cookbook. Oven temperature needs adjustment: See “Oven Temperature Control” in the “Electronic Oven Controls” section. Oven was not preheated: See “Baking and Roasting” section. Racks were positioned improperly: See “Positioning Racks and Bakeware” section.
ACCESSORIES For accessories in the U.S.A., you can visit our website at www.whirlpool.com or call us at 1-800-253-1301. In Canada, visit our website at www.whirlpool.ca or call us at 1-800-807-6777.
ATTACH YOUR RECEIPT HERE. PROOF OF PURCHASE IS REQUIRED TO OBTAIN WARRANTY SERVICE. Please have the following information available when you call the Customer eXperience Center: ■■ Name, address and telephone number ■■ Model number and serial number ■■ A clear, detailed description of the problem ■■ Proof of purchase including dealer or retailer name and address WHIRLPOOL® MAJOR APPLIANCE LIMITED WARRANTY IF YOU NEED SERVICE: 1.
Guide d’utilisation Cuisinière électrique MERCI d’avoir acheté ce produit de grande qualité. Enregistrez la cuisinière sur www.whirlpool.ca. Pour référence ultérieure, consignez par écrit les numéros de modèle et de série de votre produit. Vous trouverez les numéros de modèle et de série sur la plaque signalétique située sur le châssis du four, derrière la partie supérieure droite de la porte du four.
SÉCURITÉ DE LA CUISINIÈRE Votre sécurité et celle des autres est très importante. Nous donnons de nombreux messages de sécurité importants dans ce manuel et sur votre appareil ménager. Assurez-vous de toujours lire tous les messages de sécurité et de vous y conformer. Voici le symbole d’alerte de sécurité. Ce symbole d’alerte de sécurité vous signale les dangers potentiels de décès et de blessures graves à vous et à d’autres.
IMPORTANTES INSTRUCTIONS DE SÉCURITÉ AVERTISSEMENT : Pour réduire le risque d’incendie, de choc électrique, de blessures ou de dommages lors de l’utilisation de la cuisinière, il convient d’observer certaines précautions élémentaires dont les suivantes : ■ AVERTISSEMENT : POUR MINIMISER LE RISQUE DE BASCULEMENT DE LA CUISINIÈRE, ELLE DOIT ÊTRE BIEN IMMOBILISÉE PAR DES DISPOSITIFS ANTIBASCULEMENT CORRECTEMENT INSTALLÉS.
IMPORTANTES INSTRUCTIONS DE SÉCURITÉ ■ ■ ■ ■ ■ ■ Pour les cuisinières avec programme d’autonettoyage – ■ Ne pas nettoyer le joint de la porte – Le joint de la porte est essentiel pour l’étanchéité. Veiller à ne pas frotter, endommager ou déplacer le joint.
CONSEILS ÉLÉMENTAIRES D’UTILISATION Technologie d’autonettoyage AquaLift® 1. Éliminer les salissures alimentaires avec le grattoir pour table de cuisson. La technologie d’autonettoyage AquaLift® est une solution de nettoyage inédite permettant de réduire la durée, la température et les odeurs habituellement dégagées par rapport aux méthodes d’autonettoyage traditionnelles.
GUIDE DES CARACTÉRISTIQUES Ce manuel concerne plusieurs modèles. Le modèle que vous avez peut comporter toutes les caractéristiques énumérées ou seulement certaines d’entre elles. Se reporter à ce manuel ou à la section d’aide sur les produits à l’adresse www.whirlpool.ca pour des instructions plus détaillées. AVERTISSEMENT Risque d'empoisonnement alimentaire Ne pas laisser des aliments dans un four plus d'une heure avant ou après la cuisson.
Touche Fonction Instructions BAKE (cuisson au four) Cuisson au four et rôtissage 1. 2. 3. 4. 5. FROZEN BAKE (cuisson de plat surgelé) Plats préparés surgelés 1. Placer le plat sur une grille plate du four à la position 4. Voir la section “Positionnement des grilles et ustensiles de cuisson au four”. REMARQUE : Cuire un seul plat surgelé à la fois lorsque la technologie FrozenBake™ est utilisée. 2. Appuyer sur FROZEN BAKE (cuisson de plat surgelé) 3.
Touche Fonction Instructions DELAY START Mise en marche (mise en différée marche différée) La touche Delay Start (mise en marche différée) sert à entrer l’heure de mise en marche pour un four équipé d’une mise en marche différée. La mise en marche différée ne doit pas être utilisée pour les aliments tels que pains et gâteaux, car ils risquent de ne pas bien cuire. Pour régler une cuisson minutée ou une cuisson minutée différée, voir la section “Durée de cuisson”.
Commandes électroniques du four Affichage des commandes Horloge L’affichage clignote à la mise sous tension ou après une coupure de courant. Appuyer sur CANCEL (annulation) pour effacer. Lorsque le four n’est pas utilisé, l’heure s’affiche. Si la cuisinière est en mode d’économie d’énergie, l’écran est inactif lorsque le four n’est pas utilisé. Cette horloge est réglable sur 12 ou 24 heures. 1. Appuyer sur SETTINGS/CLOCK (réglages/horloge) jusqu’à afficher “CLOCK” (horloge). 2.
Désactivation des signaux sonores de rappel Arrêt au bout de 12 heures Désactive le signal sonore bref qui retentit chaque minute après le signal sonore de fin de programme. 1. Appuyer sur SETTINGS/CLOCK (réglages/horloge) jusqu’à afficher “REMINDER TONE” (signal sonore de rappel). 2. Le réglage en cours s’affiche. 3. Appuyer sur la touche “1” pour changer le réglage. 4. Appuyer sur START (mise en marche) ou CANCEL (annulation) pour quitter et afficher l’heure.
TABLE DE CUISSON AVERTISSEMENT Risque d'incendie ■■ Ne pas ranger de bocaux ou de boîtes de conserve audessus de la table de cuisson. La chute d’un objet lourd ou dur sur la table de cuisson pourrait la fêler. ■■ Afin d’éviter d’endommager la table de cuisson, ne pas laisser un couvercle chaud sur la table de cuisson. Lorsque la table de cuisson refroidit, de l’air peut se trouver piégé entre le couvercle et la table de cuisson, et la vitrocéramique pourrait se casser lorsqu’on enlève le couvercle.
Témoin lumineux d’allumage de la table de cuisson Élément d’ébullition rapide (élément arrière gauche) Le témoin lumineux d’allumage de la table de cuisson se trouve sur le panneau de la console. Lorsqu’un bouton de commande sur le panneau de la console est activé, le témoin lumineux d’allumage de la table de cuisson s’allume. L’élément d’ébullition rapide apporte une plus grande souplesse de cuisson. L’élément d’ébullition rapide peut être utilisé pour faire bouillir des liquides plus vite.
Ustensiles de cuisson Élément de zone de maintien au chaud AVERTISSEMENT IMPORTANT : Ne pas laisser d’ustensile de cuisson vide sur une surface de cuisson, un élément ou un brûleur de surface chauds. Les ustensiles de cuisson idéals doivent avoir un fond plat, des parois droites, un couvercle qui ferme hermétiquement et le matériau doit être d’épaisseur moyenne à forte. Les finis rugueux peuvent égratigner la table de cuisson.
Ustensile Caractéristiques Cuivre ■■ Chauffe très rapidement et uniformément. ■■ Peut laisser des résidus de cuivre. Pour en réduire la quantité, les nettoyer immédiatement après la cuisson. ■■ Peut laisser une tache indélébile ou adhérer à la table de cuisson en cas de surchauffe du matériau. ■■ Suivre les instructions du fabricant. ■■ Utiliser des réglages de température basse. ■■ Peut érafler la table de cuisson.
FOUR Des odeurs et de la fumée sont normales lorsque le four est utilisé les premières fois, ou lorsqu’il est très sale. IMPORTANT : La santé de certains oiseaux est très sensible aux émanations de fumée. L’exposition aux émanations peut entraîner la mort de certains oiseaux. Toujours déplacer les oiseaux dans une autre pièce fermée et bien aérée.
Évent du four Réglage de la température (lorsque le mode Sabbat fonctionne) : 1. Appuyer sur les touches numériques comme indiqué par le texte déroulant afin de sélectionner la nouvelle température. REMARQUE : Le changement de température n’apparaît pas sur l’affichage et aucun son n’est émis. Le texte déroulant s’affiche tel qu’il était avant que l’on n’appuie sur la touche. 2. Appuyer sur START (mise en marche).
Cuisson par convection Température du four En cours d’utilisation, les éléments chauffants du four s’allument et s’éteignent en alternance pour maintenir une température constante, mais leur température peut varier légèrement dans un sens ou dans l’autre du fait de cette alternance. L’ouverture de la porte du four en cours d’utilisation laisse échapper l’air chaud et refroidit le four, ce qui peut modifier la durée nécessaire et le résultat de la cuisson.
Durée de cuisson 4. Appuyer sur les touches numériques pour entrer la durée de cuisson. 5. Appuyer sur DELAY START (mise en marche différée). 6. Appuyer sur les touches numériques pour entrer le nombre d’heures et/ou de minutes dont on souhaite différer l’heure de mise en marche. 7. Appuyer sur START (mise en marche). Lorsque l’heure de mise en marche est atteinte, le four s’allume automatiquement.
ENTRETIEN DE LA CUISINIÈRE Programme de nettoyage 5. Appuyer sur CANCEL (annulation) à la fin du programme. On peut appuyer sur Cancel (annulation) à tout moment pour arrêter le programme de nettoyage. 6. Enlever l’eau résiduelle et les saletés délogées avec une éponge ou un chiffon immédiatement après la fin du programme de nettoyage. La plupart de l’eau initiale contenue dans 2 tasses (16 oz [500 mL]) restera dans le four après la fin du programme de nettoyage.
■■ ■■ VITROCÉRAMIQUE Des ensembles de nettoyage à technologie AquaLift® supplémentaires peuvent être obtenus en commandant la pièce numéro W10423113RP. Voir la section “Accessoires” pour plus d’informations. Méthode de nettoyage : Afin d’éviter d’endommager la table de cuisson, ne pas utiliser de laine d’acier, de nettoyants en poudre abrasifs, d’eau de Javel, de produit antirouille ou d’ammoniaque. 1. Éliminer les salissures alimentaires avec le grattoir pour table de cuisson.
COMMANDES DE LA TABLE DE CUISSON GRILLES DU FOUR Afin d’éviter d’endommager les commandes de la table de cuisson, ne pas utiliser de laine d’acier, de nettoyants abrasifs ou de nettoyant pour four. Afin d’éviter toute détérioration, ne pas laisser tremper les boutons de commande. Lors de la réinstallation des boutons, s’assurer que chaque bouton est à la position OFF (arrêt). Sur certains modèles, ne pas enlever les joints sous les boutons.
DÉPANNAGE Essayer d’abord les solutions suggérées ici. Pour obtenir de l’aide ou des conseils qui permettront peut-être d’éviter une intervention de dépannage, consulter la page de garantie de ce manuel et scanner le code QR avec votre appareil intelligent, ou consultez le site internet http://www.whirlpool.ca. Vous pouvez adresser tous commentaires ou questions par courrier à l’adresse ci-dessous : Au Canada : Whirlpool Brand Home Appliances Customer eXperience Centre 200 - 6750 Century Ave.
Problème Causes et/ou solutions possibles Des dépôts minéraux se forment au fond du four après le programme de nettoyage Le programme de nettoyage a été effectué avec de l’eau du robinet : Utiliser de l’eau distillée ou filtrée pour le programme de nettoyage. Utiliser un chiffon imbibé de vinaigre pour enlever les dépôts. Utiliser ensuite un chiffon humide pour enlever complètement tout résidu de vinaigre.
ACCESSOIRES Pour les accessoires, consulter notre site Web www.whirlpool.ca ou nous contacter au 1-800-807-6777.
GARANTIE LIMITÉE DES GROS APPAREILS MÉNAGERS WHIRLPOOL® ATTACHEZ ICI VOTRE REÇU DE VENTE. UNE PREUVE D’ACHAT EST OBLIGATOIRE POUR OBTENIR L’APPLICATION DE LA GARANTIE.
CLAUSE D’EXONÉRATION DE RESPONSABILITÉ AU TITRE DES GARANTIES IMPLICITES LES GARANTIES IMPLICITES, Y COMPRIS LES GARANTIES APPLICABLES DE QUALITÉ MARCHANDE OU D’APTITUDE À UN USAGE PARTICULIER, SONT LIMITÉES À UN AN OU À LA PLUS COURTE PÉRIODE AUTORISÉE PAR LA LOI. Certains États et provinces ne permettent pas de limitation sur la durée des garanties implicites de qualité marchande ou d’aptitude à un usage particulier, de sorte que la limitation ci-dessus peut ne pas être applicable dans votre cas.