Slide-In Electric Range Control Guide FEATURE GUIDE WARNING: To reduce the risk of fire, electric shock, or injury to persons, read the IMPORTANT SAFETY INSTRUCTIONS, located in your appliance's Owner's Manual, before operating this appliance. This manual covers several models. Your model may have some or all of the items listed. Refer to this manual or the Product Help section of our website at www.whirlpool.com for more detailed instructions. In Canada, refer to the Product Help section at www.whirlpool.
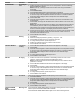
KEYPAD FEATURE INSTRUCTIONS FROZEN BAKE Prepackaged food 1. Position the food on a flat rack in the oven on rack position 4. See the “Positioning Racks and Bakeware” section. NOTE: Cook only 1 package of frozen food at a time when using Frozen Bake™ Technology. 2. Press FROZEN BAKE. 3. Press FROZEN BAKE until the desired food option is displayed. 4. Press the number keypads to set the desired temperature.
KEYPAD FEATURE INSTRUCTIONS DELAY TIME Delayed start The Delay Start keypad is used to enter the starting time for an oven function with a delayed start. Delay Start should not be used for foods such as breads and cakes because they may not bake properly. To set a Timed Cook or a Delayed Timed Cook, see “Cook Time” section. COOK TIME Timed coking Timed cooking allows the oven to be set to turn on at a certain time of day, cook for a set length of time, and/or shut off automatically.
Three Tones End of Cycle Tone � Invalid keypad press Use the Settings/Clock keypad to change the tone settings. Activates or turns off the tones that sound at the end of a cycle. 1. Press SETTINGS/CLOCK until “END TONE” is displayed 2. The current setting will be displayed. 3. Press the “1” keypad to adjust the setting. 4. Press START or CANCEL to exit and display the time of day.
Languages - Scrolling Display Text Language options are English, Spanish and French. 1. Press SETTINGS/CLOCK until “LANGUAGE” is displayed. 2. The current setting will be displayed. 3. Press the “1” or “2” keypad to select the desired language. 4. Press START or CANCEL to exit and display the time of day. Oven Temperature Offset Control IMPORTANT: Do not use a thermometer to measure oven temperature.
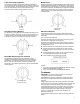
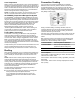
Triple Zone Cooking Element Melt Element The Triple Zone cooking element offers flexibility depending on the size of the cookware. Single size can be used in the same way as a regular element. The dual and triple sizes combine the single, dual, and outer elements and is recommended for larger cookware, larger quantities of food, and home canning. The Melt cooking element offers flexibility due to a wide range of settings between Hi and Melt.
Check for flatness by placing the straight edge of a ruler across the bottom of the cookware. While you rotate the ruler, no space or light should be visible between it and the cookware. Use the following chart as a guide for cookware material characteristics. COOKWARE CHARACTERISTICS Aluminum � Heats quickly and evenly. � Suitable for all types of cooking. � Medium or heavy thickness is best for most cooking tasks.
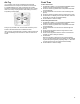
Positioning Racks and Bakeware Sabbath Mode To position a rack, pull it out to the stop position, raise the front edge, and then lift out. Use the following illustration and charts as a guide. Sabbath Mode sets the oven to remain on in a bake setting until turned off. The oven has 7 positions for a flat rack, as shown in the previous illustration and the following table.
Oven Temperature Convection Cooking While in use, the oven elements will cycle on and off as needed to maintain a consistent temperature, but they may run slightly hot or cool at any point in time due to this cycling. Opening the oven door while in use will release the hot air and cool the oven which could impact the cooking time and performance. It is recommended to use the oven light to monitor cooking progress.
Air Fry Cook Time In a convection oven, the fan-circulated hot air continually distributes heat more evenly than the natural movement of air in a standard thermal oven. This movement of hot air helps maintain a consistent temperature throughout the oven, cooking foods more evenly, crisping surfaces while sealing in moisture, and yielding crustier breads. To Set a Timed Cook: 1. Press BAKE or BROIL, or press CONVECT MODES until the desired convection mode appears on the display. 2.
Guide des commandes de la cuisinière électrique autoportante GUIDE DES CARACTÉRISTIQUES AVERTISSEMENT : Pour réduire le risque d’incendie, de décharge électrique ou de blessures, lire les INSTRUCTIONS IMPORTANTES DE SÉCURITÉ du guide d’utilisation de votre appareil avant de faire fonctionner cet appareil. Ce manuel concerne plusieurs modèles. Le modèle que vous avez peut comporter toutes les caractéristiques énumérées ou seulement certaines d’entre elles.
TOUCHE CARACTÉRISTIQUE INSTRUCTIONS START (mise en marche) Démarrage de la cuisson La touche Start (mise en marche) met en marche n’importe quelle fonction du four. Si, après avoir appuyé sur une touche, on n’appuie pas sur Start (mise en marche) dans les 2 minutes qui suivent, la fonction est annulée et l’heure s’affiche. CANCEL (annulation) Fonction de la cuisinière La touche Cancel (annulation) désactive toutes les fonctions du four à l’exception de l’horloge et de la minuterie.
TOUCHE CARACTÉRISTIQUE INSTRUCTIONS AIR FRY (friture à l’air) Air Frying (friture à l’air) 1. Placer les aliments dans le panier à friture à l’air sur une plaque à pâtisserie plate dans le four sur une grille à la position 4. Voir la section « Positionnement des grilles et ustensiles de cuisson au four ». REMARQUE : Si les instructions sur l’emballage conseillent de préchauffer le four, laisser le four préchauffer pendant 17 minutes. 2.
TOUCHE CARACTÉRISTIQUE INSTRUCTIONS START hold 3 sec. to lock (mise en marche [appuyer pendant 3 s pour verrouiller]) Verrouillage des commandes du four Aucune touche ne fonctionne lorsque les commandes sont verrouillées. 1. Vérifier que le four est éteint. 2. Appuyer sur la touche START K (mise en marche K) pendant 3 secondes. 3. Un signal sonore retentit et l’avertissement « Control Locked » (commandes verrouillées) défile, puis « Locked » (verrouillé) s’affiche. 4.
Settings (réglages) Désactivation des signaux sonores de rappel De nombreuses fonctions du four peuvent être réglées pour répondre à vos besoins. La touche Settings/Clock (réglages/horloge) sert à effectuer ces ajustements. Désactive le signal sonore bref qui retentit chaque minute après le signal sonore de fin de programme. 1. Appuyer sur SETTINGS/CLOCK (réglages/horloge) jusqu’à afficher « REMINDER TONE » (tonalité de rappel). 2. Le réglage en cours s’affiche. 3.
Activation du mode Sabbath (Sabbat) (une seule fois) : 1. Appuyer sur SETTINGS/CLOCK (réglages/horloge) jusqu’à afficher « SABBATH » (sabbat). 2. Le réglage en cours s’affiche. 3. Appuyer sur la touche « 1 » pour changer le réglage. 4. Appuyer sur START (mise en marche) ou CANCEL (annulation) pour quitter et afficher l’heure. Utilisation de la table de cuisson AVERTISSEMENT Langue du texte inscrit sur l’affichage Les options de langue sont l’anglais, l’espagnol et le français. 1.
� Afin d’éviter d’endommager la table de cuisson, ne pas laisser d’objets qui pourraient fondre, comme du plastique ou du papier d’aluminium, toucher une partie quelconque de la table de cuisson. � Afin d’éviter d’endommager la table de cuisson, ne pas l’utiliser en guise de planche à découper. � Utiliser des ustensiles de cuisson de la même taille environ que la surface de cuisson. L’ustensile de cuisson ne doit pas dépasser de plus de 1/2 po (1,3 cm) hors de la zone de cuisson. A.
Élément faire fondre L’élément Melt (faire fondre) offre plus de souplesse de cuisson grâce à une grande amplitude de réglages entre Hi (élevé) et Melt (faire fondre). L’option de chauffage HI Heat (chaleur élevée) peut être utilisée pour faire bouillir rapidement de petites quantités de liquide. Pour réduire le réglage du niveau de puissance, tourner le bouton dans le sens horaire.
USTENSILES DE CUISSON CARACTÉRISTIQUES Acier émaillé en porcelaine ou fonte émaillée � Voir les points acier inoxydable ou fonte. � Les ustensiles de cuisson au four en émail vitrifié dépourvus d’une base métallique peuvent adhérer à la table de cuisson en cas de surchauffe du matériau. Acier inoxydable � Chauffe rapidement, mais inégalement. � Un fond ou une base d’aluminium ou de cuivre sur l’acier inoxydable procure un chauffage uniforme.
Panier à friture à l’air Cuisson au four et rôtissage Lors de l’utilisation de la fonction Air Fry (friture à l’air), placer le panier de friture à l’air sur plaque à pâtisserie de grande taille. Placer le panier et la plaque au milieu du four pour augmenter la circulation d’air. Éviter d’utiliser plus d’un panier pour éviter la cuisson irrégulière.
Technologie Frozen Bake™ (cuire congelé) La technologie Frozen Bake™ (cuire congelé) peut servir à cuire des plats préparés surgelés sans préchauffer le four et sans brunir les aliments. Quatre options préprogrammées de plats sont disponibles : Pizza, lasagne, croquettes/frites et tarte. La technologie Frozen Bake™ (cuire congelé) doit être utilisée uniquement pour ce type de produit. Cuire un seul plat surgelé à la fois lorsque la technologie Frozen Bake™ (cuire congelé) est utilisée.
Cook Time (durée de cuisson) Réglage d’une cuisson minutée : 1. Appuyer sur BAKE (cuisson au four), BROIL (gril) ou CONVECT MODES (modes de cuisson par convection) jusqu’à afficher à l’écran le mode de convection souhaité. 2. Appuyer sur les touches numériques pour entrer une température autre que celle qui est affichée. 3. Appuyer sur COOK TIME (durée de cuisson). Le témoin lumineux de Cook Time (durée de cuisson) du four s’allume. 4. Appuyer sur les touches numériques pour entrer la durée de cuisson. 5.
Guía de controles de la estufa autónoma eléctrica GUÍA DE FUNCIONES ADVERTENCIA: A fin de reducir el riesgo de incendio, choque eléctrico o lesiones personales, lea las INSTRUCCIONES IMPORTANTES DE SEGURIDAD que se encuentran en el Manual del propietario, antes de usar el electrodoméstico. Este manual abarca varios modelos. Su modelo puede contar con algunos o todos los elementos enumerados. Consulte este manual o la sección de Ayuda del producto de nuestro sitio web en www.whirlpool.
TECLA FUNCIÓN INSTRUCCIONES BAKE (Hornear) Hornear y asar 1. Presione BAKE (Hornear). 2. Presione las teclas numéricas para fijar la temperatura deseada. Si la temperatura que se ingresó no está dentro del rango de temperaturas permitidas, aparecerá la temperatura mínima o máxima permitida. Ingrese una temperatura dentro del rango permitido. 3. Presione TIMER (Asar a la parrilla). 4. Para cambiar la temperatura, repita los pasos 2 y 3. 5. Presione CANCEL (Cancelar) cuando haya terminado.
TECLA FUNCIÓN INSTRUCCIONES AIR FRY (Freído sin aceite) Air frying (Freído sin aceite) 1. Ubique los alimentos en la canasta para freír sin aceite en hoja para hornear plana del horno en la posición de parrilla 4. Consulte la sección “Colocación de las parrillas y los utensilios para hornear”. NOTA: Si las instrucciones del paquete recomiendan precalentar el horno, permita que se precaliente por 17 minutos. 2.
TECLA FUNCIÓN INSTRUCCIONES START (Inicio) oprima por 3 sec. para bloquear Bloqueo de controles del horno Cuando los controles estén bloqueados, no funcionará ninguna tecla. 1. Verifique que el horno esté apagado. 2. Oprima y sostenga el botón de START K (Inicio) durante 3 segundos. 3. Sonará un tono y se mostrará “Control Locked” (Bloqueo de control); luego se mostrará en la pantalla “Locked” (Bloqueado). 4. Repita para desbloquear. SETTINGS/CLOCK (Ajustes/Reloj) Ahorro de energía 1.
Settings (Ajustes) Deshabilitar los tonos recordatorios Muchas características del control del horno pueden regularse para satisfacer sus necesidades personales. Estos cambios se hacen con la tecla Settings/Clock (Ajustes/Reloj). Apaga el tono breve que se repite cada 1 minuto después de los tonos de fin de ciclo. 1. Presione SETTINGS/CLOCK (Ajustes/Reloj) hasta que aparezca en la pantalla “REMINDER TONE” (Tono recordatorio). 2. Aparecerá el ajuste actual. 3.
Para activar la función del modo Sabbath (Sabbat) (solo una vez): 1. Presione SETTINGS/CLOCK (Ajustes/Reloj) hasta que aparezca en la pantalla “SABBATH” (Sabbat). 2. Aparecerá el ajuste actual. 3. Presione la tecla “1” para configurar el ajuste. 4. Presione START (Inicio) o CANCEL (Cancelar) para salir y para que se muestre la hora del día. Uso de la superficie de cocción ADVERTENCIA Idiomas - Texto que se desplaza en la pantalla Las opciones de idioma son inglés, español y francés. 1.
� Para evitar que se dañe la superficie de cocción, no deje que los objetos de materiales que pueden derretirse, como plástico o papel aluminio, toquen alguna parte de la superficie de cocción. � Para evitar que se dañe la superficie de cocción, no la use como tabla para cortar. � Utilice utensilios de cocina que tengan más o menos el mismo tamaño que el área de cocción de la superficie. Los utensilios de cocina no deben extenderse más de 1/2" (1,3 cm) fuera del área. A. Área de cocción de la superficie B.
Elemento Melt (Derretir) Utensilios de cocina El elemento de cocción Melt (derretir) ofrece flexibilidad debido a una variedad de ajustes entre Hi (alta) y Melt (derretir). La opción de calor Hi (Alto) puede usarse para hervir rápidamente pequeñas cantidades de líquido. Para reducir el ajuste de intensidad, gire la perilla hacia la derecha. El ajuste Melt (Derretir) se ha diseñado para alimentos delicados que requieren un calor bajo, por ejemplo para derretir chocolate o mantener salsas calientes.
UTENSILIOS DE COCINA CARACTERÍSTICAS Cobre � Se calienta de manera muy rápida y uniforme. � Puede dejar residuos de cobre que se pueden atenuar si se limpian inmediatamente después de la cocción. � Puede dejar manchas o adherencias permanentes en la superficie de cocción si se calienta en exceso. Barro cocido � Siga las instrucciones del fabricante. � Use con ajustes de calor bajos. � Podría rayar la superficie de cocción.
3 parrillas (con convección): Use las posiciones de parrilla 2 y 7, y una parrilla de horno de máxima capacidad en la posición de parrilla 5. Utensilios para hornear Para una cocción uniforme, el aire caliente debe poder circular. Deje 2" (5 cm) libres alrededor del utensilio para hornear y las paredes del horno. Asegúrese de que ningún utensilio para hornear esté directamente encima de otro.
Tecnología Frozen Bake™ (Horneado de congelados) La tecnología Frozen Bake™ (Horneado de congelados) se puede usar para cocinar alimentos congelados envasados previamente sin que sea necesario precalentar el horno y sin que los alimentos se doren en exceso. Se pueden elegir 4 opciones preprogramadas para alimentos: Pizza, lasaña, croquetas/papas fritas y tarta. La tecnología Frozen Bake™ (Horneado de congelados) debe usarse solamente para estos alimentos.
Cook Time (Tiempo de cocción) Para fijar una cocción programada: 1. Presione BAKE o BROIL (Hornear o Asar), o CONVECT MODES (Modos de cocción por convección) hasta que el modo de cocción por convección deseado aparezca en la pantalla. 2. Presione las teclas numéricas para ingresar una temperatura diferente de la que aparece en la pantalla. 3. Presione COOK TIME (Tiempo de cocción). La luz indicadora de tiempo de cocción del horno se iluminará. 4.