
Owner's Manual


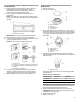

Table Of Contents
- RANGE SAFETY
- Range Safety
- RANGE MAINTENANCE AND CARE
- General Cleaning
- Self-Cleaning Cycle (on some models)
- INSTALLATION INSTRUCTIONS
- REQUIREMENTS
- Tools and Parts
- Location Requirements
- Electrical Requirements
- Gas Supply Requirements
- INSTALLATION
- Unpack Range
- Install Anti-Tip Bracket
- Adjust Leveling Legs
- Level Range
- Make Gas Connection
- Verify Anti-Tip Bracket Is Installed and Engaged
- Electronic Ignition System
- Remove/Replace Drawer
- Oven Door
- Complete Installation
- GAS CONVERSIONS
- Propane Gas Conversion
- Natural Gas Conversion
- Adjust Flame Height
- Moving the Range
- SECURITE DE LA CUISINIERE
- Securite de la cuisiniere
- ENTRETIEN ET REPARATION DE LA CUISINIERE
- Nettoyage general
- Programme d'autonettoyage (sur certains modeles)
- INSTRUCTIONS D'INSTALLATION
- EXIGENCE
- Outils et pieces
- Exigences d'emplacement
- Specifications electriques
- Specifications de l'alimentation en gaz
- INSTALLATION
- Deballage de la cuisiniere
- Installation de la bride antibasculement
- Reglage des pieds de nivellement
- Reglage de l'aplomb de la cuisiniere
- Raccordement au gaz
- Verifier que la bride antibasculement est bien installee et engagee
- Systeme d'allumage electronique
- Depose et reinstallation du tiroir
- Porte du four
- Achever l'installation
- CONVERSIONS POUR CHANGEMENT DE GAZ
- Conversion pour l'alimentation au propane
- Conversion pour l'alimentation au gaz naturel
- Reglage de la taille des flammes
- Deplacement de la cuisiniere

19
To Convert Gas Pressure Regulator (Propane Gas
to Natural Gas)
1. Remove the premium storage drawer, warming drawer or
baking drawer or premium storage drawer. See the
Remove/Replace Drawer, Storage Drawer or Warming
Drawer or Premium Storage Drawer section.
2. Locate gas pressure regulator at rear of the drawer
compartment.
NOTE: On models with a warming drawer or baking drawer,
an access cover must be removed to access the gas pressure
regulator.
A. Gas pressure regulator
IMPORTANT: Do not remove the gas pressure regulator.
3. Remove plastic cover from gas pressure regulator cap.
4. Turn gas pressure regulator cap counterclockwise with a 5/8"
(1.6 cm) combination wrench to remove.
NOTE: Do not remove the spring beneath the cap.
A. Plastic cover
B. Gas pressure regulator cap with hollow end facing out
C. Gas pressure regulator cap with solid end facing out
D. Washer
E. Gas pressure regulator cap
5. Turn over the gas pressure regulator cap and reinstall on
regulator so that the solid end faces out and the marking
“↓NG” is facing the direction shown in the above drawing.
6. Replace plastic cover over gas pressure regulator cap.
To Convert Surface Burners (Propane Gas to
Natural Gas)
1. Remove burner cap.
2. Remove the burner base.
A. Igniter electrode
B. Burner cap
C. Gas tube opening
D. Burner base
3. Apply masking tape to the end of a 9/32" (7 mm) nut driver to
help hold the gas orifice spud in the nut driver while changing
it. Press nut driver down onto the gas orifice spud and remove
by turning it counterclockwise and lifting out. Set gas orifice
spud aside.
A. Igniter electrode
B. Orifice spud
C. Orifice spud holder
D. Screws
4. Gas orifice spuds are stamped with a number on the side.
Replace the Propane gas orifice spud with the correct Natural
gas orifice spud.
A. Stamped number
Refer to the following chart for the correct Natural gas orifice
spud placement.
Natural Gas Orifice Spud Chart
Burner Rating Size (mm) ID Number
15,000 BTU 1.75 175
9,500 BTU 1.35 135
5,000 BTU 1.00 100
NOTE: Refer to the model/serial/rating plate located on the
oven frame behind the top right-hand side of the oven door for
proper sizing of spuds for each burner location.
5. Place Propane gas orifice spuds in the orifice spud bag.
IMPORTANT: Keep the Propane gas orifice spuds in case of
reinstallation with Propane gas.
6. Replace the burner base.
7. Replace burner cap.