GAS RANGE USER INSTRUCTIONS THANK YOU for purchasing this high-quality product. Register your new range at www.whirlpool.com. In Canada, register your range at www.whirlpool.ca. For future reference, please make a note of your product model and serial numbers. These can be located on the oven frame behind the top right side of the oven door. Model Number __________________________________________ Serial Number________________________________________ Para una versión en español, visite: www.whirlpool.com.
RANGE SAFETY Your safety and the safety of others are very important. We have provided many important safety messages in this manual and on your appliance. Always read and obey all safety messages. This is the safety alert symbol. This symbol alerts you to potential hazards that can kill or hurt you and others. All safety messages will follow the safety alert symbol and either the word “DANGER” or “WARNING.
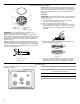
The Anti-Tip Bracket The range will not tip during normal use. However, the range can tip if you apply too much force or weight to the open door without the antitip bracket fastened down properly. WARNING Tip Over Hazard A child or adult can tip the range and be killed. Verify the anti-tip bracket has been properly installed and engaged per installation instructions. Re-engage anti-tip bracket if range is moved. Do not operate range without anti-tip bracket installed and engaged.
FEATURE GUIDE This manual covers several models. Your model may have some or all of the items listed. Refer to this manual or the Frequently Asked Questions (FAQs) section of our website at www.whirlpool.com for more detailed instructions. In Canada, reference the Customer Service section at www.whirlpool.ca. WARNING Food Poisoning Hazard Do not let food sit in oven more than one hour before or after cooking. Doing so can result in food poisoning or sickness.
KEYPAD FEATURE INSTRUCTIONS KEEP WARM Hold warm Food must be at serving temperature before placing it in the warmed oven. 1. Press KEEP WARM. 2. Temperature is set at 170°F (75°C) for 60 minutes (1 hour). 3. Press START. 4. Press CANCEL when finished. NOTE: The oven will automatically turn off after 60 minutes. CONVECT BAKE Convection baking and roasting 1. Press CONVECT BAKE. 2.
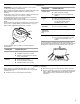
Sealed Surface Burners Burner ports: Check burner flames occasionally for proper size and shape as shown in the previous illustration. A good flame is blue in color, not yellow. Keep this area free of soil and do not allow spills, food, cleaning agents or any other material to enter the burner ports. A To Clean: D B IMPORTANT: Before cleaning, make sure all controls are off and the oven and cooktop are cool. Do not use oven cleaners, bleach or rust removers. 1.
Cookware IMPORTANT: Do not leave empty cookware on a hot surface cooking area, element or surface burner. Ideal cookware should have a flat bottom, straight sides and a wellfitting lid, and the material should be of medium-to-heavy thickness. Rough finishes may scratch the cooktop or grates. Aluminum and copper may be used as a core or base in cookware. Cookware material is a factor in how quickly and evenly heat is transferred, which affects cooking results.
OVEN USE The normal operation of the range will include several noises that may be heard each time the Bake or Broil burners ignite during the cooking cycle: ■ gas valves may make a “popping” sound when opening or closing ■ igniters will “click” several times until a flame is sensed ■ a “poof” sound is heard when a Bake or Broil burner ignites Odors and smoke are normal when the oven is used the first few times, or when it is heavily soiled.
To Bake Using Sabbath Mode: 1. 2. 3. 4. Press BAKE. Press the “up” or “down” arrow pads. Press START. Press and hold the KITCHEN TIMER keypad for 5 seconds. “SAb” will flash in the display. 5. Press START within 5 seconds to enter Sabbath Mode; otherwise, the entire cycle cancels out. “SAb” will stop flashing and remain on in the display. The oven is now in Sabbath Mode and is Sabbath compliant. Pressing the Cancel keypad at any time returns the oven to the normal cooking mode (not Sabbath Mode compliant).
Oven Vent The oven vent releases hot air and moisture from the oven, and should not be blocked or covered. Blocking or covering the oven vent will cause poor air circulation, affecting cooking and cleaning results. Do not set plastics, paper or other items that could melt or burn near the oven vent. A A. Oven vent Baking and Roasting The bake and broil elements or burners cycle on and off in intervals. This feature is automatically activated when the oven is in use.
RANGE CARE Self-Cleaning Cycle How the Cycle Works WARNING Burn Hazard Do not touch the oven during the Self-Cleaning cycle. Keep children away from oven during Self-Cleaning cycle. Failure to follow these instructions can result in burns. IMPORTANT: The health of some birds is extremely sensitive to the fumes given off during the Self-Cleaning cycle. Exposure to the fumes may result in death to certain birds. Always move birds to another closed and well-ventilated room.
PORCELAIN-COATED GRATES AND CAPS CONTROL PANEL AND OVEN DOOR EXTERIOR Food spills containing acids, such as vinegar and tomato, should be cleaned as soon as the cooktop, grates and caps are cool. These spills may affect the finish. To avoid chipping, do not bang grates and caps against each other or hard surfaces such as cast iron cookware. Do not reassemble caps on burners while wet.
TROUBLESHOOTING First try the solutions suggested here. If you need further assistance or more recommendations that may help you avoid a service call, refer to the warranty page in this manual and scan the code there with your mobile device, or visit http://www.whirlpool.com/product_help. In Canada, visit http://www.whirlpool.ca. Contact us by mail with any questions or concerns at the address below: In U.S.A.
PROBLEM Oven will not operate POSSIBLE CAUSES Air in the gas lines. Control is locked. Control is in Demo Mode. Oven burner flames are yellow or noisy Oven temperature too high or too low Convection fan not working Display shows messages Self-Cleaning Cycle will not operate Oven cooking results not what expected 14 Electronic oven control set incorrectly. Range converted improperly. Oven temperature needs adjustment. The convection cycle is in the first 5 minutes of operation. Oven door is open.
Noises PROBLEM POSSIBLE CAUSES SOLUTIONS Surface burner making popping noises Wet burner Allow it to dry. Gas range noises during Bake and Broil operations The following are some normal sounds with the explanations. These sounds are normal operational noises that can be heard each time the Bake or Broil burners ignite during the cycle. Pop Gas valve is opening or cycling on and will make a single pop when it snaps open from the solenoid.
® WHIRLPOOL MAJOR APPLIANCE LIMITED WARRANTY ATTACH YOUR RECEIPT HERE. PROOF OF PURCHASE IS REQUIRED TO OBTAIN WARRANTY SERVICE. Please have the following information available when you call the Customer eXperience Center: ■ Name, address and telephone number ■ Model number and serial number ■ A clear, detailed description of the problem ■ Proof of purchase including dealer or retailer name and address IF YOU NEED SERVICE: 1.
INSTRUCTIONS D'UTILISATION DE LA CUISINIÈRE À GAZ MERCI d'avoir acheté ce produit de grande qualité. Enregistrer la cuisinière sur www.whirlpool.ca. Pour référence ultérieure, consigner par écrit les numéros de modèle et de série de votre produit. Vous trouvez les numéros de modèle et de série sur le châssis du four, derrière la partie supérieure droite de la porte du four.
SÉCURITÉ DE LA CUISINIÈRE Votre sécurité et celle des autres est très importante. Nous donnons de nombreux messages de sécurité importants dans ce manuel et sur votre appareil ménager. Assurez-vous de toujours lire tous les messages de sécurité et de vous y conformer. Voici le symbole d’alerte de sécurité. Ce symbole d’alerte de sécurité vous signale les dangers potentiels de décès et de blessures graves à vous et à d’autres.
La bride antibasculement Dans des conditions de service normales, la cuisinière ne bascule pas. Elle peut cependant basculer si une force ou un poids excessif est appliqué sur la porte ouverte alors que la bride antibasculement n’est pas convenablement fixée. AVERTISSEMENT Risque de basculement Un enfant ou une personne adulte peut faire basculer la cuisinière, ce qui peut causer un décès. Vérifier que la bride antibasculement est bien installée et engagée, conformément aux instructions d'installation.
IMPORTANTES INSTRUCTIONS DE SÉCURITÉ AVERTISSEMENT : Pour réduire le risque d’incendie, de choc électrique, de blessures ou de dommages lors de l’utilisation de la cuisinière, il convient d’observer certaines précautions élémentaires dont les suivantes : ■ AVERTISSEMENT : POUR MINIMISER LE RISQUE DE BASCULEMENT DE LA CUISINIÈRE, ELLE DOIT ÊTRE BIEN IMMOBILISÉE PAR DES DISPOSITIFS ANTIBASCULEMENT CORRECTEMENT INSTALLÉS.
GUIDE DES CARACTÉRISTIQUES Ce manuel couvre différents modèles. Le modèle que vous avez peut comporter toutes les caractéristiques énumérées ou seulement certaines d'entre elles. Se reporter à ce manuel ou à la section Foire Aux Questions (FAQ) de notre site Web sur www.whirlpool.ca pour des instructions plus détaillées. AVERTISSEMENT Risque d'empoisonnement alimentaire Ne pas laisser des aliments dans un four plus d'une heure avant ou après la cuisson.
TOUCHE CARACTÉRISTIQUE INSTRUCTIONS BROIL (cuisson au gril) Cuisson au gril 1. Appuyer sur BROIL (cuisson au gril). 2. Appuyer sur les touches à flèche “vers le haut” ou “vers le bas” de Temp/Time (durée/ température) pour modifier la température par tranches de 5°F (5°C), entre 300°F et 500°F (150°C et 260°C). 3. Appuyer sur START (mise en marche), et laisser le four préchauffer pendant 5 minutes. 4. Placer les ustensiles de cuisson dans le four et fermer la porte du four. 5.
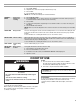
UTILISATION DE LA TABLE DE CUISSON AVERTISSEMENT Réglage : 1. Enfoncer et tourner le bouton dans le sens antihoraire à IGNITE. Tous les brûleurs de surface émettront un déclic. Seul le brûleur dont le bouton de commande est placé sur IGNITE produira une flamme. 2. Tourner le bouton à n'importe quel réglage entre HIGH (élevé) et LOW (bas). Risque d’incendie La flamme d'un brûleur ne devrait pas dépasser le bord du récipient de cuisson.
4. Réinstaller le chapeau de brûleur et s’assurer que les tiges d’alignement sont bien alignées avec le chapeau de brûleur. A 5. Allumer le brûleur. Si le brûleur ne s’allume pas, vérifier l’alignement du chapeau. Si le brûleur ne s’allume toujours pas, ne pas faire soi-même la réparation du brûleur scellé. Contacter un technicien de réparation qualifié. B A. Incorrect B. Correct Taille du brûleur Sélectionner un brûleur qui convient le plus aux ustensiles de cuisson utilisés.
USTENSILE CARACTÉRISTIQUES Acier émaillé en porcelaine ou fonte émaillée ■ Voir acier inoxydable ou fonte. Acier inoxydable ■ Chauffe rapidement, mais inégalement. ■ Un fond ou une base d’aluminium ou de cuivre sur l’acier inoxydable procure un chauffage uniforme. Pour les meilleurs résultats, les ustensiles de cuisson doivent être centrés au-dessus du brûleur tout en étant posés à l’horizontale au fond sur la grille.
Commande de la température du four IMPORTANT : Ne pas utiliser de thermomètre pour mesurer la température du four. Les éléments chauffants s'allument et s'éteignent en alternance pour maintenir une température constante, mais leur température peut varier légèrement dans un sens ou dans l'autre du fait de cette alternance. De nombreux thermomètres réagissent lentement à un changement de température, et ne donneront pas une mesure exacte du fait de cette alternance.
4. Appuyer sur les touches à flèche “vers le haut” ou “vers le bas” pour saisir une durée de cuisson. 5. Appuyer sur DELAY START (heure de mise en marche). Le témoin lumineux de l’heure de mise en marche s’allume. 6. Appuyer sur les touches à flèche “vers le haut” ou “vers le bas” pour saisir une heure de mise en marche. 7. Appuyer sur START (mise en marche). 8. Appuyer sur la touche KITCHEN TIMER (minuterie) pendant 5 secondes. “SAb” clignote sur l'affichage. 9.
Cuisson au four et rôtissage Les éléments de cuisson au four et au gril ou brûleurs s'allument et s'éteignent par intermittence. Cette caractéristique s'active automatiquement lorsque le four est en marche. Avant la cuisson au four et le rôtissage, placer les grilles tel qu’indiqué à la section “Positionnement des grilles et des ustensiles de cuisson”. Lors du rôtissage, il n’est pas nécessaire d'attendre la fin du préchauffage du four avant d’y placer l’aliment, sauf si la recette le recommande.
ENTRETIEN DE LA CUISINIÈRE Programme d’autonettoyage AVERTISSEMENT Risque de brûlures Ne pas toucher le four au cours du programme d'autonettoyage. Garder les enfants loin du four au cours du programme d'autonettoyage. Le non-respect de ces instructions peut causer des brûlures. IMPORTANT : Certains oiseaux sont extrêmement sensibles aux émanations qui surviennent durant le programme d’autonettoyage. L’exposition aux émanations peut entraîner la mort de certains oiseaux.
ACIER INOXYDABLE (sur certains modèles) COMMANDES DE LA TABLE DE CUISSON REMARQUE : Afin d’éviter d'endommager les surfaces en acier inoxydable, ne pas utiliser de tampons à récurer savonneux, de nettoyants abrasifs, de crème à polir pour table de cuisson, de tampons en laine d’acier, de chiffons de lavage rudes ou d'essuietout abrasifs. Les surfaces en acier inoxydable pourraient subir des dommages, même en cas d’utilisation limitée ou non renouvelée.
DÉPANNAGE Essayer d'abord les solutions suggérées ici. Pour obtenir de l'aide ou des conseils qui permettront peut-être d'éviter une intervention de dépannage, consulter la page de garantie de ce manuel et scanner le code QR avec votre appareil intelligent, ou consultez le site Internet http://www.whirlpool.ca pour des conseils qui vous permettront peut-être d'éviter une intervention de dépannage.
PROBLÈME Les résultats de cuisson ne sont pas les résultats prévus CAUSES POSSIBLES Ustensiles de cuisson inappropriés. Le bouton de commande est réglé sur un niveau de chaleur incorrect. La cuisinière n’est pas d'aplomb. Le four ne fonctionne pas Il y a de l'air dans les conduites de gaz. La commande est verrouillée. L'appareil est au mode de démonstration. Les flammes du brûleur du four sont jaunes ou bruyantes. La commande électronique du four est mal réglée.
PROBLÈME Les résultats de cuisson au four ne sont pas les résultats prévus CAUSES POSSIBLES La cuisinière n’est pas d'aplomb. Le réglage de température était incorrect. Il faut ajuster la température du four. Le four n’a pas été préchauffé. Les grilles ont été positionnées de façon inappropriée. La circulation d’air est insuffisante autour des ustensiles de cuisson. Brunissage plus foncé des aliments à cause d’ustensiles de cuisson plus ternes ou plus foncés.
ACCESSOIRES Pour les accessoires, consulter notre site Web www.whirlpool.ca ou nous contacter au 1-800-807-6777.
GARANTIE LIMITÉE DES GROS APPAREILS MÉNAGERS WHIRLPOOL® ATTACHEZ ICI VOTRE REÇU DE VENTE. UNE PREUVE D’ACHAT EST OBLIGATOIRE POUR OBTENIR L'APPLICATION DE LA GARANTIE.
W10719737A SP PN W10734488A ® /™ ©2014 Whirlpool. Used under license in Canada. All rights reserved. Utilisé sous licence au Canada. Tous droits réservés. 8/14 Printed in U.S.A. Imprimé aux É.-U.