
Owner's Manual
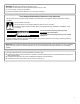
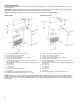
Table Of Contents
- RANGE SAFETY
- Range Safety
- RANGE MAINTENANCE AND CARE
- General Cleaning
- Clean Cycle
- INSTALLATION INSTRUCTIONS
- REQUIREMENTS
- Tools and Parts
- Location Requirements
- Electrical Requirements
- Gas Supply Requirements
- INSTALLATION
- Unpack Range
- Install Anti-Tip Bracket
- Adjust Leveling Legs
- Level Range
- Make Gas Connection
- Install Griddle (on some models)
- Verify Anti-Tip Bracket Is Installed and Engaged
- Electronic Ignition System
- Remove/Replace Drawer (On some models)
- Oven Door
- Complete Installation
- GAS CONVERSIONS
- Propane Gas Conversion
- Natural Gas Conversion
- Adjust Flame Height
- Moving the Range
- SECURITE DE LA CUISINIERE
- Securite de la cuisiniere
- ENTRETIEN ET REPARATION DE LA CUISINIERE
- Nettoyage general
- Programme de nettoyage
- INSTRUCTIONS D'INSTALLATION
- EXIGENCE
- Outils et pieces
- Exigences d'emplacement
- Specifications electriques
- Specifications de l'alimentation en gaz
- INSTALLATION
- Deballage de la cuisiniere
- Installation de la bride antibasculement
- Reglage des pieds de nivellement
- Reglage de l'aplomb de la cuisiniere
- Raccordement au gaz
- Installation de la plaque a frire (Sur certains modeles)
- Verifier que la bride antibasculement est bien installee et engagee
- Systeme d'allumage electronique
- Depose et reinstallation du tiroir (Sur certains modeles)
- Porte du four
- Achever l'installation
- CONVERSIONS POUR CHANGEMENT DE GAZ
- Conversion pour l'alimentation au propane
- Conversion pour l'alimentation au gaz naturel
- Reglage de la taille des flammes
- Deplacement de la cuisiniere
- SEGURIDAD DE LA ESTUFA
- Seguridad de la estufa
- CUIDADO Y MANTENIMIENTO DE LA ESTUFA
- Limpieza General
- Ciclo de limpieza
- INSTRUCCIONES DE INSTALACION
- REQUISITOS
- Herramientas y piezas
- Requisitos de ubicacion
- Requisitos electricos
- Requisitos del suministro de gas
- INSTALACION
- Desempaque la estufa
- Instalacion del soporte anti-vuelco
- Regule las patas niveladoras
- Nivelacion de la estufa
- Conexion del suministro de gas
- Instalacion de la plancha (En algunos modelos)
- Verifique que el soporte antivuelco este instalado y enganchado
- Sistema de encendido electronico
- Quite/vuelva a colocar el cajon (En algunos modelos)
- Puerta del horno
- Completar la instalacion
- CONVERSIONES DE GAS
- Conversion a gas propano
- Conversion a gas natural
- Como ajustar la altura de la llama
- Como mover la estufa

3
WARNING: Gas leaks cannot always be detected by smell.
Gas suppliers recommend that you use a gas detector approved by UL or CSA.
For more information, contact your gas supplier.
If a gas leak is detected, follow the “What to do if you smell gas” instructions.
Your safety and the safety of others are very important.
We have provided many important safety messages in this manual and on your appliance. Always read and obey all safety
messages.
This is the safety alert symbol.
This symbol alerts you to potential hazards that can kill or hurt you and others.
All safety messages will follow the safety alert symbol and either the word “DANGER” or “WARNING.” These
words mean:
DANGER
You can be killed or seriously injured if you don't
immediately follow instructions.
WARNING
You can be killed or seriously injured if you don’t follow
instructions.
All safety messages will tell you what the potential hazard is, tell you how to reduce the chance of injury, and tell you what can
happen if the instructions are not followed.
IMPORTANT: Do not install a ventilation system that blows air downward toward this gas cooking appliance. This type of ventilation
system may cause ignition and combustion problems with this gas cooking appliance resulting in personal injury or unintended
operation.
In the State of Massachusetts, the following installation instructions apply:
■ Installation and repairs must be performed by a qualified or licensed contractor, plumber, or gas fitter qualified or licensed by the
State of Massachusetts.
■ Acceptable Shut-off Devices: Gas Cocks and Ball Valves installed for use shall be listed.
■ A flexible gas connector, when used, must not exceed 4 feet (121.9 cm).