USER INSTRUCTIONS GAS RANGE THANK YOU for purchasing this high-quality product. Register your new range at www.whirlpool.com. In Canada, register your range at www.whirlpool.ca. For future reference, please make a note of your product model and serial numbers. These can be located on the oven frame behind the top right side of the oven door. Model Number__________________________________________ Serial Number__________________________________________ Table of Contents RANGE SAFETY..........................
RANGE SAFETY WARNING: If the information in these instructions is not followed exactly, a fire or explosion may result causing property damage, personal injury or death. – Do not store or use gasoline or other flammable vapors and liquids in the vicinity of this or any other appliance. – WHAT TO DO IF YOU SMELL GAS: • Do not try to light any appliance. • Do not touch any electrical switch. • Do not use any phone in your building. • Immediately call your gas supplier from a neighbor's phone.
The Anti-Tip Bracket The range will not tip during normal use. However, the range can tip if you apply too much force or weight to the open door without the anti-tip bracket fastened down properly. WARNING Tip Over Hazard A child or adult can tip the range and be killed. Verify the anti-tip bracket has been properly installed and engaged per installation instructions. Re-engage anti-tip bracket if range is moved. Do not operate range without anti-tip bracket installed and engaged.
KEY USAGE TIPS AquaLift® Self-Cleaning Technology Surface Burners The burner bases and caps must be properly positioned before cooking. Your range comes with three sizes of burners and caps. Each round burner base is marked with a letter indicating the burner size.
FEATURE GUIDE These instructions cover several models. Your model may have some or all of the items listed. Refer to these instructions or the Frequently Asked Questions (FAQs) section of our website at www.whirlpool.com for more detailed instructions. In Canada, visit our website at www.whirlpool.ca. Keypad Feature Instructions Oven Power Oven Function Power The Oven Power keypad begins oven function and wakes it from sleep mode.
Touch Panel Setup and Demo Mode 1. Select STORE DEMO MODE to enter Demo Mode. OR 1. Select NEXT to enter into product use. 2. Follow the prompts on the display screen to select a language, set up Wi-Fi/connect to network, accept the terms of service, and set the time. NOTE: The display screen will show the time and date (default screen/standby mode). 3. If you selected Store Demo Mode, select TRY THE PRODUCT to explore various features and options of the product.
Cooking Method Feature Instructions CONVECT BAKE Convection baking 1. Select CONVECT BAKE. 2. Select the desired temperature by scrolling left to right or manually by selecting the grid in the upper right corner and entering the convect bake temperature into the keypad. 3. Select START to begin preheating. There will be a beep when preheating is complete. (Optional) To quickly preheat the oven, see the “Rapid” section for more information in this section. 4. Press the Cancel keypad when finished.
Favorites NOTE: A select set of Favorites and suggestions may be automatically shown on the Home screen based on your meal times. To save a recipe, select the Favorites keypad (heart icon) and follow the prompts on the screen to customize your favorites. Add an image or name to the favorite to customize it to your preferences. The Favorites feature stores the oven mode and temperature for your favorite recipe.
Tools Sound Volume Set sound volume preferences. The Tools keypad allows you access to functions and customization options for your oven. These tools allow you to set the clock, change the oven temperature between Fahrenheit and Celsius, turn the audible signals and prompts on and off, adjust the oven calibration, change the language, and more. Select the Tools keypad to view the Tools features. See the “More Modes” section for more information.
More Modes Sabbath Mode Temperature Calibration For guidance on usage and a complete list of models with Sabbath Mode, visit www.star-k.org. The Sabbath Mode sets the oven to remain on in a bake setting until disabled. When the Sabbath Mode is activated, only the Bake cycle will operate. All other cooking and cleaning cycles are disabled. No tones will sound, and the displays will not indicate temperature changes.
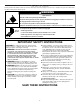
COOKTOP WARNING A B C E Fire Hazard D Do not let the burner flame extend beyond the edge of the pan. Turn off all controls when not cooking. A. Burner cap B. Gas tube opening C. Burner base Failure to follow these instructions can result in death or fire. Electric igniters automatically light the surface burners when control knobs are turned to Ignite. Before setting a control knob, place filled cookware on the grate. Do not operate a burner using empty cookware or without cookware on the grate. D.
4. Replace the burner base. Each round burner base is marked with a letter indicating the burner size. See the following illustration for burner positions. A The surface grates interlock using the hook on one end of the grate and the indent on the other. To remove the grates, lift the rear of the left grate off the hook, and then lift the front of the right grate off the hook and pull apart. To replace the grates, replace the left grate first.
Cookware IMPORTANT: Do not leave empty cookware on a hot surface cooking area, element, or surface burner. Ideal cookware should have a flat bottom, straight sides, and a well-fitting lid, and the material should be of medium-to-heavy thickness. Rough finishes may scratch the cooktop or coils. Aluminum and copper may be used as a core or base in cookware. However, when used as a base, they can leave permanent marks on the surfaces.
OVEN * If your model has a Max Capacity Oven Rack, the recessed ends must be placed in the rack position above the desired position of the food. See the following illustration. Odors and smoke are normal when the oven is used the first few times or when it is heavily soiled. IMPORTANT: The health of some birds is extremely sensitive to the fumes given off by the oven. Exposure to the fumes may result in death to certain birds. Always move birds to another closed and well-ventilated room.
Temperature Management System Oven Vent The temperature management system electronically regulates the oven heat levels during preheat and Bake to maintain a precise temperature range for optimal cooking results. The bake and broil elements or burners cycle on and off in intervals. On convection range models, the fan will run while preheating and may be cycled on and off for short intervals during bake to provide the best results. This feature is automatically activated when the oven is in use.
Convection Cooking Cook Time In a convection oven, the fan-circulated hot air continually distributes heat more evenly than the natural movement of air in a standard thermal oven. This movement of hot air helps maintain a consistent temperature throughout the oven, cooking foods more evenly, crisping surfaces while sealing in moisture, and yielding crustier breads. WARNING Food Poisoning Hazard Do not let food sit in oven more than one hour before or after cooking.
RANGE CARE Clean Cycle 5. Press the Cancel keypad at the end of the cycle. Cancel may be pressed at any time to stop the Clean cycle. 6. Remove the residual water and loosened soils with a sponge or cloth immediately after the Clean cycle is complete. Much of the initial 13/4 cups (14 oz [414 mL]) of water will remain in the oven after the cycle is completed. If additional soils remain, leave a small amount of water in the oven bottom to assist with the cleaning.
General Cleaning SURFACE BURNERS IMPORTANT: Before cleaning, make sure all controls are off and the oven and cooktop are cool. Always follow label instructions on cleaning products. For additional information, you can visit our website at www.whirlpool.com. Soap, water, and a soft cloth or sponge are suggested first unless otherwise noted. Food spills containing acids, such as vinegar and tomato, should be cleaned as soon as the cooktop, grates, and caps are cool. These spills may affect the finish.
TROUBLESHOOTING First try the solutions suggested here. If you need further assistance or more recommendations that may help you avoid a service call, refer to the warranty page in this manual or visit producthelp.whirlpool.com. In Canada, visit www.whirlpool.ca. Contact us by mail with any questions or concerns at the address below: In the U.S.A.
Problem Possible Causes and/or Solutions Oven temperature too high or too low Oven temperature needs adjustment: See “Temperature Calibration” in the “More Modes” section. Convection fan not working The convection cycle is in the first 5 minutes of operation: This is normal. The convection fan will start running approximately 5 minutes into the cycle. Oven door is open: If the oven door is opened during convection cooking, the fan will turn off immediately.
Noises Problem Possible Causes and/or Solutions Surface burner making popping noises Wet burner: Allow it to dry. Gas range noises during bake and broil operations The following are some normal sounds with the explanations. These sounds are normal operational noises that can be heard each time the bake or broil burners ignite during the cycle. Pop Gas valve is opening or cycling on and will make a single pop when it snaps open from the solenoid.
WHIRLPOOL® MAJOR APPLIANCE LIMITED WARRANTY ATTACH YOUR RECEIPT HERE. PROOF OF PURCHASE IS REQUIRED TO OBTAIN WARRANTY SERVICE. Please have the following information available when you call the Customer eXperience Center: ■■ Name, address and telephone number ■■ Model number and serial number ■■ A clear, detailed description of the problem ■■ Proof of purchase including dealer or retailer name and address IF YOU NEED SERVICE: 1.
INSTRUCTIONS D’UTILISATION CUISINIÈRE À GAZ MERCI d’avoir acheté ce produit de grande qualité. Enregistrez la cuisinière sur www.whirlpool.ca. Pour référence ultérieure, consignez par écrit les numéros de modèle et de série de votre produit. Vous trouverez les numéros de modèle et de série sur la plaque signalétique située sur le châssis du four, derrière la partie supérieure droite de la porte du four.
SÉCURITÉ DE LA CUISINIÈRE AVERTISSEMENT : Si les renseignements dans ces instructions ne sont pas exactement observés, un incendie ou une explosion peut survenir, causant des dommages au produit, des blessures ou un décès. – Ne pas entreposer ni utiliser de l’essence ou d’autres vapeurs ou liquides inflammables à proximité de cet appareil ou de tout autre appareil électroménager. – QUE FAIRE DANS LE CAS D’UNE ODEUR DE GAZ : • Ne pas tenter d’allumer un appareil.
La bride antibasculement Dans des conditions de service normales, la cuisinière ne bascule pas. Elle peut cependant basculer si une force ou un poids excessif est appliqué sur la porte ouverte alors que la bride antibasculement n’est pas convenablement fixée. AVERTISSEMENT Risque de basculement Un enfant ou une personne adulte peut faire basculer la cuisinière, ce qui peut causer un décès. Vérifier que la bride antibasculement est bien installée et engagée, conformément aux instructions d'installation.
CONSEILS ÉLÉMENTAIRES D’UTILISATION Technologie d’autonettoyage AquaLift® Brûleurs de surface Les bases et les chapeaux des brûleurs doivent être correctement positionnés avant la cuisson. Votre cuisinière est équipée de brûleurs et de chapeaux de 3 tailles. Chaque base de brûleur rond est marquée d’une lettre indiquant la taille du brûleur.
GUIDE DES CARACTÉRISTIQUES Ces instructions concerne plusieurs modèles. Le modèle que vous avez peut comporter toutes les caractéristiques énumérées ou seulement certaines d’entre elles. Se reporter à ces instructions ou à la section d’aide sur les produits à l’adresse www.whirlpool.ca pour des instructions plus détaillées.
Panneau tactile Mode de paramétrage et de démonstration Le panneau tactile regroupe le menu de commande et les commandes des différentes fonctions. Le panneau tactile est très sensible, il suffit d’un léger toucher pour l’activer. Naviguer vers le haut, le bas, la gauche ou la droite pour explorer les différentes options et fonctions. Pour plus d’information sur chaque commande, voir leurs sections respectives dans ce manuel. 1.
Méthodes de cuisson AVERTISSEMENT Risque d'empoisonnement alimentaire Ne pas laisser des aliments dans un four plus d'une heure avant ou après la cuisson. Le non-respect de cette instruction peut causer un empoisonnement alimentaire ou une maladie. Le clavier des méthodes de cuisson permet aux utilisateurs de sélectionner l’une des méthodes de cuisson suivantes en fonction de leur besoin : ■■ Cuisson au four Utiliser: ■■ Cuisson au gril ■■ Cuisson par convection ■■ Grillage par convection 1.
Méthodes de cuisson Caractéristique Instructions KEEP WARM (maintien au chaud) Keep warm (maintien au chaud) Les aliments doivent être à la température de service avant d’être placés dans le four chaud. 1. Sélectionner KEEP WARM (maintien au chaud). 2. Sélectionner la température souhaitée en naviguant vers la gauche et la droite ou manuellement à l’aide de la grille située dans le coin supérieur droit pour saisir la température de cuisson à l’aide du clavier. 3. Appuyer sur la touche mise en marche.
Favoris REMARQUE : Un ensemble de favoris et de suggestions peut être automatiquement affiché à l’écran d’accueil selon l’heure du repas. Pour sauvegarder une recette, sélectionner l’icône des favoris et suivre les étapes à l’écran pour personnaliser les favoris. Ajouter une image ou un nom au favori pour le personnaliser. La fonction des favoris sauvegarde le mode et la température du four pour vos recettes préférées.
Outils Volume sonore Régler les préférences pour le volume sonore. La touche outils permet d’accéder aux fonctions et aux options pour personnaliser. Ces outils permettent de régler l’horloge, d’alterner entre unités Fahrenheit et Celsius pour la température du four, d’activer ou de désactiver les signaux sonores et les messages, de régler le calibrage du four, de choisir la langue et plus. Sélectionner le clavier des outils pour afficher les outils.
Plus de modes Mode Sabbat Calibrage de température Pour obtenir de l’aide concernant l’utilisation de ce produit, ainsi qu’une liste des modèles munis du mode Sabbat, consulter le www.star-k.org. Le mode Sabbat permet au four de continuer à fonctionner sur un réglage de cuisson au four jusqu’à ce qu’on l’éteigne. Lorsque le mode Sabbat est réglé, seul le programme de cuisson au four fonctionne. Tous les autres programmes de cuisson et de nettoyage sont désactivés.
TABLE DE CUISSON Alignement : Veiller à aligner l’ouverture du tube d’arrivée de gaz de la base du brûleur avec le porte-gicleur situé sur la table de cuisson, et à aligner également l’électrode d’allumage avec l’encoche de la base du brûleur. REMARQUE : Chaque base de brûleur rond est marquée d’une lettre indiquant la taille du brûleur. AVERTISSEMENT A Risque d’incendie La flamme d'un brûleur ne devrait pas dépasser le bord du récipient de cuisson.
3. Nettoyer les orifices de brûleur obstrués avec une épingle droite tel qu’indiqué. Ne pas agrandir ni déformer l’orifice. Ne pas utiliser un cure-dents en bois. Si le brûleur a besoin d’être ajusté, contacter un technicien de réparation qualifié. Grilles de surface Les grilles doivent être correctement positionnées avant la cuisson. Les grilles doivent être en affleurement et de niveau pour être en bonne position.
Les ustensiles de cuisson avec surface antiadhésive ne doivent pas être utilisés sous le gril. Vérifier que le récipient est plat en plaçant le bord plat d’une règle en travers du fond du récipient. Lorsque l’on fait tourner la règle, aucun espace ni aucune lumière ne devraient être visibles entre celle-ci et le récipient. Taille du brûleur Sélectionner un brûleur qui convient le plus aux ustensiles de cuisson utilisés. Voir le tableau et l’illustration suivants.
Ustensile Caractéristiques Cuivre ■■ Chauffe très rapidement et uniformément. ■■ Peut laisser des résidus de cuivre. Pour en réduire la quantité, les nettoyer immédiatement après la cuisson. ■■ Peut laisser une tache indélébile ou adhérer à la table de cuisson en cas de surchauffe du matériau. ■■ Mise en conserve à la maison La mise en conserve peut se faire sur une surface de cuisson lisse en verre ou sur une table de cuisson à éléments tubulaires traditionnels.
UTILISATION DU FOUR Des odeurs et de la fumée sont normales lorsque le four est utilisé les premières fois, ou lorsqu’il est très sale. IMPORTANT : La santé de certains oiseaux est très sensible aux émanations de fumée. L’exposition aux émanations peut entraîner la mort de certains oiseaux. Toujours déplacer les oiseaux dans une autre pièce fermée et bien aérée. Le four possède 7 positions pour grille plate, comme indiqué dans l’illustration précédente et le tableau suivant.
Cuisson au four de biscuits et de gâteaux à étages sur deux grilles Préchauffage rapide La fonction Rapid Preheat (préchauffage rapide) peut servir à réduire la durée de préchauffage. Durant le préchauffage rapide, seule une grille doit se trouver dans le four. Les autres grilles doivent être retirées avant de démarrer le préchauffage rapide. Le programme de préchauffage doit être terminé avant de placer de la nourriture dans le four.
Options de cuisson par convection Cuisson au four par convection : cuisson au four sur plusieurs grilles de biscuits, pains, plats en sauce, tartes, tourtes et gâteaux Rôtissage par convection : poulets ou dindes entiers, légumes, rôtis de porc, rôtis de boeuf Cuisson au gril par convection : morceaux plus épais ou inégaux de viande, de poisson ou de volaille Cuisson au gril Pour la cuisson au gril, préchauffer le four pendant 2 minutes avant d’y placer des aliments, à moins que la recette ne recommande au
3. Appuyer sur COOK TIME (durée de cuisson). 4. Appuyer sur les touches numériques pour entrer la durée de cuisson. 5. Appuyer sur STOP TIME (arrêt) correspondant au four sélectionné. 6. Appuyer sur les touches numériques pour entrer l’heure d’arrêt de cuisson. 7. Appuyer sur START (mise en marche). L’heure de mise en marche est calculée automatiquement. Lorsque l’heure de mise en marche est atteinte, le four s’allume automatiquement. Lorsque l’heure d’arrêt est atteinte, le four s’éteint automatiquement.
■■ ■■ Avant d’enlever l’eau résiduelle et les saletés délogées à la fin du programme de nettoyage, insérer un chiffon ou un essuietout entre l’extrémité inférieure de la porte du four et l’avant du châssis, afin d’empêcher l’eau de se déverser sur le devant de la cuisinière et le plancher. PEINTURE MÉTALLIQUE (sur certains modèles) Les saletés cuites suite à plusieurs programmes de cuisson seront plus difficiles à enlever avec le programme de nettoyage.
GRILLES DU FOUR CAVITÉ DU FOUR Méthode de nettoyage : Utiliser régulièrement la technologie AquaLift® pour nettoyer les renversements dans le four. Ne pas utiliser de nettoyants à four. Les éclaboussures alimentaires doivent être nettoyées lorsque le four a refroidi. À haute température, les aliments réagissent avec l’émail et peuvent provoquer la formation de taches, une attaque acide, des piqûres ou des décolorations blanchâtres.
Problème Causes et/ou solutions possibles Les flammes des brûleurs de surface ne sont pas uniformes, sont de teinte jaune et/ou sont bruyantes Orifices de brûleurs obstrués : Voir la section “Brûleurs de surface”. Chapeaux de brûleurs mal positionnés : Voir la section “Brûleurs de surface”. Conversion inappropriée de la cuisinière : Si l’on utilise du gaz propane, contacter un technicien de service ou consulter la section “Garantie” pour des renseignements de contact.
Problème Causes et/ou solutions possibles La cuisson au four ne produit pas les résultats prévus La cuisinière n’est pas d’aplomb : Régler l’aplomb de la cuisinière. Voir les instructions d’installation. Le réglage de la température était incorrect : Revérifier la recette dans un livre de cuisine fiable. La température du four doit être ajustée : Voir “Calibrage température” dans la section “Plus de modes”. Le four n’a pas été préchauffé : Voir la section “Cuisson au four et rôtissage”.
ACCESSOIRES Pour les accessoires, consulter notre site Web www.whirlpool.ca. Si vous avez des problèmes ou des questions, appelez Whirlpool Corporation Connected Appliances au 1-866-333-4591.
GARANTIE LIMITÉE DES GROS APPAREILS MÉNAGERS WHIRLPOOL® ATTACHEZ ICI VOTRE REÇU DE VENTE. UNE PREUVE D’ACHAT EST OBLIGATOIRE POUR OBTENIR L’APPLICATION DE LA GARANTIE.
CLAUSE D’EXONÉRATION DE RESPONSABILITÉ AU TITRE DES GARANTIES IMPLICITES LES GARANTIES IMPLICITES, Y COMPRIS LES GARANTIES APPLICABLES DE QUALITÉ MARCHANDE OU D’APTITUDE À UN USAGE PARTICULIER, SONT LIMITÉES À UN AN OU À LA PLUS COURTE PÉRIODE AUTORISÉE PAR LA LOI. Certains États et provinces ne permettent pas de limitation sur la durée des garanties implicites de qualité marchande ou d’aptitude à un usage particulier, de sorte que la limitation ci-dessus peut ne pas être applicable dans votre cas.
INSTRUCCIONES PARA EL USUARIO DE LA ESTUFA GAS LE AGRADECEMOS la compra de este producto de alta calidad. Registre su nueva estufa en www.whirlpool.com. En Canadá, registre su estufa en www.whirlpool.ca. Para referencia futura, tome nota de los números de modelo y de serie de su producto. Puede encontrarlos en el marco del horno, detrás del lado derecho superior de la puerta del horno.
SEGURIDAD DE LA ESTUFA Su seguridad y la seguridad de los demás es muy importante. Hemos incluido muchos mensajes importantes de seguridad en este manual y en su electrodoméstico. Lea y obedezca siempre todos los mensajes de seguridad. Este es el símbolo de alerta de seguridad. Este símbolo le llama la atención sobre peligros potenciales que pueden ocasionar la muerte o una lesión a usted y a los demás.
Soporte antivuelco La estufa no se volcará durante el uso normal. Sin embargo, se puede volcar si se aplica demasiada fuerza o peso sobre la puerta abierta sin tener el soporte antivuelco adecuadamente sujeto al piso. ADVERTENCIA Peligro de Vuelco Un niño o un adulto puede volcar accidentalmente la estufa y resultar muerto. Verifique que se haya instalado y asegurado debidamente el soporte anti-vuelco según las instrucciones de instalación.
CONSEJOS DE USO ESENCIALES Tecnología autolimpiante AquaLift® Quemadores de superficie Las bases y las tapas de los quemadores deben estar correctamente ubicadas antes de cocinar. La estufa viene con tres tamaños de quemadores y de tapas. La base de cada quemador redondo tiene marcada una letra que indica el tamaño del quemador.
La tapa de cada quemador redondo tiene marcada una letra que indica el tamaño del quemador. Coloque las tapas de los quemadores sobre las bases de los quemadores apropiados. AUX SR Tapa pequeña (AUX) Tapa mediana (SR) Las tapas de los quemadores deben estar niveladas cuando se colocan en la posición correcta. Si las tapas de los quemadores no están en la posición correcta, los quemadores de la superficie no se encenderán.
Panel táctil Configuración y modo de demostración El panel de control aloja el menú de control y los controles de las funciones. Las teclas táctiles son muy sensibles y se activan con un toque ligero. Desplácese hacia arriba, abajo, derecha o izquierda para explorar las distintas opciones y funciones. Para obtener más información acerca de los controles individuales, consulte las secciones respectivas en este manual. 1.
Método de cocción Función Instrucciones BROIL (asado a la parrilla) Asar a la parrilla 1. Seleccione BROIL (Asar a la parrilla). 2. Seleccione la temperatura que desee desplazándose a izquierda o derecha, o manualmente, seleccionando la parrilla en la esquina superior derecha e introduciendo la temperatura de asado a la parrilla en el teclado. 3. Seleccione START (Inicio) para empezar a asar a la parrilla. 4. Presione la tecla cancelar cuando haya finalizado.
Favoritos NOTA: Es posible que la pantalla inicial muestre automáticamente un conjunto seleccionado de favoritos y recomendaciones basado en sus tiempos de cocción. Para guardar una receta, seleccione la tecla favoritos y siga las instrucciones en pantalla para personalizar sus favoritos. Añada una imagen o asigne nombre al favorito para personalizarlo de acuerdo con sus preferencias. La función Favoritos almacena el modo y la temperatura del horno de sus recetas favoritas.
Herramientas La tecla Herramientas permite acceder a funciones y opciones de personalización del horno. Con dichas herramientas puede ajustar el reloj, cambiar la temperatura del horno entre Fahrenheit y Celsius, activar o desactivar las señales y mensajes sonoros, ajustar la calibración del horno o cambiar el idioma, entre otras cosas. Seleccione la tecla Herramientas para ver sus funciones: Para obtener más información, consulte la sección “Otros modos”.
Más modos Modo Sabbath Calibración de la temperatura Para buscar orientación sobre el uso y una lista completa de modelos con modo Sabbath (modo de día de descanso), visite www.star-k.org. El modo Sabbat programa el horno para que permanezca encendido en un ajuste de hornear hasta que se desconecte. Cuando se activa el modo Sabbat, solo funciona el ciclo Bake (hornear). Todos los demás ciclos de cocción y limpieza estarán deshabilitados.
SUPERFICIE DE COCCIÓN ADVERTENCIA A B C E Peligro de Incendio D No permita que la llama del quemador se extienda más allá de la orilla de la cacerola. Apague todos los controles cuando no esté cocinando. A. Tapa del quemador B. Abertura del tubo de gas C. Base del quemador No seguir estas instrucciones puede ocasionar la muerte o incendio. Los encendedores eléctricos encienden automáticamente los quemadores de la superficie cuando las perillas de control se giran hasta IGNITE (Encendido).
4. Vuelva a colocar la base del quemador. La base de cada quemador redondo tiene marcada una letra que indica el tamaño del quemador. Vea en la ilustración siguiente las posiciones de los quemadores. A Rejillas de la superficie Las rejillas deben colocarse correctamente antes de cocinar. Cuando están bien colocadas, las rejillas deben quedar al ras y niveladas. La instalación incorrecta de las rejillas puede dar como resultado desportillados o rayas en la superficie de cocción.
Verifique si está plano colocando el borde derecho de una regla a lo largo del fondo del utensilio de cocina. Mientras rota la regla, no debe verse espacio ni luz entre la regla y el utensilio de cocina. Tamaño del quemador Seleccione un quemador cuyo tamaño sea el más adecuado para el utensilio de cocina. Vea la ilustración y la tabla siguientes.
Utensilios de cocina Características Cobre ■■ Se calienta de manera rápida y uniforme. ■■ Puede dejar residuos de cobre, que disminuirán si se limpia inmediatamente después de la cocción. ■■ Barro cocido Envasado casero Cuando esté haciendo enlatados durante períodos largos, alterne el uso de los quemadores de la superficie entre una tanda y otra. Esto da tiempo para que se enfríen las zonas que se han usado recientemente.
HORNO Los olores y el humo son normales cuando el horno se usa las primeras veces o cuando tiene suciedad profunda. IMPORTANTE: La salud de algunos pájaros es sumamente sensible a los gases emanados por el horno. La exposición a los gases puede ocasionar la muerte de ciertos pájaros. Traslade siempre los pájaros a otro cuarto cerrado y bien ventilado.
Sistema de control de temperatura Ventilación del horno El sistema de control de temperatura regula electrónicamente los niveles de calor del horno durante el precalentamiento y el horneado para mantener una temperatura precisa y obtener resultados de cocción óptimos. Los elementos o quemadores de hornear y asar a la parrilla tendrán ciclos con encendido y apagado a intervalos.
Cocción por convección Tiempo de cocción En un horno por convección, el aire caliente que hace circular el ventilador distribuye el calor continuamente y con más uniformidad que el movimiento natural del aire en un horno térmico estándar. Este movimiento de aire caliente ayuda a mantener una temperatura uniforme en todo el horno, cocina los alimentos más uniformemente y deja las superficies crujientes a la vez que atrapa la humedad y hace que los panes salgan con cortezas más crujientes.
CUIDADO DE LA ESTUFA Ciclo de limpieza 5. Presione la tecla cancelar al final del ciclo. Se puede presionar cancelar en cualquier momento para detener el ciclo de limpieza. 6. Retire el agua residual y la suciedad que se aflojó con una esponja o un paño de inmediato una vez que el ciclo de limpieza esté completo. Gran parte de las 13/4 tazas (14 oz [414 mL]) de agua permanecerá en el horno después de que se complete el ciclo.
■■ QUEMADORES DE SUPERFICIE Para obtener kits de limpieza con tecnología AquaLift® adicionales, haga un pedido de la pieza número W10423113RP. Para obtener más información, vea la sección “Accesorios”. ■■ Las salpicaduras de alimentos que contienen ácidos, como vinagre y tomate, deben limpiarse apenas la superficie de cocción, las rejillas y las tapas estén frías; esos derrames pueden afectar el acabado.
SOLUCIÓN DE PROBLEMAS Pruebe primero las soluciones que aquí se recomiendan. Si necesita asistencia adicional o más recomendaciones que puedan ayudarle a evitar una llamada de servicio técnico, consulte la página de la garantía de este manual o visite producthelp.whirlpool.com. En Canadá, visite www.whirlpool.ca.
Problema Posibles causas y/o soluciones El horno no funciona Hay aire en las líneas de gas: Si es la primera vez que se usa el horno, encienda la perilla de cualquiera de los quemadores de superficie para liberar el aire de las líneas de gas. El control está bloqueado: Consulte “Bloqueo de controles” en la sección “Herramientas”. La estufa está en modo Demo (modo de demostración): El modo de demostración desactiva todos los elementos del horno. Consulte “Información” en la sección “Herramientas”.
Ruidos Problema Posibles causas y/o soluciones El quemador de superficie hace ruidos como estallidos Quemador mojado: Déjelo secar. Ruidos provenientes de la estufa a gas durante el funcionamiento del horneado y el asado a la parrilla A continuación, se indican algunos sonidos normales con las explicaciones. Estos sonidos son ruidos normales del funcionamiento que se pueden escuchar cada vez que se encienden los quemadores para hornear o asar durante el ciclo.
GARANTÍA LIMITADA DE LOS ELECTRODOMÉSTICOS PRINCIPALES DE WHIRLPOOL® ADJUNTE SU RECIBO AQUÍ. SE REQUIERE LA PRUEBA DE COMPRA PARA OBTENER SERVICIO BAJO LA GARANTÍA. Tenga a mano la siguiente información cuando llame al Centro para la eXperiencia del cliente: ■■ Nombre, dirección y número de teléfono ■■ Número de modelo y de serie ■■ Una descripción clara y detallada del problema ■■ Prueba de compra incluido el nombre y la dirección del distribuidor o vendedor SI NECESITA SERVICIO TÉCNICO: 1.
EXCLUSIÓN DE GARANTÍAS IMPLÍCITAS LAS GARANTÍAS IMPLÍCITAS, INCLUYENDO CUALQUIER GARANTÍA IMPLÍCITA DE COMERCIABILIDAD O GARANTÍA IMPLÍCITA DE CAPACIDAD PARA UN PROPÓSITO PARTICULAR, SERÁN LIMITADAS A UN AÑO O AL PERÍODO MÁS CORTO PERMITIDO POR LEY. Algunos estados y provincias no permiten la limitación de la duración de las garantías implícitas de comerciabilidad o capacidad, de modo que la limitación arriba indicada quizá no le corresponda.