
Owners Manual


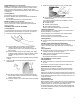


Table Of Contents
- RANGE SAFETY
- Range Safety
- RANGE MAINTENANCE AND CARE
- Self-Cleaning Cycle (on some models)
- General Cleaning
- INSTALLATION INSTRUCTIONS
- REQUIREMENTS
- Tools and Parts
- Location Requirements
- Electrical Requirements - U.S.A. Only
- Electrical Requirements - Canada Only
- INSTALLATION
- Unpack Range
- Install Anti-Tip Bracket
- Adjust Leveling Legs
- Level Range
- Electrical Connection - U.S.A. Only
- Verify Anti-Tip Bracket Is Installed and Engaged
- Warming Drawer or Premium Storage Drawer (on some models)
- Storage Drawer (on some models)
- Oven Door
- Complete Installation
- Moving the Range
- SECURITE DE LA CUISINIERE
- Securite de la cuisiniere
- ENTRETIEN ET REPARATION DE LA CUISINIERE
- Cycle d'autonettoyage (sur certains modeles)
- Nettoyage general
- INSTRUCTIONS D'INSTALLATION
- SPECIFICATIONS
- Outils et pieces
- Exigences d'emplacement
- Specifications electriques ± E.-U. seulement
- Specifications electriques ± Canada seulement
- INSTALLATION
- Deballage de la cuisiniere
- Installation de la bride antibasculement
- Reglage des pieds de nivellement
- Ajustement de l'aplomb de la cuisiniere
- Raccordement electrique ± E.-U. seulement
- Verifier que la bride antibasculement est bien installee et engagee
- Tiroir-rechaud ou tiroir de remisage de qualite superieure (sur certains modeles)
- Tiroir de rangement (sur certains modeles)
- Porte du four
- Achever l'installation
- Deplacement de la cuisiniere
- SEGURIDAD DE LA ESTUFA
- Seguridad de la estufa
- MANTENIMIENTO Y CUIDADO DE LA ESTUFA
- Ciclo de autolimpieza (en algunos modelos)
- Limpieza general
- INSTRUCCIONES DE INSTALACION
- REQUISITOS
- Herramientas y piezas
- Requisitos de ubicacion
- Requisitos electricos, en EE. UU. unicamente
- Requisitos electricos ± Solo en Canada
- INSTALACION
- Desembalaje de la estufa
- Instalacion del soporte antivuelco
- Regule las patas niveladoras
- Nivelacion de la estufa
- Conexion electrica, en EE. UU. unicamente
- Verifique que el soporte antivuelco este instalado y enganchado
- Cajon de calentamiento o cajon de almacenamiento Premium (en algunos modelos)
- Cajon de almacenamiento (en algunos modelos)
- Puerta del horno
- Finalizacion de la instalacion
- Como mover la estufa

5
STAINLESS STEEL (on some models)
NOTE: To avoid damage to stainless steel surfaces, do not use
soap-filled scouring pads, abrasive cleaners, Cooktop Cleaner,
steel-wool pads, gritty washcloths, or abrasive paper towels.
Damage may occur to stainless steel surfaces, even with one-time
or limited use.
Cleaning Method:
Rub in direction of grain to avoid damaging.
■ Affresh
®
Stainless Steel Cleaner Part Number W10355016
(not included):
See the Quick Start Guide for contact information.
METALLIC PAINT (on some models)
Do not use abrasive cleaners, cleaners with bleach, rust
removers, ammonia, or sodium hydroxide (lye) because paint
surface may stain.
CERAMIC GLASS COOKTOP CLEANING
Cleaning Method:
To avoid damaging the cooktop, do not use steel wool, abrasive
powder cleansers, chlorine bleach, rust remover, or ammonia.
1. Remove food/residue with the Cooktop Scraper.
■ For best results, use the Cooktop Scraper while the
cooktop is still warm but not hot to the touch. It is
recommended to wear an oven mitt while scraping the
warm cooktop.
■ Hold the Cooktop Scraper at approximately a 45° angle
against the glass surface and scrape the residue. It will be
necessary to apply pressure in order to remove the
residue.
Allow the cooktop to cool down completely before proceeding
to Step 2.
2. Apply a few dime-sized drops of Cooktop Cleaner to the
affected areas.
■ Rub affresh
®
Cleaner onto the cooktop surface with the
blue Cooktop Cleaning Pad. Some pressure is needed to
remove stubborn stains.
■ Allow the cleaner to dry to a white haze before proceeding
to Step 3.
3. Polish with a clean, dry cloth or a clean, dry paper towel.
■ Repeat steps 1 through 3 as necessary for stubborn or
burned-on stains.
The Complete Cooktop Cleaner Kit is available for order
including the following:
■ Cooktop Scraper
■ Affresh
®
Cooktop Cleaner
■ Blue Cooktop Cleaning Pads
See the Quick Start Guide for ordering information.
COOKTOP CONTROLS
To avoid damage to the cooktop controls, do not use steel wool,
abrasive cleansers, or oven cleaner.
To avoid damage, do not soak knobs. When replacing knobs,
make sure knobs are in the Off position.
On some models, do not remove seals under knobs.
Cleaning Method:
■ Soap and water: Pull knobs straight away from control panel to
remove
CONTROL PANEL AND OVEN DOOR EXTERIOR
To avoid damage to the control panel, do not use abrasive
cleaners, steel-wool pads, gritty washcloths, or abrasive paper
towels.
Cleaning Method:
■ Glass cleaner and soft cloth or sponge: Apply glass cleaner to
soft cloth or sponge, not directly on panel.
■ Affresh
®
Kitchen and Appliance Cleaner Part Number
W10355010 (not included):
See the Quick Start Guide for contact information.
COIL ELEMENTS (on some models)
Cleaning Method:
■ Damp cloth: Make sure control knobs are OFF and elements
are cool.
Do not clean or immerse in water. Soil will burn off when hot.
BURNER BOWLS (on some models)
Before removing or replacing coil elements and burner bowls,
make sure they are cool and the control knobs are in the OFF
position.
Remove the coil element by pushing the edge of the coil element
toward the receptacle. Lift it enough to clear the burner bowl. Pull
the coil element straight away from the receptacle to remove. Lift
out the burner bowl.
Cleaning Method:
Chrome burner bowls
Wash frequently in warm, soapy water. (It is not recommended to
wash chrome bowls in a dishwasher.) A mild abrasive cleaner and
a plastic scrubber can be used to remove stubborn stains.
For heavily soiled bowls, place an ammonia-soaked paper towel
on the stains and allow to soak for a short time, then gently scrub
with a plastic scrubber.