Health & Safety, Use & Care and Installation guide
THANK YOU FOR BUYING A WHIRLPOOL PRODUCT. In order to receive a more complete assistance, please register your appliance on: www.whirlpool.com.au Index Health and Safety guide......................................................................................................................... 3 Use and Care guide PRODUCT DESCRIPTION ............................................................................................................................... 5 APPLIANCE ................................
HEALTH AND SAFETY GUIDE IMPORTANT TO BE READ AND OBSERVED Before using the appliance, read these safety instructions. Keep them nearby for future reference. These instructions and the appliance itself provide important safety warnings, to be observed at all times. The manufacturer declines any liability for failure to observe these safety instructions, for inappropriate use of the appliance or incorrect setting of controls. Very young children (0-3 years) should be kept away from the appliance.
are kink-free and are not crushed. Before using the appliance for the first time, check the water inlet and drain hose for leaks. Make sure that the four feet are stable and resting on the floor, adjusting them as required, and check that the dishwasher is perfectly levelled using a spirit level. ELECTRICAL WARNINGS The rating plate is on the edge of the dishwasher door (visible when the door is open).
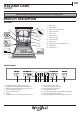
EN USE AND CARE GUIDE Before using the appliance carefully read Health and Safety guide. PRODUCT DESCRIPTION APPLIANCE 1 7 2 8 3 4 5 9 6 11 10 1. 2. 3. 4. 5. 6. 7. 8. 9. 10. 11. 12. Upper rack Foldable flaps Upper rack height adjuster Upper spray arm Lower rack Cutlery basket Lower spray arm Filter Assembly Salt reservoir Detergent and Rinse Aid dispensers Rating plate Control panel Service: 0000 000 00000 12 CONTROL PANEL 1 1. 2. 3. 4. 5. 6. 7.
FIRST TIME USE SALT, RINSE AID AND DETERGENT ADVICE REGARDING THE FIRST TIME USE After installation, remove the stoppers from the racks and the retaining elastic elements from the upper rack. FILLING THE SALT RESERVOIR The use of salt prevents the formation of LIMESCALE on the dishes and on the machine’s functional components. • It is important that the salt reservoir be never empty. • It is important to set the water hardness.
EN Drying PROGRAMS TABLE Program Available options *) Detergent container Tub B Duration of wash program (h:min)**) Water consumption (litres/cycle) Energy consumption (kWh/cycle) 1. Eco 50° 3:10 10,3 0,73 2. 6th Sense 5060° 01:25 - 3:00 7 - 14 0,9 - 1,40 3. Intensive 65° - 2:50 14 1,50 4. Daily 50° - 1:30 12 1,15 5. Silent 50° - 3:30 15 1,15 6. Rapid 30’ 50° - 0:30 9 0,50 7. Cristal 45° - 1:40 11 1,10 8.
OPTIONS AND FUNCTIONS OPTIONS can be selected directly by pressing the corresponding button (see CONTROL PANEL). If an option is not compatible with the selected program see PROGRAMS TABLE, the corresponding LED flashes rapidly 3 times and beeps will sound. The option will not be enabled. DELAY The start of the program may be delayed for a period of time between 0:30 and 24 hours. 1. Select the program and any desired options. Press the DELAY button (repeatedly) to delay the start of the program.
EN DAILY USE 1. CHECK WATER CONNECTION Check that the dishwasher is connected to the water supply and that the top is open. 2. SWITCH ON THE DISHWASHER Press the ON/OFF button. 3. LOAD THE RACKS (see LOADING THE RACKS). 4. FILLING THE DETERGENT DISPENSER (see PROGRAMS TABLE). 5. CHOOSE THE PROGRAM AND CUSTOMISE THE CYCLE Select the most appropriate program in accordance with the type of crockery and its soiling level (see PROGRAMS DESCRIPTION) by pressing the P button.
LOADING THE RACKS UPPER RACK LOWER RACK Load delicate and light dishes: glasses, cups, saucers, low salad bowls. For pots, lids, plates, salad bowls, cutlery etc. Large plates and lids should ideally be placed at the sides to avoid interferences with the spray arm. The lower rack has tip-up supports which can be used in a vertical position when arranging plates or in a horizontal position (lower) to load pans and salad bowls easily.
EN CARE AND MAINTENANCE ATTENTION: Always unplug the appliance when cleaning it and when performing maintenance work.Do not use flammable liquids to clean the machine. The lower spray arm may be removed by pulling it upwards. CLEANING THE DISHWASHER Any marks on the inside of the appliance may be removed using a cloth dampened with water and a little vinegar. The external surfaces of the machine and the control panel can be cleaned using a non-abrasive cloth which has been dampened with water.
TROUBLESHOOTING Your dishwasher may not work properly. Before contacting the Service Centre check if the problem can be solved by going through the following list. PROBLEMS POSSIBLE CAUSES SOLUTIONS The dishwasher won’t start or does not respond to commands. The appliance has not been plugged in properly. Power outage. Insert the plug into the socket. The dishwasher door is not closed. It does not respond to commands. Vigorously push the door until you hear the “click”.
EN INSTALLATION ATTENTION: If the appliance must be moved at any time, keep it in an upright position; if absolutely necessary, it may be tilted onto its back. ELECTRICAL CONNECTION WARNING: Under no circumstances should the water inlet hose be cut as it contains live electrical parts. Before inserting the plug into the electrical socket, make sure that: CONNECTING THE WATER SUPPLY Adaptation of the water supply for installation should only be performed by a qualified technician.
AFTER-SALES SERVICE CONTACTING AFTER-SALES SERVICE When you contact the After-Sales Service, you must provide the codes shown on the rating plate attached to the left or right side inside the door of the dishwasher. The phone number is listed in the warranty booklet or on the website: www.whirlpool.com.
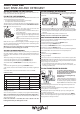
INSTALLATION GUIDE mm EN 590 850 850 590 448 598 min: 0,05 MPa/0,5 Bar max: 1 Mpa/10 Bar min: 400 mm max: 800 mm min.
b a 3 4 a c 5 Whirlpool® is a registered trademark of Whirlpool, USA.