Use and Care Guide and Installation Instructions Guide d’utilisation et d’entretien et Instructions d’installation Smart All-In-One Washer and Dryer Laveuse et sécheuse intelligente combinées Para obtener acceso al Manual de uso y cuidado en español, o para obtener información adicional acerca de su producto, visite: www.whirlpool.com If you have any problems or questions, visit us at www.whirlpool.com. Pour tout problème ou toute question, consulter www.whirlpool.ca.
Table of Contents ALL-IN-ONE WASHER/DRYER SAFETY............................... 2 ACCESSORIES........................................................................ 4 OPERATING INSTRUCTIONS................................................ 5 Control Panel and Features.............................................. 5 Cycle Guides.................................................................... 6 Choosing the Right Detergent...........................................9 Using the Load & Go™ Bulk Dispenser....
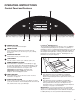
ACCESSORIES INSTALLATION & MAINTENANCE ACCESSORIES FACTORY CERTIFIED PARTS – these three words represent quality parts and accessories designed specifically for your appliance. Time tested engineering that meets our strict quality specifications. FACTORY CERTIFIED PARTS Accessories designed for your appliance: Customize your new washer/dryer with the following genuine Whirlpool accessory. For more information on options and ordering, call 1-866-698-2538 or visit us at: www.whirlpool.com.
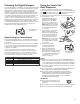
OPERATING INSTRUCTIONS Control Panel and Features 5 2 4:28 3:15 What to Wash REGULAR Temperature WARM 1 1 Spin Speed EXTRA FAST 3 POWER BUTTON Touch to power up the washer/dryer. 2 HOME BUTTON Touch this button and the LCD screen will show the home screen, where you can select your cycle, settings, and options. 3 FAVORITES BUTTON 4 LCD SCREEN 5 REMOTE ENABLE BUTTON 6 4 7 Load & Go™ Bulk Dispenser The Load & Go™ bulk dispenser holds up to 33.8 oz.
Cycle Guides You can use this washer/dryer to wash only, dry only, or wash and dry. This washer/dryer has a unique user interface to help you select the best wash cycle for your load. The “What to Wash/How to Wash” layout guides you to the optimal cycle in two easy steps: First determine what items are in the load that you are trying to wash. Use that to guide your “What to Wash” selection. Then determine how you want the washer to wash them and select the appropriate “How to Wash” selection.
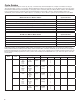
What How Colors Delicates Whites Towels Basic Settings Additional Options Temperature Spin Speed Dry Mode Set Soil Level Rinses Pre-Soak Tumble Fresh™ Wrinkle Shield™ Normal Warm Cool Cold Extra Fast Fast Medium Slow Off Auto Timed Light Normal Heavy 2 3 4 5 X X X Quick Warm Cool Cold Extra Fast Fast Medium Slow Off Auto Timed Light Normal Heavy 2 3 X X X Cold Wash Cool Cold Extra Fast Fast Medium Slow Off Auto Timed Light Normal Heavy 2 3 4 5 X X X Normal Warm Co
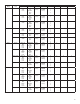
What How Bulky Items Basic Settings Additional Options Temperature Spin Speed Dry Mode Set Soil Level Rinses Pre-Soak Tumble Fresh™ Wrinkle Shield™ Normal Extra Hot Hot Warm Cool Cold Medium Slow Off Auto Timed Light Normal Heavy 2 3 4 5 X X X Quick Extra Hot Hot Warm Cool Cold Medium Slow Off Auto Timed Light Normal Heavy 2 3 X X X Heavy Duty Extra Hot Hot Warm Cool Cold Medium Slow Off Auto Timed Light Normal Heavy 2 3 4 5 X X X Government energy certifications for
Choosing the Right Detergent Use only High Efficiency detergents. The package will be marked “HE” or “High Efficiency.” Low-water washing creates excessive sudsing with a non-HE detergent. Using non-HE detergent will likely result in longer cycle times and reduced rinsing performance. It may also result in component malfunction and, over time, buildup of mold or mildew. HE detergents should be low-sudsing and quick-dispersing to produce the right amount of suds for the best performance.
Using the All-In-One Washer/Dryer First wash cycle without laundry Before washing clothes for the first time, set up the Load & Go™ bulk dispenser (see page 9). Choose the Regular (What to Wash) and Quick (How to Wash) cycle and run it without clothes. Use only HE detergent. This initial cycle serves to ensure the interior is clean and the bulk dispenser is primed and ready for use before washing clothes.
4. Add liquid HE detergent to Load & Go ™ bulk dispenser (if bulk dispenser is not already loaded or if low detergent icon on display is lit), if desired 6. Touch POWER button to turn on washer/dryer Touch until the indicators turn on. 7. Select wash program/cycle 4:28 3:15 See page 9 for instructions on how to fill the liquid detergent bulk dispenser (Dispenser 1). Press the TOOLS button and make sure that the bulk dispenser is active. See Step 11 on page 13.
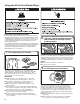
8. Select temperature and spin speed † 4:28 3:15 What to Wash REGULAR Temperature WARM How to Wash NORMAL Spin Speed EXTRA FAST Auto Dry Dry From the home screen, touch the “Temperature” area of the screen to show the Temperature settings available for the cycle/program chosen in Step 7. Touch the desired setting and touch OKAY to confirm that setting. The recommended wash temperature is preset for each cycle. Some preset temperatures can be changed.
10. Select options, if desired † From the home screen, touch the Options icon (at upper right of screen) and the Options screen will show Soil Level, Extra Rinses, Pre-Soak, Tumble Fresh,™ and Wrinkle Shield™ selections. Previously selected “What to Wash” and “How to Wash” options will be shown on the screen. Touch the screen for each option to change its setting. Soil Level Option The Soil Level option allows you to select a Light, Normal, or Heavy soil level setting.
12. Touch START/PAUSE button to begin cycle Setting a delayed start 4:28 3:15 Touch the START/PAUSE button to start the cycle. To pause a cycle in progress, touch the START/PAUSE button once, then touch again to continue the cycle. To cancel a cycle, touch the “X” on the touch screen to the right of the estimated time remaining. Once you touch the START/PAUSE button, you will hear the door lock. The washer/dryer door will remain locked during a wash cycle. 13.
All-In-One Washer/Dryer Maintenance CLEANING THE WASHER/DRYER LOCATION Keep washer/dryer area clear and free from items that would block the airflow for proper dryer operation. This includes clearing piles of laundry in front of the washer/dryer. WASHER/DRYER CARE Recommendations to Help Keep Your Washer/Dryer Clean and Performing at its Best 1. Always use High Efficiency (HE) detergents and follow the HE detergent manufacturer’s instructions regarding the amount of HE detergent to use.
CLEAN WASHER CYCLE REMINDER NON-USE AND VACATION CARE The Clean Washer with affresh® message will flash at the end of a wash cycle when the washer has run 30 wash cycles. This is a reminder to run the Clean Washer with affresh® cycle. If the Clean Washer with affresh® cycle is not run, the message will stop flashing at the end of a wash cycle after running three more regular wash cycles.
CLEANING THE DRAIN PUMP FILTER/ DRAINING RESIDUAL WATER (cont.) 3. Lay a cotton cloth beneath the drain pump filter to absorb any water still in it. Then remove the drain pump filter by turning it counterclockwise. CLEANING THE DRAIN PUMP FILTER/ DRAINING RESIDUAL WATER NOTE: Perform the following procedure every 6 months. 4. Remove large clumps of lint by hand from the filter and place lint in a suitable waste container. Remove remaining residue from the filter by rinsing with water. 1.
TRANSPORTING YOUR WASHER/DRYER 1. Shut off water faucet. Disconnect and drain water inlet hose. 2. If washer/dryer will be moved during freezing weather, follow “Winter Storage Care” directions before moving. 3. Disconnect drain hose from drain system and from back of washer/dryer. 4. Unplug power cord. 5. Place inlet hose and drain hose inside drum. 6. Bundle power cord with a rubber band or cable tie to keep it from hanging onto the ground. IMPORTANT: Call for service to install new transport bolts.
INSTALLATION INSTRUCTIONS Installation Requirements Optional tools: Tools and Parts Gather required tools and parts before starting installation. Tools needed: Flashlight Adjustable or open-end wrenches 3/8" (10 mm) and 1/2" (13 mm) Level Ruler or measuring tape Pliers that open to 19⁄16" (39.5 mm) Bucket Alternate parts: (Not supplied with washer/dryer) Your installation may require additional parts. To order, please refer to toll-free numbers on the back page of this manual.
Location Requirements 24" (610 mm) Proper installation is your responsibility. Check code requirements. Some codes limit, or do not permit, installing washer/dryer in garages, closets, mobile homes, or sleeping quarters. Contact your local building inspector. 331/4" Min. (845 mm) 333/4" Max. (857 mm) 28" (675 mm) 48 15/16" (1243 mm) You will need: n A separate 30 amp circuit. n A grounded electrical outlet located within 2 ft. (610 mm) of either side of washer/dryer. See “Electrical Requirements.
Location Requirements (cont.) Custom cabinet installation: Closet installation: 12" (305 mm) 3" (76 mm) 48 in.2 min. (310 cm2) 12" 9" (229 (305 mm) 3" (76 mm) 4" (102 mm) 4" (102 mm) 1" (25 mm) 3" (76 mm) NOTE: The 12" minimum space above the washer/dryer is required for use of the Load & Go™ bulk dispenser. 1" (25 mm) 24 in.2 min. (155 cm2) 3" (76 mm) NOTE: The 12" minimum space above the washer/dryer is required for use of the Load & Go™ bulk dispenser.
Drain System Drain system can be installed using a floor drain, wall standpipe, floor standpipe, or laundry tub. Select method you need. IMPORTANT: To avoid siphoning, only 41⁄2" (114 mm) of drain hose should be inside standpipe. Always secure drain hose with cable tie. Floor standpipe drain system 1/2" 44.5" (114 mm) Max. 48" 49" max. (125 cm) (1219 mm) Min. 30" 24" min. (60 cm) (762 mm) Minimum diameter for a standpipe drain: 2" (51 mm). Minimum carry-away capacity: 17 gal. (64 L) per minute.
Unpacking Washer/Dryer 2. Remove four transport bolts from washer/dryer NOTE: To avoid floor damage, set washer/dryer onto cardboard before moving it. 1. Move washer/dryer Loosen the four transport bolts with a 3/8" (10 mm) wrench. Once each bolt is loose, wiggle and completely pull them out of the washer/dryer, along with all four shipping plugs. Transport bolt 48" (1.
Electrical Requirements – U.S.A. Only It is your responsibility: ■■ To contact a qualified electrical installer. ■■ To be sure that the electrical connection is adequate and in conformance with the National Electrical Code, ANSI/ NFPA 70 – latest edition and all local codes and ordinances. The National Electrical Code requires a 4-wire power supply connection for homes built after 1996, dryer circuits involved in remodeling after 1996, and all mobile home installations.
Electrical Requirements – Canada Only Electrical Installation – U.S.A. Only Before you start: disconnect power. 1. Choose electrical connection type Power supply cord 4-wire receptacle (NEMA-Type 14-30R): Go to “Power Supply Cord Connection.” Power supply cord 3-wire receptacle (NEMA Type 10-30R): Go to “Power Supply Cord Connection.” It is your responsibility: ■■ To contact a qualified electrical installer.
Power Supply Cord Connection WARNING Fire Hazard Use a new UL listed 30 amp power supply cord. Use a UL listed strain relief. 4-Wire Power Supply Cord Connection IMPORTANT: A 4-wire connection is required for mobile homes and where local codes do not permit the use of 3-wire connections. 4-wire receptacle (NEMA-type 14-30R) 4 prong plug Spade terminals with upturned ends Ring terminals Disconnect power before making electrical connections.
3-Wire Power Supply Cord Connection 3. Connect ground wire D B Use where local codes permit connecting cabinet-ground conductor to neutral wire. 3-wire receptacle (NEMA-type 10-30R) 3 prong plug Spade terminals with upturned ends Ring terminals Connect ground wire (D) (green or bare) of power supply cord under green external ground conductor screw (B). Tighten screw. 4. Connect remaining wires 1. Connect neutral (center) wire A Connect remaining wires under outer terminal block screws.
Optional External Ground for 3-Wire Connection 3. Connect remaining wires IMPORTANT: You must verify with a qualified electrician that this grounding method is acceptable before connecting. 1. Prepare to connect neutral wire B A Place ends of remaining wires under outer terminal block screws. Tighten screws and tighten strain relief. Remove center terminal block screw (A) and green external ground conductor screw (B). 4. Connect external ground wire D B 2.
Route Drain Hose Proper routing of the drain hose protects your floor from damage due to water leakage. Read and follow these instructions. 3. Place drain hose in standpipe 1. Remove drain hose from washer/dryer Place hose into standpipe (shown in picture) or over side of laundry tub. IMPORTANT: Only 41⁄2" (114 mm) of drain hose should be inside standpipe; do not force excess hose into standpipe or lay on bottom of laundry tub. Drain hose form must be used.
2. Clear water line 5. Secure drain hose Laundry Tub 41/2" 4.5" (114 mm) Run water for a few seconds through hose into a laundry tub, drainpipe, or bucket to avoid clogs. Water should run until clear. 3. Connect inlet hose to washer/dryer Standpipe 41/2" (114 mm) Wall 1/2" 44.5" (113 mm) (114 Secure drain hose to laundry tub leg, drain standpipe, or inlet hose for wall standpipe with cable tie. Level Washer/Dryer Leveling your washer/dryer properly reduces excess noise and vibration. 1.
2. Rock washer/dryer to test foot contact 4. Tighten leveling feet Jam nut Grip washer/dryer from top and rock back and forth, making sure all four feet are firmly on floor. Repeat, rocking washer/ dryer from side to side. If washer rocks, go to Step 3 and adjust leveling feet. If all four feet are in firm contact with floor, go to “Plug In Washer/Dryer.” 3.
Complete Installation Checklist In Canada 1. Plug into a grounded 4 prong outlet q Check electrical requirements. Be sure you have correct electrical supply and recommended grounding method. q q Check that washer/dryer is plugged into a grounded outlet. Check that all parts are now installed. If there is an extra part, go back through steps to see what was skipped. q q q q q Check that washer/dryer is level. q q q q Check that inlet hose is attached and water faucet is on.
TROUBLESHOOTING First try the solutions suggested here or visit our website at www.whirlpool.com/owners (in Canada www.whirlpool.ca/owners) for assistance and to possibly avoid a service call. If you experience Possible Causes Solution Vibration or Off-Balance Vibration, rocking, or “walking” Feet may not be in contact with the floor and locked. Front and rear feet must be in firm contact with floor, and washer/dryer must be level to operate properly.
TROUBLESHOOTING First try the solutions suggested here or visit our website at www.whirlpool.com/owners (in Canada www.whirlpool.ca/owners) for assistance and to possibly avoid a service call. If you experience Possible Causes Solution Water Leaks (cont.) Water or suds leaking from door or rear of cabinet Not using HE detergent or using too much HE detergent. Only use HE detergent. Suds from regular detergents can cause leaking from the door or rear of cabinet.
TROUBLESHOOTING First try the solutions suggested here or visit our website at www.whirlpool.com/owners (in Canada www.whirlpool.ca/owners) for assistance and to possibly avoid a service call. If you experience Possible Causes Solution Wash cycle not performing as expected (cont.) Washer/dryer won’t run or fill; washer/dryer stops working (cont.) Normal washer/dryer operation. Washer/dryer will pause during certain phases of cycle. Do not interrupt cycle.
TROUBLESHOOTING First try the solutions suggested here or visit our website at www.whirlpool.com/owners (in Canada www.whirlpool.ca/owners) for assistance and to possibly avoid a service call. If you experience Possible Causes Solution Wash cycle not performing as expected (cont.) Washer/dryer not draining/spinning; loads are still wet (cont.) Using cycles with a lower spin speed. Cycles with lower spin speeds remove less water than cycles with high spin speeds.
TROUBLESHOOTING First try the solutions suggested here or visit our website at www.whirlpool.com/owners (in Canada www.whirlpool.ca/owners) for assistance and to possibly avoid a service call. If you experience Possible Causes Solution Wash cycle not performing as expected (cont.) Load not rinsed Improper water supply connection. Inlet hose must be attached to both washer/dryer and cold water supply faucet and have water flowing to inlet valve. Cold water faucet must be on.
TROUBLESHOOTING First try the solutions suggested here or visit our website at www.whirlpool.com/owners (in Canada www.whirlpool.ca/owners) for assistance and to possibly avoid a service call. If you experience Possible Causes Solution Wash cycle not performing as expected (cont.) Not cleaning or removing stains (cont.) Not using correct cycle for fabric type. Use a warmer wash temperature to improve cleaning.
TROUBLESHOOTING First try the solutions suggested here or visit our website at www.whirlpool.com/owners (in Canada www.whirlpool.ca/owners) for assistance and to possibly avoid a service call. If you experience Possible Causes Solution Wash cycle not performing as expected (cont.) Gray whites, dingy colors Load not sorted properly. The transfer of dye can occur when mixing whites and colors in a load. Sort dark clothes from whites and lights. Wash temperatures too low.
TROUBLESHOOTING First try the solutions suggested here or visit our website at www.whirlpool.com/owners (in Canada www.whirlpool.ca/owners) for assistance and to possibly avoid a service call. If you experience Possible Causes Solution Drying Operation Drying cycle will not run Door not closed completely. Make sure the washer/dryer door is closed completely. Start/Pause button not touched firmly. Touch the START/PAUSE button firmly. Drain pump filter not in place or clogged.
TROUBLESHOOTING First try the solutions suggested here or visit our website at www.whirlpool.com/owners (in Canada www.whirlpool.ca/owners) for assistance and to possibly avoid a service call. If you experience Possible Causes Solution Lint on load Drain pump filter is clogged with lint. Clean the drain pump filter. See “Cleaning the Drain Pump Filter/ Draining Residual Water.” This procedure should be performed every 6 months.
TROUBLESHOOTING First try the solutions suggested here or visit our website at www.whirlpool.com/owners (in Canada www.whirlpool.ca/owners) for assistance and to possibly avoid a service call. If you experience Possible Causes Solution Error Code Appears in Display Once any possible issues are corrected, touch the POWER button once to clear the code. Re-select and restart the cycle.
TROUBLESHOOTING First try the solutions suggested here or visit our website at www.whirlpool.com/owners (in Canada www.whirlpool.ca/owners) for assistance and to possibly avoid a service call. If you experience Possible Causes Solution Error Code Appears in Display (cont.) Once any possible issues are corrected, touch the POWER button once to clear the code. Re-select and restart the cycle. F5E4 Door not opened between cycles Three consecutive cycles were run without the door being opened.
Manually Unlocking the Door HOW TO MANUALLY OPEN DOOR (cont.) 2. Pull down on the plastic strap located beneath the removed screw. The door can now be opened and the laundry removed, if needed. 3. After removing laundry (if needed), secure the plastic strap by replacing and tightening the Phillips head screw removed in Step 1 through the hole in the strap. HOW TO MANUALLY OPEN DOOR Before opening the door as described below, refer to the failure “Door will not unlock” in the “Troubleshooting” section.
Connected Appliance Regulatory Notices Federal Communications Commission (FCC) Compliance Notice This equipment has been tested and found to comply with the limits for a Class B digital device, pursuant to Part 15 of the FCC Rules. These limits are designed to provide reasonable protection against harmful interference in a residential installation.
Connected Appliance Regulatory Notices (cont.) Open Source License Usage The following statements refer to the portions of this software based in part on FreeRTOS v7.0.2, http://www.freertos.org. The use of this software is governed by the terms of GNU General Public License v. 2, which is available at: http://www.gnu.org/licenses/gpl-2.0.html. A copy of the source code may be obtained by written request for the software by name to opensource@whirlpool.com, along with the address for delivery.
WHIRLPOOL® LAUNDRY LIMITED WARRANTY ATTACH YOUR RECEIPT HERE. PROOF OF PURCHASE IS REQUIRED TO OBTAIN WARRANTY SERVICE. Please have the following information available when you call the Customer eXperience Center: n Name, address, and telephone number n Model number and serial number n A clear, detailed description of the problem n Proof of purchase including dealer or retailer name and address IF YOU NEED SERVICE: 1.
SÉCURITÉ DE LAVEUSE/SÉCHEUSE COMBINÉE 48
ACCESSOIRES ACCESSOIRES D’INSTALLATION ET D’ENTRETIEN PIÈCES AGRÉÉES PAR LE FABRICANT – Ces mots désignent des pièces de qualité et des accessoires conçus spécialement pour votre appareil. Une ingénierie qui a fait ses preuves, pour répondre à nos normes de qualité les plus strictes. PIÈCES AGRÉÉES PAR LE FABRICANT Accessoires conçus pour votre appareil : Personnaliser votre nouvelle laveuse/sécheuse grâce aux authentiques accessoires Whirlpool suivants.
INSTRUCTIONS D’UTILISATION Tableau de commande et caractéristiques 5 2 4:28 3:15 What to Wash REGULAR Temperature WARM 1 1 Spin Speed EXTRA FAST 3 BOUTON DE MISE SOUS/HORS TENSION Appuyer pour mettre en marche la laveuse/sécheuse. 2 BOUTON D’ACCUEIL Appuyer sur cet bouton pour afficher l’écran d’accueil à l’écran ACL et permettre de sélectionner le programme, les réglages et les options. 3 BOUTON FAVORIS 4 ÉCRAN ACL 5 Pour sauvegarder et accéder aux programmes favoris.
Guides des programmes Il est possible d’utiliser cette laveuse/sécheuse pour n’effectuer que des lavages, que des séchages ou les deux. La laveuse/sécheuse possède une interface utilisateur unique pour vous aider à sélectionner le programme le mieux adapté à votre charge. Les configurations “What to Wash” (articles à laver) et “How to Wash” (méthode de lavage) vous indiquent le programme idéal en deux étapes faciles : D’abord, déterminer les articles de la charge que l’on va nettoyer.
Quels articles Quelle méthode Colors (couleurs) Normal Delicates (articles délicats) Whites (blancs) Towels (serviettes) Réglages de base Options supplémentaires Vitesse d’essorage Mode de séchage Régler le niveau de saleté Pretrémpage Tumble Fresh™ (culbutage frais) Wrinkle Shield™ (antifroissement) Warm Cool Cold Extra Fast Fast Medium Slow Off Auto Timed Light Normal Heavy 2 3 4 5 X X X Quick (rapide) Warm Cool Cold Extra Fast Fast Medium Slow Off Auto Timed Light Normal Heavy
Quels articles Quelle méthode Bulky Items (articles volumineux) Normal Réglages de base Options supplémentaires Vitesse d’essorage Mode de séchage Régler le niveau de saleté Extra Hot Hot Warm Cool Cold Medium Slow Off Auto Timed Light Normal Heavy Quick (rapide) Extra Hot Hot Warm Cool Cold Medium Slow Off Auto Timed Heavy Duty (service intense) Extra Hot Hot Warm Cool Cold Medium Slow Off Auto Timed Extra Hot (très chaude) Hot (chaude) Warm (tiède) Cool (fraîche) Cold (froide) Tempér
Choix du détergent approprié Utiliser uniquement un détergent Haute efficacité (“HE”). L’emballage portera la mention “HE” ou “High Efficiency” (haute efficacité). Un lavage avec faible consommation d’eau produit un excès de mousse avec un détergent non HE ordinaire. Il est probable que l’utilisation d’un détergent ordinaire prolongera la durée des programmes et réduira la performance de rinçage. Ceci peut aussi entraîner des défaillances de composants et, avec le temps, une accumulation de moisissure.
Utilisation de la laveuse/sécheuse combinée n Retourner les tricots pour éviter le boulochage. Séparer Premier programme de lavage sans vêtements Avant de laver des vêtements pour la première fois, régler le distributeur Load & Go™ (voir la page 55). Lancer un programme Regular (régulier) (What to Wash [articles à laver]) et Quick (rapide) (How to Wash [méthode de lavage]) sans ajouter de vêtements. Utiliser uniquement un détergent HE.
3. C harger les vêtements dans la laveuse/sécheuse Placer une charge de linge trié dans la laveuse/sécheuse sans les tasser. Les articles doivent pouvoir se déplacer librement pour un nettoyage optimal et pour réduire le froissement et l’emmêlement. Si l’option de séchage est utilisée, ne charger le tambour qu’à moitié ou moins et ne pas interrompre le programme de séchage en ouvrant la porte pour améliorer le rendement de séchage et la durée du programme.
7. Sélectionner le programme de lavage Fonctions de séchage (Étape 9) 4:28 3:15 What to Wash REGULAR Temperature WARM How to Wash NORMAL Spin Speed EXTRA FAST Auto Dry Dry À partir de l’écran d’accueil, appuyer sur la zone “What to Wash” (articles à laver) pour sélectionner le programme répondant le mieux aux articles à laver. Il pourrait être nécessaire de naviguer vers le bas dans le menu pour voir toutes les sélections. Appuyer sur le programme désiré pour revenir à l’écran d’accueil.
Pour n’effectuer qu’un programme de séchage : Remplir le tambour à moitié ou moins pour obtenir un rendement de séchage optimal et une durée de programme plus courte. À partir du menu d’accueil, appuyer sur la zone “Drying Mode” (mode de séchage) à l’écran pour afficher les modes de séchage. À partir de l’écran de mode de séchage, après avoir sélectionné Auto-Drying (séchage automatique) ou Timed-Drying (séchage minuté) comme indiqué précédemment, appuyer sur “DRYING ONLY ON” (séchage seulement).
12. Toucher le bouton START/PAUSE (mise en marche/pause) pour démarrer le programme Toucher le bouton START/PAUSE (mise en marche/pause) pour démarrer le programme de lavage. Pour suspendre un programme en cours, toucher une fois le bouton START/PAUSE (mise en marche/pause), puis toucher de nouveau pour poursuivre le programme. Pour annuler un programme, appuyer sur le “X” situé à droite du temps restant estimé affiché à l’écran tactile.
Entretien de la laveuse/sécheuse combinée NETTOYAGE DE L’EMPLACEMENT DE LA LAVEUSE/SÉCHEUSE Éviter de laisser autour de la laveuse/sécheuse des éléments qui pourraient obstruer la circulation de l’air et empêcher le bon fonctionnement de la sécheuse. Ceci implique de dégager également les éventuelles piles de linge placées devant la laveuse/sécheuse. ENTRETIEN DE LA LAVEUSE/SÉCHEUSE (suite) Nettoyage du joint de la porte 1.
ENTRETIEN DE LA LAVEUSE/SÉCHEUSE (suite) Nettoyage du distributeur Load & Go™ Après avoir utilisé la laveuse/sécheuse pendant longtemps, on peut parfois constater une accumulation de résidus dans le distributeur Load & Go.™ Pour éliminer les résidus dans les distributeurs, soulever la poignée du boîtier du distributeur pour le retirer de la laveuse/sécheuse, puis bien rincer les deux distributeurs sous l’eau courante.
ENTRETIEN POUR ENTREPOSAGE HIVERNAL IMPORTANT : Pour éviter tout dommage, installer et remiser la laveuse/sécheuse à l’abri du gel. L’eau qui peut rester dans les tuyaux risque d’abîmer la laveuse/ sécheuse en temps de gel. Si la laveuse/sécheuse doit faire l’objet d’un déménagement ou d’entreposage au cours d’une période de gel, hivériser la laveuse/sécheuse. Hivérisation de la laveuse/sécheuse : 1. Fermer le robinet d’eau; déconnecter et vidanger le tuyau d’arrivée d’eau.
TRANSPORT DE LA LAVEUSE/SÉCHEUSE 1. Fermer le robinet d’eau; déconnecter et vidanger le tuyau d’arrivée d’eau. 2. Si l’on déplace la laveuse/sécheuse pendant une période de gel, suivre les instructions de la section “Entretien pour entreposage hivernal” avant de la déplacer. 3. Déconnecter le tuyau de vidange du système de vidange et de l’arrière de la laveuse/sécheuse. 4. Débrancher le cordon d’alimentation. 5. Placer le tuyau d’arrivée d’eau et le tuyau de vidange dans le tambour. 6.
INSTRUCTIONS D’INSTALLATION Exigences d’installation Outillage facultatif : Outils et pièces Rassembler les outils et composants nécessaires avant d’entreprendre le processus d’installation. Outillage nécessaire : Torche électrique Clés plates ou clés à molette de 3/8" (10 mm) et 1/2" (13 mm) Niveau Règle ou mètre ruban Pince qui s'ouvre à 19⁄16" (39,5 mm) Seau Autres pièces : (Non fournies avec la laveuse/sécheuse) Il se peut que l’installation nécessite des pièces supplémentaires.
Exigences d’emplacement 24" (610 mm) C’est à l’utilisateur qu’incombe la responsabilité de réaliser une installation correcte. Vérifier les spécifications des codes. Certains codes limitent ou interdisent l’installation de la laveuse/sécheuse dans un garage, un placard, une résidence mobile ou une chambre à coucher. Contacter l’inspecteur en bâtiments local. 331/4" Min. (845 mm) 333/4" Max. (857 mm) 28" (675 mm) 48 15/16" (1243 mm) Il vous faudra : n Un circuit séparé de 30 ampères.
Exigences d’emplacement (suite) Installation dans un placard personnalisée : Installation dans un placard : 12" (305 mm) 3" (76 mm) 48 in.2 min. (310 cm2) 12" 9" (229 (305 mm) 3" (76 mm) 4" (102 mm) 4" (102 mm) 1" (25 mm) 3" (76 mm) REMARQUE : Un espace minimum de 12" au-dessus de la laveuse/sécheuse est requis pour utiliser le distributeur Load & Go.™ 1" (25 mm) 24 in.2 min.
Système de vidange Le système de vidange peut être installé à l’aide d’un avaloir sol, un tuyau rigide de rejet à l’égout mural, un tuyau rigide de rejet à l’égout au sol ou un évier de buanderie. Sélectionner la méthode à utiliser. IMPORTANT : Pour éviter un effet de siphon, pas plus de 41⁄2" (114 mm) de tuyau de vidange ne devrait être inséré à l’intérieur de la canalisation d’évacuation. Toujours immobiliser le tuyau de vidange avec un serre-câble.
Déballage de la laveuse/sécheuse 2. Retirer quatre boulons de transport de la laveuse/sécheuse REMARQUE : Pour éviter d’endommager le plancher, installer la laveuse/sécheuse sur un carton avant de la déplacer. 1. Déplacer la laveuse/sécheuse Desserrer les quatre boulons avec une clé à molette de 3/8" (10 mm). Une fois chacun des boulons desserrés, les retirer complètement de la laveuse/sécheuse en même temps que les quatre bouchons d’expédition.
Spécifications électriques C’est à l’utilisateur qu’incombe la responsabilité de : ■■ Contacter un électricien qualifié. ■■ S’assurer que le raccordement électrique est adéquat et conforme à la dernière édition du Canadian Electrical Code, C22.1, et à tous les codes et règlements locaux en vigueur. Pour obtenir un exemplaire des normes des codes cidessus, contacter : Canadian Standards Association, 178 Rexdale Blvd., Toronto, ON M9W 1R3 CANADA.
Acheminer le tuyau de vidange Le bon acheminement du tuyau de vidange protège vos planchers contre les dommages liés à une fuite d’eau. Lire et suivre ces instructions. 1. Retirer le tuyau de vidange 3. P lacer le tuyau de vidange dans le tuyau de rejet à l’égout Bride de retenue pour tuyau de vidange de la laveuse/sécheuse Placer le tuyau dans le tuyau de rejet à l’égout (illustré à l’image) ou par-dessus le côté de l’évier de buanderie.
2. Purger la canalisation d’eau 5. Fixer le tuyau de vidange Évier de buanderie Tuyau rigide de rejet à l’égout 41/2" 4.5" (114 mm) Faire couler de l’eau dans le tuyau de l’évier de buanderie, le tuyau rigide de rejet à l’égout ou le seau pendant quelques secondes pour éviter toute obstruction. On doit laisser couler l’eau jusqu’à ce qu’elle soit limpide. 3. C onnecter le tuyau d’arrivée d’eau à la laveuse/sécheuse Mur 41/2" (114 mm) 1/2" 44.
2. Faire basculer la laveuse/sécheuse pour tester la stabilité des pieds sur le plancher 4. Serrer les pieds de nivellement ContreJam nut écrou Saisir la laveuse/sécheuse par le dessus et la faire basculer d’avant en arrière tout en s’assurant que les quatre pieds sont en contact ferme avec le sol. Faire de nouveau basculer la laveuse/sécheuse, transversalement. Si la laveuse/sécheuse bascule, passer à l’étape 3 et ajuster les pieds de nivellement.
Liste de vérification pour installation terminée q Consulter les spécifications électriques. S’assurer de disposer d’une source d’électricité appropriée, et d’une liaison à la terre conforme à la méthode recommandée. q Vérifier que la laveuse/sécheuse est branchée sur une prise de courant à 4 alvéoles reliée à la terre. q Vérifier que toutes les pièces sont maintenant installées. S’il reste une pièce, passer en revue les différentes étapes pour découvrir laquelle aurait été oubliée.
DÉPANNAGE Essayer d’abord les solutions suggérées ici ou consulter le site Web www.whirlpool.ca/owners pour obtenir de l’aide et pour éviter une intervention de réparation. Si les phénomènes suivants se produisent Causes possibles Solution Vibrations ou déséquilibre Vibrations, balancement ou effet de “marche” de la machine Les pieds ne sont peut-être pas en contact avec le plancher ou verrouillés.
DÉPANNAGE Essayer d’abord les solutions suggérées ici ou consulter le site Web www.whirlpool.ca/owners pour obtenir de l’aide et pour éviter une intervention de réparation. Si les phénomènes suivants se produisent Causes possibles Solution Fuites d’eau (suite) Eau ou mousse suintant par la porte ou par l’arrière de la caisse Détergent HE non utilisé ou utilisation excessive de détergent HE. Utiliser uniquement un détergent HE.
DÉPANNAGE Essayer d’abord les solutions suggérées ici ou consulter le site Web www.whirlpool.ca/owners pour obtenir de l’aide et pour éviter une intervention de réparation. Si les phénomènes suivants se produisent Causes possibles Solution Programme de lavage ne fonctionne pas comme prévu (suite) La laveuse/sécheuse ne fonctionne pas ou ne se remplit pas; elle cesse de fonctionner (suite) Fonctionnement normal de la laveuse/ sécheuse.
DÉPANNAGE Essayer d’abord les solutions suggérées ici ou consulter le site Web www.whirlpool.ca/owners pour obtenir de l’aide et pour éviter une intervention de réparation. Si les phénomènes suivants se produisent Causes possibles Solution Programme de lavage ne fonctionne pas comme prévu (suite) La laveuse/sécheuse ne se vidange pas/n’effectue pas d’essorage; les charges ressortent mouillées 78 Le tuyau de vidange se prolonge dans le tuyau rigide de rejet à l’égout au-delà de 4,5" (114 mm).
DÉPANNAGE Essayer d’abord les solutions suggérées ici ou consulter le site Web www.whirlpool.ca/owners pour obtenir de l’aide et pour éviter une intervention de réparation. Si les phénomènes suivants se produisent Causes possibles Solution Programme de lavage ne fonctionne pas comme prévu (suite) Porte verrouillée à la fin du programme de lavage La porte ne se déverrouille pas Températures de lavage incorrectes Il reste de l’eau dans la laveuse/ sécheuse après le programme.
DÉPANNAGE Essayer d’abord les solutions suggérées ici ou consulter le site Web www.whirlpool.ca/owners pour obtenir de l’aide et pour éviter une intervention de réparation. Si les phénomènes suivants se produisent Causes possibles Solution Programme de lavage ne fonctionne pas comme prévu (suite) Charge non rincée (suite) La laveuse/sécheuse n’a pas été chargée tel que recommandé. Éviter un tassement excessif de la laveuse/sécheuse.
DÉPANNAGE Essayer d’abord les solutions suggérées ici ou consulter le site Web www.whirlpool.ca/owners pour obtenir de l’aide et pour éviter une intervention de réparation. Si les phénomènes suivants se produisent Causes possibles Solution Programme de lavage ne fonctionne pas comme prévu (suite) Ne nettoie ou ne détache pas (suite) Programme utilisé incorrect par rapport Utiliser une température de lavage plus chaude pour améliorer au type de tissu. le nettoyage.
DÉPANNAGE Essayer d’abord les solutions suggérées ici ou consulter le site Web www.whirlpool.ca/owners pour obtenir de l’aide et pour éviter une intervention de réparation. Si les phénomènes suivants se produisent Causes possibles Solution Programme de lavage ne fonctionne pas comme prévu (suite) Blancs grisâtres, couleurs défraîchies La charge n’a pas été correctement triée. Le transfert de teinture peut se produire lors du mélange d’articles blancs et de couleur dans une même charge.
DÉPANNAGE Essayer d’abord les solutions suggérées ici ou consulter le site Web www.whirlpool.ca/owners pour obtenir de l’aide et pour éviter une intervention de réparation. Si les phénomènes suivants se produisent Causes possibles Solution Processus de séchage Le programme de séchage ne fonctionne pas La porte n’est pas bien fermée. S’assurer que la porte de la laveuse/sécheuse est complètement fermée. L’utilisateur n’a pas appuyé fermement sur le bouton Start/ Pause (mise en marche/pause).
DÉPANNAGE Essayer d’abord les solutions suggérées ici ou consulter le site Web www.whirlpool.ca/owners pour obtenir de l’aide et pour éviter une intervention de réparation. Si les phénomènes suivants se produisent Causes possibles Solution Résultats de la séchage (suite) Charpie sur la charge Le filtre de la pompe de vidange est obstrué par de la charpie. Nettoyer le filtre de la pompe de vidange. Voir la section “Nettoyage du filtre de la pompe de vidange/vidange de l’eau résiduelle.
DÉPANNAGE Essayer d’abord les solutions suggérées ici ou consulter le site Web www.whirlpool.ca/owners pour obtenir de l’aide et pour éviter une intervention de réparation. Si les phénomènes suivants se produisent Causes possibles Solution Un code d’erreur apparaît sur l’affichage Une fois que tout problème éventuel a été résolu, toucher une fois le bouton POWER (mise sous tension) pour effacer le code. Sélectionner à nouveau et remettre le programme en marche.
DÉPANNAGE Essayer d’abord les solutions suggérées ici ou consulter le site Web www.whirlpool.ca/owners pour obtenir de l’aide et pour éviter une intervention de réparation. Si les phénomènes suivants se produisent Causes possibles Solution Un code d’erreur apparaît sur l’affichage (suite) Une fois que tout problème éventuel a été résolu, toucher une fois le bouton POWER (mise sous tension) pour effacer le code. Sélectionner à nouveau et remettre le programme en marche.
Déverrouillage manuel de la porte COMMENT OUVRIR MANUELLEMENT LA PORTE (suite) 2. Tirer vers le bas la courroie de plastique située sous la vis qui a été enlevée. La porte peut maintenant être ouverte et la charge enlevée, au besoin. 3. Après avoir retiré la lessive (si nécessaire), fixer de nouveau la courroie en plastique en replaçant et en serrant la vis cruciforme enlevée à l’étape 1 dans le trou de la courroie.
Avis d’application de la réglementation de la connexion des électroménagers Déclaration de conformité de la Commission fédérale des communications (FCC) Cet appareil a été testé et déclaré conforme aux limites pour appareils numériques de classe B, selon la section 15 des règlements de la FCC (Federal Communications Commission). Ces limites sont conçues dans le but d’assurer une protection raisonnable contre des interférences nuisibles dans une installation résidentielle.
Avis d’application de la réglementation de la connexion des électroménagers (suite) Utilisation de la licence de source ouverte Les déclarations suivantes concernent les parties de ce logiciel selon FreeRTOS v7.0.2, http://www.freertos.org. L’utilisation de ce logiciel est assujettie aux conditions de la licence publique générale GNU v. 2, disponible au : http://www.gnu.org/licenses/gpl-2.0.html.
GARANTIE DES APPAREILS DE BUANDERIE WHIRLPOOL® ATTACHEZ ICI VOTRE REÇU DE VENTE. UNE PREUVE D’ACHAT EST OBLIGATOIRE POUR OBTENIR L’APPLICATION DE LA GARANTIE.
CLAUSE D’EXONÉRATION DE RESPONSABILITÉ AU TITRE DES GARANTIES IMPLICITES LES GARANTIES IMPLICITES, Y COMPRIS LES GARANTIES APPLICABLES DE QUALITÉ MARCHANDE OU D’APTITUDE À UN USAGE PARTICULIER, SONT LIMITÉES À UN AN OU À LA PLUS COURTE PÉRIODE AUTORISÉE PAR LA LOI. Certains États et certaines provinces ne permettent pas de limitation sur la durée de garanties implicites de qualité marchande ou d’aptitude à un usage particulier, de sorte que la limitation ci-dessus peut ne pas être applicable dans votre cas.
Assistance or Service Before calling for assistance or service, please check “Troubleshooting” or visit www.whirlpool.com/owners. It may save you the cost of a service call. If you still need help, follow the instructions below. When calling, please know the purchase date and the complete model and serial number of your appliance. This information will help us to better respond to your request.