
Owner's Manual
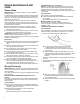
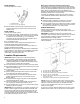
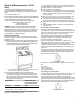
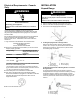
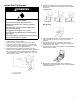

Table Of Contents
- RANGE SAFETY
- Range Safety
- RANGE MAINTENANCE AND CARE
- Steam Clean
- General Cleaning
- INSTALLATION INSTRUCTIONS
- REQUIREMENTS
- Tools and Parts
- Location Requirements
- Electrical Requirements - U.S.A. Only
- Electrical Requirements - Canada Only
- INSTALLATION
- Unpack Range
- Install Anti-Tip Bracket
- Adjust Leveling Legs
- Level Range
- Electrical Connection - U.S.A. Only
- Verify Anti-Tip Bracket Is Installed and Engaged
- Warming Drawer or Premium Storage Drawer (on some models)
- Storage Drawer (on some models)
- Oven Door
- Complete Installation
- Moving the Range
- SÉCURITÉ DE LA CUISINIÈRE
- Sécurité de la cuisinière
- ENTRETIEN ET RÉPARATION DE LA CUISINIÈRE
- Nettoyage à la vapeur
- Nettoyage Général
- INSTRUCTIONS D’INSTALLATION
- EXIGENCE
- Outillage et pièces
- Exigences d’emplacement
- Spécifications électriques – É.-U. seulement
- Spécifications électriques – Canada seulement
- INSTALLATION
- Déballage de la cuisinière
- Installation de la bride antibasculement
- Réglage des pieds de nivellement
- Réglage de l’aplomb de la cuisinière
- Raccordement électrique – É.-U. seulement
- Vérifier que la bride antibasculement est bien installée et engagée
- Tiroir-réchaud ou tiroir de remisage de qualité supérieure (sur certains modèles)
- Tiroir de remisage (sur certains modèles)
- Porte du four
- Terminer l’installation
- Déplacement de la cuisinière
- SEGURIDAD DE LA ESTUFA
- Seguridad de la estufa
- CUIDADO Y MANTENIMIENTO DE LA ESTUFA
- Limpieza con vapor
- Limpieza general
- INSTRUCCIONES DE INSTALACIÓN
- REQUISITOS
- Herramientas y piezas
- Requisitos de ubicación
- Requisitos eléctricos — EE. UU. únicamente
- Requisitos eléctricos – Solo en Canadá
- INSTALACIÓN
- Desempaque la estufa
- Instalación del soporte antivuelco
- Regule las patas niveladoras
- Nivelación de la estufa
- Conexión eléctrica — EE. UU. únicamente
- Verifique que el soporte antivuelco esté instalado y enganchado
- Cajón de calentamiento o cajón de almacenamiento Premium
- Cajón de almacenamiento (en algunos modelos)
- Puerta del horno
- Completar la instalación
- Cómo mover la estufa

8
Electrical Requirements - Canada
Only
WARNING
Electrical Shock Hazard
Electrically ground appliance.
Failure to do so could result in death, fire, or electrical
shock.
If codes permit and a separate ground wire is used, it is
recommended that a qualified electrical installer determine that
the ground path is adequate and wire gauge are in accordance
with local codes.
Be sure that the electrical connection and wire size are adequate
and in conformance with CSA Standard C22.1, Canadian
Electrical Code, Part 1 - latest edition, and all local codes and
ordinances.
A copy of the above code standards can be obtained from:
Canadian Standards Association
178 Rexdale Blvd.
Toronto, ON M9W 1R3 CANADA
� Check with a qualified electrical installer if you are not sure the
range is properly grounded.
Range Rating* Specified Rating of Power
Supply Cord Kit and Circuit
Protection
120/240 V 120/208 V Amps
8.8 - 16.5 KW 7.8 - 12.5
KW
40 or 50**
16.6 - 22.5 KW 12.6 - 18.5
KW
50
* The NEC calculated load is less than the total connected load
listed on the model/serial/rating plate.
**If connecting to a 50 A circuit, use a 50 A rated cord with kit.
For 50 A rated cord kits, use kits that specify use with a nominal
1
3
/
8
" (34.9 mm) diameter connection opening.
� A time-delay fuse or circuit breaker is recommended.
� This range is equipped with a CSA International Certified
Power Cord intended to be plugged into a standard 14-50R wall
receptacle. Be sure the wall receptacle is within reach of
range’s final location.
� Do not use an extension cord.
INSTALLATION
Unpack Range
WARNING
Excessive Weight Hazard
Use two or more people to move and install or uninstall
appliance.
Failure to do so can result in back or other injury.
1. Remove shipping materials, tape and film from range.
2. Remove oven racks and parts package from inside oven.
3. Do not remove the shipping base at this time.
A. Shipping base
4. On Ranges Equipped with a Storage Drawer:
Remove the storage drawer. See the “Storage Drawer”
section. Use a 1/4" (6.4 mm) drive ratchet to lower the rear
leveling legs one-half turn. Use a wrench or pliers to lower
front leveling legs one half turn.
A. 1/4" (6.4 mm)
drive ratchet
B. Rear leveling leg
C. Wrench or pliers
D. Front leveling leg
On Ranges Equipped with a Warming Drawer or Premium
Storage Drawer:
On ranges equipped with a warming drawer or premium
storage drawer, the rear legs cannot be accessed by removing
the warming drawer or premium storage drawer. It will be
necessary to adjust the rear legs from outside the range. Use
wrench or pliers to lower the front and rear leveling legs one
half turn.
A. Rear leveling leg
B. Wrench or pliers
C. Front leveling leg