
Installation Instructions


9
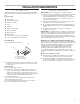
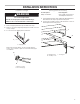
Install Anti-Tip Bracket
A. Backguard slot
B. Assembly screw
C. Locking nut
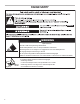
WARNING
Tip Over Hazard
A child or adult can tip the range and be killed.
Install anti-tip bracket to floor or wall per installation
instructions.
Slide range back so rear range foot is engaged in the
slot of the anti-tip bracket.
Re-engage anti-tip bracket if range is moved.
Do not operate range without anti-tip bracket installed
and engaged.
Failure to follow these instructions can result in death
or serious burns to children and adults.
Power Supply Cord
1. Disconnect power.
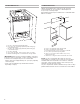
2. Remove the terminal block cover screws located on the back
of the range.
Remove the top 10-31 hex nut and lugs from each of the 3
terminal blocks and set aside.
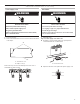
Direct Wire
3. Add strain relief.
Style 1: Power supply cord strain relief
■ Assemble a UL listed strain relief in the opening that is
centered beneath the conduit bracket.
■ Tighten strain relief screw against the power supply cord.
B
A
A. Terminal block cover
B. Phillips screws (2)
A
A. UL listed strain relief
Electrical Connection - U.S.A. Only
WARNING
Electrical Shock Hazard
Disconnect power before servicing.
Use 8 gauge copper or 6 gauge aluminum wire.
Electrically ground range.
Failure to follow these instructions can result in death,
fire, or electrical shock.
WARNING
Electrical Shock Hazard
Disconnect power before servicing.
Use a new 40 A power supply cord.
Plug into a grounded outlet.
Failure to follow these instructions can result in death,
fire, or electrical shock.