ELECTRIC RANGE USER INSTRUCTIONS THANK YOU for purchasing this high-quality product. Register your range at www.whirlpool.com. In Canada, register your range at www.whirlpool.ca. For future reference, please make a note of your product model and serial numbers. These can be found on the label located on the upper right corner of the front frame.
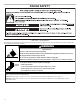
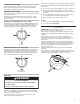
RANGE SAFETY The Anti-Tip Bracket The range will not tip during normal use. However, the range can tip if you apply too much force or weight to the open door without the anti-tip bracket fastened down properly. WARNING Tip Over Hazard A child or adult can tip the range and be killed. Verify the anti-tip bracket has been properly installed and engaged per installation instructions. Re-engage anti-tip bracket if range is moved. Do not operate range without anti-tip bracket installed and engaged.
IMPORTANT SAFETY INSTRUCTIONS WARNING: To reduce the risk of fire, electrical shock, injury to persons, or damage when using the range, follow basic precautions, including the following: ■ WARNING: TO REDUCE THE RISK OF TIPPING OF THE RANGE, THE RANGE MUST BE SECURED BY PROPERLY INSTALLED ANTI-TIP DEVICES. TO CHECK IF THE DEVICES ARE INSTALLED PROPERLY, SLIDE RANGE FORWARD, LOOK FOR ANTI-TIP BRACKET SECURELY ATTACHED TO FLOOR OR WALL, AND SLIDE RANGE BACK SO REAR RANGE FOOT IS UNDER ANTI-TIP BRACKET.
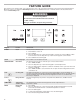
FEATURE GUIDE This manual covers several models. Your model may have some or all of the items listed. Refer to this manual or the Frequently Asked Questions section of our website at www.whirlpool.com for more detailed instructions. In Canada, reference the Customer Service section at www.whirlpool.ca. WARNING Food Poisoning Hazard Do not let food sit in oven more than one hour before or after cooking. Doing so can result in food poisoning or sickness.
Keypad Feature Instructions FROZEN BAKE Prepackaged food 1. Position the food on a flat rack in the oven on rack 3 or 4. See the “Positioning Racks and Bakeware” section. NOTE: Cook only one package of frozen food at a time when using Frozen Bake™ Technology. 2. Press FROZEN BAKE LASAGNA or PIZZA. 3. Press the Temp/Time up or down arrow keypad to set the temperature as recommended on the food packaging. 4. Press COOK TIME. 5.
COOKTOP USE WARNING ■■ To avoid scratches, do not slide cookware or bakeware across the cooktop. Aluminum or copper bottoms and rough finishes on cookware or bakeware could leave scratches or marks on the cooktop. ■■ Do not cook popcorn in prepackaged aluminum containers on the cooktop. They could leave aluminum marks that cannot be removed completely. ■■ To avoid damage to the cooktop, do not allow objects that could melt, such as plastic or aluminum foil, to touch any part of the cooktop.
Cooktop On Indicator Light The Cooktop On indicator light is located on the display panel. When any cooktop element on the console panel is turned on, the Cooktop On indicator light will glow. The Warm Zone area will not glow red when cycling on. However, the Cooktop On indicator light will be displayed when the Warm Zone is in use. ■■ Use only cookware recommended for oven and cooktop use. ■■ Cover all foods with a lid or aluminum foil.
Use the following chart as a guide for cookware material characteristics. Use flat-bottomed cookware for best cooking results and energy efficiency. The cookware should be about the same size as the cooking area outlined on the cooktop. Cookware should not extend more than 1/2" (13 mm) outside the area. Cookware Characteristics Aluminum ■■ Heats quickly and evenly. ■■ Suitable for all types of cooking ■■ Medium or heavy thickness is best for most cooking tasks.
OVEN USE Odors and smoke are normal when the oven is used the first few times or when it is heavily soiled. IMPORTANT: The health of some birds is extremely sensitive to the fumes given off. Exposure to the fumes may result in death to certain birds. Always move birds to another closed and well-ventilated room. Electronic Oven Controls Control Display The display will flash when powered up or after a power loss. Press the Cancel keypad to clear. When oven is not in use, the time of day is displayed.
To Activate and Bake Using Sabbath Mode: 1. 2. 3. 4. Press BAKE. Press the Temp/Time up or down arrow keypad. Press the Start keypad. Press and hold TIMER SET/OFF for 5 seconds. “SAb” will flash in the display. 5. Press the Start keypad while “SAb” is flashing to enter Sabbath mode; otherwise, the entire cycle cancels out. “SAb” will stop flashing and remain on in the display. The oven is now in Sabbath mode and is Sabbath compliant.
Aluminum Foil IMPORTANT: To avoid permanent damage to the oven bottom finish, do not line the oven bottom with any type of foil or liner. For best cooking results, do not cover entire oven rack with foil because air must be able to move freely. Baking Cookies and Layer Cakes on Two Racks Baking Layer Cakes For best results when baking cakes on two racks, use the Bake function, a flat rack in rack position 4, and a flat rack in rack position 2. Place the cakes on the racks as shown. Keep at least 3" (7.
Before baking and roasting, position racks according to the “Positioning Racks and Bakeware” section. When roasting, it is not necessary to wait for the oven preheat cycle to end before putting food in unless it is recommended in the recipe. Broiling When broiling, preheat the oven for two minutes before putting food in unless recommended otherwise in the recipe. Position food on grid in a broiler pan, then place it in the center of the oven rack.
General Cleaning IMPORTANT: Before cleaning, make sure all controls are off and the oven and cooktop are cool. Always follow label instructions on cleaning products. For additional information, you can visit the Frequently Asked Questions (FAQs) section of our website at www.whirlpool.com. In Canada, refer to the Customer Service section at www.whirlpool.ca. Soap, water, and a soft cloth or sponge are suggested first unless otherwise noted. 2.
OVEN RACKS Cleaning Method: ■■ Steel-wool pad ■■ For racks that have discolored and are harder to slide, a light coating of vegetable oil applied to the rack guides will help them slide. STORAGE DRAWER (on some models) Check that storage drawer is cool and empty before cleaning. Cleaning Method: ■■ Mild detergent OVEN CAVITY Food spills should be cleaned when oven cools. At high temperatures, foods react with porcelain. Staining, etching, pitting, or faint white spots can result.
TROUBLESHOOTING First try the solutions suggested here. If you need further assistance or more recommendations that may help you avoid a service call, refer to the warranty page in this manual, or visit producthelp.whirlpool.com. In Canada, visit www.whirlpool.ca. Contact us by mail with any questions or concerns at the address below: In the U.S.A.
Problem Possible Causes Solutions Oven cooking results not what expected Range is not level. Level the range. See the Installation Instructions. The temperature set was incorrect. Double-check the recipe in a reliable cookbook. 16 Oven temperature is calibrated incorrectly. See “Oven Temperature Control” in the “Electronic Oven Controls” section. Oven was not preheated. See the “Baking and Roasting” section. Racks were positioned improperly. See the “Positioning Racks and Bakeware” section.
ACCESSORIES For accessories in the U.S.A., you can visit our website at www.whirlpool.com or call us at 1-800-253-1301. In Canada, you can visit our website at www.whirlpool.ca or call us at 1-800-807-6777.
WHIRLPOOL® MAJOR APPLIANCE LIMITED WARRANTY ATTACH YOUR RECEIPT HERE. PROOF OF PURCHASE IS REQUIRED TO OBTAIN WARRANTY SERVICE. Please have the following information available when you call the Customer eXperience Center: ■ Name, address, and telephone number ■ Model number and serial number ■ A clear, detailed description of the problem ■ Proof of purchase, including dealer or retailer name and address IF YOU NEED SERVICE: 1.
INSTRUCTIONS D’UTILISATION DE LA CUISINIÈRE ÉLECTRIQUE Nous vous REMERCIONS d’avoir acheté ce produit de haute qualité. Enregistrez votre cuisinière sur www.whirlpool.com. Au Canada, enregistrer votre cuisinière sur www.whirlpool.ca. Pour référence ultérieure, consignez par écrit les numéros de modèle et de série de votre produit. Ces numéros figurent sur l’étiquette située dans le coin supérieur droite du cadre avant.
SÉCURITÉ DE LA CUISINIÈRE La bride antibasculement Dans des conditions de service normales, la cuisinière ne bascule pas. Elle peut cependant basculer si une force ou un poids excessif est appliqué sur la porte ouverte alors que la bride antibasculement n’est pas convenablement fixée. AVERTISSEMENT Risque de basculement Un enfant ou une personne adulte peut faire basculer la cuisinière, ce qui peut causer un décès.
IMPORTANTES INSTRUCTIONS DE SÉCURITÉ AVERTISSEMENT : Pour réduire le risque d’incendie, de choc électrique, de blessures ou de dommages lors de l’utilisation de la cuisinière, il convient d’observer certaines précautions élémentaires dont les suivantes : ■ AVERTISSEMENT : POUR MINIMISER LE RISQUE DE BASCULEMENT DE LA CUISINIÈRE, ELLE DOIT ÊTRE BIEN IMMOBILISÉE PAR DES DISPOSITIFS ANTIBASCULEMENT CORRECTEMENT INSTALLÉS.
IMPORTANTES INSTRUCTIONS DE SÉCURITÉ ■ ■ ■ ■ ■ ■ Nettoyer la table de cuisson avec prudence – Si une éponge ou un chiffon mouillé est utilisé pour essuyer les renversements sur une surface de cuisson chaude, éviter les brûlures causées par la vapeur chaude. Certains nettoyants peuvent produire des émanations désagréables lorsqu’ils sont utilisés sur une surface chaude.
GUIDE DES CARACTÉRISTIQUES Ce manuel concerne plusieurs modèles. Le modèle que vous avez peut comporter toutes les caractéristiques énumérées ou seulement certaines d’entre elles. Reportez-vous à ce manuel ou à la section Foire Aux Questions de notre site Web sur www.whirlpool.com pour des instructions plus détaillées. Au Canada, consulter la section service à la clientèle à www.whirlpool.ca.
Touche Fonction Instructions BAKE (cuisson au four) Cuisson au four et rôtissage 1. Appuyer sur BAKE (cuisson au four). 2. Appuyer sur la touche à flèche vers le haut ou vers le bas de Temp/Time (température/ durée) jusqu’à ce que la température souhaitée soit atteinte. Un signal sonore retentit lorsque la température minimum ou maximum est atteinte. 3. Appuyer sur la touche mise en marche. 4. Pour changer la température, répéter l’étape 2. Appuyer sur la touche mise en marche. 5.
Touche Fonction Instructions COOK TIME Cuisson minutée (durée de cuisson) La cuisson minutée permet d’allumer le four à une certaine heure de la journée, d’effectuer une cuisson pendant une durée déterminée et/ou d’éteindre le four automatiquement. Pour régler une cuisson minutée ou une cuisson minutée différée, voir la section “Durée de cuisson”.
UTILISATION DE LA TABLE DE CUISSON AVERTISSEMENT ■■ Ne pas ranger de bocaux ou de boîtes de conserve au-dessus de la table de cuisson. La chute d’un objet lourd ou dur sur la table de cuisson pourrait la fêler. ■■ Afin d’éviter d’endommager la table de cuisson, ne pas laisser un couvercle chaud sur la table de cuisson. Lorsque la table de cuisson refroidit, de l’air peut se trouver piégé entre le couvercle et la table de cuisson, et la vitrocéramique pourrait se casser lorsqu’on enlève le couvercle.
Nettoyage de la table de cuisson en vitrocéramique Élément de cuisson faire fondre (sur certains modèles) Nettoyer la table de cuisson après chaque utilisation afin d’éviter les égratignures, les piqûres et l’abrasion et pour entretenir la surface de verre. Un nettoyant pour table de cuisson en vitrocéramique et un grattoir de table de cuisson sont aussi recommandés pour les saletés tenaces. Ne pas utiliser de produits de nettoyage abrasifs, de tampons de nettoyage ou de produits chimiques agressifs.
Plat de cuisson IMPORTANT : Ne pas laisser d’ustensile de cuisson vide sur une surface de cuisson, un élément ou un brûleur de surface chaud. Les ustensiles de cuisson idéals doivent avoir un fond plat, des parois droites, un couvercle qui ferme hermétiquement et le matériau doit être d’épaisseur moyenne à forte. Les finis rugueux peuvent égratigner la table de cuisson. L’aluminium et le cuivre peuvent être utilisés comme fond ou base d’un ustensile de cuisson.
UTILISATION AU FOUR Des odeurs et de la fumée sont normales lorsque le four est utilisé les premières fois et lorsqu’il est très sale. IMPORTANT : La santé de certains oiseaux est très sensible aux émanations de fumée. L’exposition aux émanations peut entraîner la mort de certains oiseaux. Toujours déplacer les oiseaux dans une autre pièce fermée et bien aérée. Commandes électroniques du four Affichage des commandes L’affichage clignote à la mise sous tension ou après une coupure de courant.
Au mode de vacances, la température peut être modifiée une fois que le four est au mode Sabbat en appuyant sur la touche à flèche vers le haut ou vers le bas de Temp/Time (température/ durée). La température du four change de 25 °F (14 °C) à chaque pression des touches à flèche vers le haut ou vers le bas de Temp/ Time (température/durée). Appuyer sur la touche mise en marche pour activer la nouvelle température. L’affichage ne change pas et aucun signal sonore ne retentit durant cet ajustement.
Pour utiliser: Cuisson sur plusieurs grilles 1. Appuyer sur KEEP WARM (maintien au chaud). 2. Appuyer sur la touche à flèche vers le haut ou vers le bas de Temp/Time (température/durée) jusqu’à ce que la durée souhaitée s’affiche. Un signal sonore retentit lorsque la température minimum ou maximum est atteinte. 3. Appuyer sur la touche mise en marche. 4. Placer les aliments dans le four 5. Appuyer sur la touche annulation après avoir terminé.
Cuisson au four et rôtissage Préchauffage Au début d’un programme de cuisson au four (Bake), le four commence par un préchauffage une fois la touche mise en marche enfoncée. Le four atteint 350 °F (177 °C) en 12 à 15 minutes environ lorsque toutes les grilles fournies avec le four sont à l’intérieur de la cavité du four. Pour atteindre une température plus élevée, le préchauffage est plus long. Le programme de préchauffage augmente rapidement la température du four.
ENTRETIEN DE LA CUISINIÈRE Nettoyage à la vapeur IMPORTANT : Ne pas utiliser de nettoyants pour four ou d’autres additifs avec Steam Clean (nettoyage avec vapeur) La fonction Steam Clean (nettoyage à la vapeur) est conçue pour effectuer un nettoyage léger de la cavité du four du bas et non pas pour la saleté intense et difficile à nettoyer. Utiliser la caractéristique Steam Clean (nettoyage avec vapeur) dès que possible après que les renversements se sont produits.
Nettoyage général IMPORTANT : Avant le nettoyage, s’assurer que toutes les commandes sont éteintes et que le four et la table de cuisson sont froids. Toujours suivre les instructions figurant sur les étiquettes des produits de nettoyage. Pour plus de renseignements, vous pouvez consulter la section Foire Aux Questions (FAQ) de notre site Web sur www.whirlpool.com. Au Canada, consulter la section service à la clientèle à l’adresse www.whirlpool.ca.
TABLEAU DE COMMANDE ET EXTÉRIEUR DE LA PORTE DU FOUR Afin d’éviter d’endommager le tableau de commande, ne pas utiliser de nettoyants abrasifs, de tampons en laine d’acier, de chiffons de lavage rêches ou d’essuie-tout abrasifs. Méthode de nettoyage : ■■ Nettoyant à vitre et chiffon doux ou éponge : Appliquer le nettoyant à vitre sur un chiffon doux ou une éponge, et non directement sur le tableau.
DÉPANNAGE Essayer d’abord les solutions suggérées ici. Pour obtenir de l’aide ou des conseils qui permettront peut-être d’éviter une intervention de dépannage, consultez la page de garantie de ce manuel, ou visitez le site Internet producthelp.whirlpool.com. Au Canada, visitez le site Internet www.whirlpool.ca.
Problème Causes possibles Solutions Des messages s’affichent Panne de courant (l’afficheur indique une heure clignotante). Effacer l’affichage. Sur certains modèles, régler de nouveau l’horloge au besoin. Voir la fonction de la touche “Clock” (horloge) à la section “Guide des caractéristiques”. Code d’erreur (l’afficheur indique une lettre suivie d'un numéro). En fonction du modèle, appuyer sur la touche annulation pour effacer l’affichage.
ACCESSOIRES Pour les accessoires aux États-Unis, consulter notre site Web www.whirlpool.com ou nous contacter au 1-800-253-1301. Aux Canada, consulter notre site Web www.whirlpool.ca ou nous contacter au 1-800-807-6777.
GARANTIE LIMITÉE DES GROS APPAREILS MÉNAGERS WHIRLPOOL® ATTACHEZ ICI VOTRE REÇU DE VENTE. UNE PREUVE D’ACHAT EST OBLIGATOIRE POUR OBTENIR L’APPLICATION DE LA GARANTIE.
W11102911C SP PN W11102915C ® /™ ©2018 Whirlpool. All rights reserved. Used under license in Canada. Tous droits réservés. Utilisé sous licence au Canada.