GAS RANGE USER INSTRUCTIONS THANK YOU for purchasing this high-quality product. Register your range at www.whirlpool.com. In Canada, register your range at www.whirlpool.ca. For future reference, please make a note of your product model and serial numbers. These can be located on the oven frame behind the top right side of the oven door. Model Number___________________________________________ Serial Number___________________________________________ Table of Contents RANGE SAFETY..........................
RANGE SAFETY Your safety and the safety of others are very important. We have provided many important safety messages in this manual and on your appliance. Always read and obey all safety messages. This is the safety alert symbol. This symbol alerts you to potential hazards that can kill or hurt you and others. All safety messages will follow the safety alert symbol and either the word “DANGER” or “WARNING.
The Anti-Tip Bracket The range will not tip during normal use. However, the range can tip if you apply too much force or weight to the open door without the anti-tip bracket fastened down properly. WARNING Tip Over Hazard A child or adult can tip the range and be killed. Verify the anti-tip bracket has been properly installed and engaged per installation instructions. Re-engage anti-tip bracket if range is moved. Do not operate range without anti-tip bracket installed and engaged.
FEATURE GUIDE This manual covers several models. Your model may have some or all of the items listed. Refer to this manual or the Frequently Asked Questions (FAQs) section of our website at www.whirlpool.com for more detailed instructions. In Canada, refer to the Customer Service Section at www.whirlpool.ca. WARNING Food Poisoning Hazard Do not let food sit in oven more than one hour before or after cooking. Doing so can result in food poisoning or sickness.
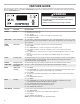
KEYPAD FEATURE INSTRUCTIONS START TIME Delayed start The Start Time keypad is used to enter the starting time for an oven function with a delayed start. Start Time should not be used for foods such as breads and cakes because they may not bake properly. To set a Timed Cook or a Delayed Timed Cook, see “Cook Time” section. COOK TIME Timed cooking Timed Cooking allows the oven to be set to turn on at a certain time of day, cook for a set length of time, and/or shut off automatically.
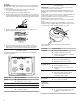
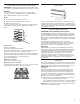
To Clean: IMPORTANT: Before cleaning, make sure all controls are OFF and the oven and cooktop are cool. Do not use oven cleaners, bleach or rust removers. 1. Remove the burner cap from the burner base and clean according to “General Cleaning” section. 2. Clean the gas tube opening with a damp cloth. 3. Clean clogged burner ports with a straight pin as shown. Do not enlarge or distort the port. Do not use a wooden toothpick. If the burner needs to be adjusted, contact a trained repair specialist.
For best results, the cookware should be centered above the burner with the bottom sitting level on the grate. The flame should be adjusted so that it does not extend up the sides of the pan. Home Canning When canning for long periods, alternate the use of surface burners between batches. This allows time for the most recently used areas to cool. ■■ Center the canner on the grate above the burner. ■■ Do not place canner on 2 surface burners at the same time.
Sabbath Mode The Sabbath Mode sets the oven to remain on in a Bake setting until turned off. A Timed Bake can also be set to keep the oven on for only part of the Sabbath. The Oven Control Lockout Feature (if present) will be disabled during the Sabbath Mode.
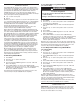
Positioning Racks and Bakeware Oven Vent IMPORTANT: To avoid permanent damage to the porcelain finish, do not place food or bakeware directly on the oven door or bottom. A Bakeware To cook food evenly, hot air must be able to circulate. Allow 2" (5 cm) of space around bakeware and oven walls. Make sure that no bakeware piece is directly over another. Racks ■■ Position racks before turning on the oven. ■■ Do not position racks with bakeware on them. Make sure racks are level.
Cook Time To Set a Delayed Timed Cook: WARNING Food Poisoning Hazard Do not let food sit in oven more than one hour before or after cooking. Doing so can result in food poisoning or sickness. To Set a Timed Cook: 1. Press BAKE. The bake indicator light will light up. 2. Press the TEMP/TIME “up” or “down” arrow pads to enter a temperature other than the one displayed. 3. Press COOK TIME. The cook time oven indicator light will light up. 4.
General Cleaning IMPORTANT: Before cleaning, make sure all controls are OFF and the oven and cooktop are cool. Always follow label instructions on cleaning products. For additional information, you can visit the Frequently Asked Questions (FAQs) section of our website at www.whirlpool.com. In Canada, reference the Customer Service section at www.whirlpool.ca. Soap, water and a soft cloth or sponge are suggested first unless otherwise noted.
TROUBLESHOOTING First try the solutions suggested here. If you need further assistance or more recommendations that may help you avoid a service call, refer to the warranty page in this manual, or visit www.whirlpool.com/product_help. In Canada, visit http://www.whirlpool.ca. Contact us by mail with any questions or concerns at the address below: In the U.S.A.
PROBLEM POSSIBLE CAUSES SOLUTIONS Oven will not operate Air in the gas lines. If this is the first time the oven has been used, turn on any one of the surface burner knobs to release air from the gas lines. Control is locked. Press and hold START for 3 seconds to unlock. Control is in Demo Mode. Press and hold START TIME for 10 seconds to exit Demo Mode. Demo Mode is used for display models in a showroom. Electronic oven control set incorrectly. See “Electronic Oven Controls” section.
PROBLEM POSSIBLE CAUSES SOLUTIONS Oven cooking results not what expected Range is not level. Level the range. See the Installation Instructions. The temperature set was incorrect. Double-check the recipe in a reliable cookbook. Oven temperature needs adjustment. See “Oven Temperature Control” in the “Electronic Oven Controls” section. Oven was not preheated. See “Baking and Roasting” section. Racks were positioned improperly. See “Positioning Racks and Bakeware” section.
ACCESSORIES For accessories in the U.S.A., you can visit our website at www.whirlpool.com or call us at 1-800-253-1301. In Canada, you can visit our website at www.whirlpool.ca or call us at 1-800-807-6777.
WHIRLPOOL® MAJOR APPLIANCE LIMITED WARRANTY ATTACH YOUR RECEIPT HERE. PROOF OF PURCHASE IS REQUIRED TO OBTAIN WARRANTY SERVICE. Please have the following information available when you call the Customer eXperience Center: Name, address, and telephone number Model number and serial number A clear, detailed description of the problem Proof of purchase, including dealer or retailer name and address IF YOU NEED SERVICE: 1.
INSTRUCTIONS D’UTILISATION DE LA CUISINIÈRE À GAZ MERCI d’avoir acheté ce produit de grande qualité. Enregistrer la cuisinière sur www.whirlpool.ca. Pour référence ultérieure, consigner par écrit les numéros de modèle et de série de votre produit. Vous trouvez les numéros de modèle et de série sur le châssis du four, derrière la partie supérieure droite de la porte du four.
SÉCURITÉ DE LA CUISINIÈRE Votre sécurité et celle des autres est très importante. Nous donnons de nombreux messages de sécurité importants dans ce manuel et sur votre appareil ménager. Assurez-vous de toujours lire tous les messages de sécurité et de vous y conformer. Voici le symbole d’alerte de sécurité. Ce symbole d’alerte de sécurité vous signale les dangers potentiels de décès et de blessures graves à vous et à d’autres.
La bride antibasculement Dans des conditions de service normales, la cuisinière ne bascule pas. Elle peut cependant basculer si une force ou un poids excessif est appliqué sur la porte ouverte alors que la bride antibasculement n’est pas convenablement fixée. AVERTISSEMENT Risque de basculement Un enfant ou une personne adulte peut faire basculer la cuisinière, ce qui peut causer un décès. Vérifier que la bride antibasculement est bien installée et engagée, conformément aux instructions d'installation.
GUIDE DES CARACTÉRISTIQUES Ce manuel couvre différents modèles. Le modèle que vous avez peut comporter toutes les caractéristiques énumérées ou seulement certaines d’entre elles. Consulter ce manuel ou la section Service à la clientèle de notre site Web sur www.whirlpool.ca pour des instructions plus détaillées. AVERTISSEMENT Risque d'empoisonnement alimentaire Ne pas laisser des aliments dans un four plus d'une heure avant ou après la cuisson.
CLAVIER CARACTÉRISTIQUE INSTRUCTIONS BROIL (cuisson au gril) Cuisson au gril 1. Appuyer sur BROIL (cuisson au gril). 2. Appuyer sur les touches à flèche “vers le haut” ou “vers le bas” de TEMP/TIME (température/durée) pour modifier la température par tranches de 5°F (5°C), entre 300°F et 500°F (150°C et 260°C). 3. Appuyer sur START (mise en marche), et laisser le four préchauffer pendant 5 minutes. 4. Placer les ustensiles de cuisson dans le four et fermer la porte du four. 5.
Brûleurs de surface scellés 3. Nettoyer les orifices de brûleur obstrués avec une épingle droite tel qu’indiqué. Ne pas agrandir ni déformer les orifices. Ne pas utiliser un cure-dent en bois. Si le brûleur a besoin d’être ajusté, faire venir un technicien de réparation qualifié. A D B E 4. Réinstaller le chapeau de brûleur et s’assurer que les tiges d’alignement sont bien alignées avec le chapeau de brûleur. C A. B. C. D. E.
Ustensiles de cuisson IMPORTANT : Ne pas laisser d’ustensile de cuisson vide sur une surface de cuisson, un élément ou un brûleur de surface chauds. L’ustensile de cuisson idéal doit avoir un fond plat, des parois droites, un couvercle qui ferme hermétiquement et le matériau doit être d’épaisseur moyenne à forte. Les finis rugueux peuvent érafler la table de cuisson ou les grilles. L’aluminium et le cuivre peuvent être utilisés comme fond ou base d’un ustensile de cuisson.
UTILISATION DU FOUR Le fonctionnement normal de la cuisinière inclut plusieurs bruits que l’on peut entendre chaque fois que les brûleurs de cuisson au four ou de cuisson au gril s’allument durant le programme de cuisson : ■■ les robinets de gaz peuvent faire un bruit “d’éclatement” lorsqu’ils s’ouvrent ou se ferment ■■ les allumeurs émettront plusieurs “cliquetis” jusqu’à ce qu’une flamme soit détectée un bruit “d’affaissement” se fait entendre lorsque le brûleur de cuisson au four ou de cuisson au gri
Avant d’entrer en mode Sabbat, l’utilisateur doit décider s’il souhaite que la lampe du four soit allumée ou éteinte pendant toute la période du mode Sabbat. Si la lampe est allumée au moment où le four entre en mode Sabbat, elle restera allumée durant toute la période d’utilisation du mode Sabbat. Si la lampe est éteinte au moment où le four entre en mode Sabbat, elle restera éteinte durant toute la période d’utilisation du mode Sabbat.
Positionnement des grilles et des ustensiles de cuisson Évent du four A IMPORTANT : Pour éviter des dommages permanents au fini en porcelaine, ne pas placer d’aliments ou d’ustensiles de cuisson directement sur la porte ou sur le fond du four. Ustensiles de cuisson L’air chaud doit pouvoir circuler autour de l’aliment pour le cuire uniformément. Laisser 2" (5 cm) entre les ustensiles de cuisson et les parois du four. S’assurer qu’aucun ustensile de cuisson ne se trouve directement au-dessus d’un autre.
Durée de cuisson AVERTISSEMENT Risque d'empoisonnement alimentaire Ne pas laisser des aliments dans un four plus d'une heure avant ou après la cuisson. Le non-respect de cette instruction peut causer un empoisonnement alimentaire ou une maladie. Réglage d’une cuisson minutée : 1. Appuyer sur BAKE (cuisson au four). Le témoin de cuisson au four s’allume. 2.
Commande de four électronique avec durée de nettoyage réglable (sur certains modèles) La durée du programme d’autonettoyage SELF CLEAN est réglable entre 2 h 30 et 4 h 30 par tranches de 15 minutes. Les durées de nettoyage suggérées sont de 2 h 30 pour un niveau de saleté faible et de 4 h 30 pour un niveau de saleté élevé. Pendant les 30 dernières minutes du programme, le four refroidit. Autonettoyage : 1. Appuyer sur SELF CLEAN. 2.
TIROIR DE REMISAGE S’assurer que le tiroir est froid et vide avant le nettoyage. Méthode de nettoyage : ■■ Détergent doux CAVITÉ DU FOUR Ne pas utiliser de nettoyants à four. Les renversements alimentaires doivent être nettoyés lorsque le four a refroidi. À des températures élevées, les aliments réagissent avec l’émail et cette réaction peut entraîner la formation de taches, une attaque acide, des piqûres ou des décolorations blanchâtres.
PROBLÈME CAUSES POSSIBLES SOLUTIONS Les brûleurs de surface ne fonctionnent pas Le bouton de commande n’est pas réglé correctement. Enfoncer le bouton avant de le tourner à un réglage. Il y a de l’air dans les conduites de gaz. Si c’est la première fois que les brûleurs de surface sont utilisés, allumer n’importe quel bouton de brûleur de surface afin de libérer l’air présent dans les canalisations. Les orifices du brûleur sont obstrués. Voir la section “Brûleurs de surface scellés”.
PROBLÈME CAUSES POSSIBLES SOLUTIONS Le programme d’autonettoyage ne fonctionne pas. La porte du four n’est pas fermée. S’assurer que la porte du four est complètement fermée. La fonction d’autonettoyage n’a pas été correctement entrée. Voir la section “Programme d’autonettoyage”. Une fonction de cuisson minutée a été entrée. Voir la section “Durée de cuisson”. La cuisinière est au mode Sabbat. Voir la section “Mode Sabbat”.
Bruits PROBLÈME CAUSES POSSIBLES Le brûleur de surface émet des Le brûleur est mouillé. bruits d’éclatement SOLUTIONS Le laisser sécher. Bruits émis par la cuisinière à gaz lors des opérations de cuisson au four et de cuisson au gril Voici quelques bruits normaux avec des explications. Ces bruits sont des bruits de fonctionnement normaux qui peuvent survenir chaque fois que les brûleurs de cuisson au four ou de cuisson au gril s’allument au cours du programme.
ACCESSOIRES Pour les accessoires, consulter notre site Web www.whirlpool.ca ou nous contacter au 1-800-807-6777.
GARANTIE LIMITÉE DES GROS APPAREILS MÉNAGERS WHIRLPOOL® ATTACHEZ ICI VOTRE REÇU DE VENTE. UNE PREUVE D’ACHAT EST OBLIGATOIRE POUR OBTENIR L’APPLICATION DE LA GARANTIE.
INSTRUCCIONES PARA EL USUARIO DE LA ESTUFA A GAS LE AGRADECEMOS la compra de este producto de alta calidad. Si usted experimenta un problema que no se haya cubierto en SOLUCIÓN DE PROBLEMAS, visite nuestro sitio de internet en www.whirlpool.com para obtener información adicional. Si aún necesita ayuda, llámenos al 1-800-253-1301. Necesitará tener a mano el número de modelo y de serie, que está ubicado en el marco del horno detrás del lado superior izquierdo de la puerta del horno.
SEGURIDAD DE LA ESTUFA Su seguridad y la seguridad de los demás es muy importante. Hemos incluido muchos mensajes importantes de seguridad en este manual y en su electrodoméstico. Lea y obedezca siempre todos los mensajes de seguridad. Este es el símbolo de alerta de seguridad. Este símbolo le llama la atención sobre peligros potenciales que pueden ocasionar la muerte o una lesión a usted y a los demás.
El soporte antivuelco La estufa no se volteará durante el uso normal. Sin embargo, si usted aplica mucha fuerza o peso a la puerta abierta sin haber fijado adecuadamente el soporte antivuelco, la estufa puede voltearse. ADVERTENCIA Peligro de Vuelco Un niño o un adulto puede volcar accidentalmente la estufa y resultar muerto. Verifique que se haya instalado y asegurado debidamente el soporte anti-vuelco según las instrucciones de instalación.
GUÍA DE CARACTERÍSTICAS Este manual cubre varios modelos. Su modelo podrá contar con algunos o todos los artículos listados. Refiérase a este manual o la sección de “Preguntas que se hacen con frecuencia” de nuestra página de Internet, en www.whirlpool.com para obtener instrucciones más detalladas. ADVERTENCIA Peligro de Intoxicación Alimentaria No deje sus alimentos en el horno por más de una hora antes o después de su cocción.
BOTÓN CARACTERÍSTICA INSTRUCCIONES KEEP WARM (Mantener caliente) Mantener caliente La comida deberá estar a la temperatura como para ser servida antes de colocarla en el horno caliente. 1. Presione KEEP WARM (Mantener caliente). 2. La temperatura se fija en 170 °F (75 °C) por 60 minutos (1 hora). 3. Presione START (Inicio). 4. Presione CANCEL (Anulación) cuando haya terminado. NOTA: El horno se apagará automáticamente después de 60 minutos.
Quemadores de superficie sellados Orificios del quemador: Verifique de vez en cuando que las llamas del quemador sean del tamaño y forma apropiada tal como se ilustra arriba. Una buena llama es de color azul, no amarillo. Mantenga esta área libre de suciedad y no permita que los derrames, alimentos, productos de limpieza o cualquier otro material se introduzca en los orificios del quemador. A D B E C A. Tapa del quemador B. Base del quemador C. Espigas de alineación D. Encendedor E.
Tamaño del quemador Seleccione un quemador cuyo tamaño sea el más adecuado para el utensilio de cocción. Vea la ilustración y la tabla siguientes.
Para obtener los mejores resultados, el recipiente de cocción deberá estar centrado encima del quemador con la base nivelada sobre la rejilla. Deberá regularse la llama para que no se extienda por los lados del recipiente. Envasado casero Al preparar envasados durante períodos prolongados, alterne el uso de los quemadores de superficie entre cada lote. Esto le da tiempo a que se enfríen las áreas que se han usado recientemente.
Control de la temperatura del horno IMPORTANTE: No use un termómetro para medir la temperatura del horno. Los elementos se encenderán y se apagarán según sea necesario para brindar una temperatura uniforme, pero es posible que funcione en algún momento ligeramente caliente o frío a causa de este ciclo. La mayoría de los termómetros son lentos para reaccionar a los cambios de temperatura y no brindarán una lectura precisa a causa de este ciclo.
El presionar el botón de Cancel (Anulación) en cualquier momento fija el horno de nuevo en el modo de cocción normal (sin cumplir con las características del modo Sabbath - Día de descanso). Para programar la hora y la duración del horneado en el modo Sabbath (en algunos modelos): 1. Presione BAKE (Hornear). 2. Presione los botones con las flechas hacia arriba o hacia abajo para seleccionar una temperatura diferente de la que aparece en la pantalla. 3. Presione COOK TIME (Tiempo de cocción).
Cómo hornear y asar Sistema de control de temperatura ACCUBAKE® El sistema ACCUBAKE® regula electrónicamente los niveles de calor del horno durante el precalentamiento y el horneado para mantener un rango de temperatura preciso y obtener óptimos resultados de cocción. Los elementos o quemadores de hornear y asar tendrán ciclos con intervalos de encendido y apagado.
CUIDADO DE LA ESTUFA Ciclo de autolimpieza ADVERTENCIA Peligro de Quemadura No toque el horno durante el ciclo de autolimpieza. Mantenga a los niños lejos del horno durante el ciclo de autolimpieza. No seguir estas instrucciones puede ocasionar quemaduras. IMPORTANTE: La salud de algunas aves es sumamente sensible a los gases emanados durante el ciclo de autolimpieza. La exposición a los gases puede ocasionar la muerte de ciertas aves. Mude siempre las aves a otro cuarto cerrado y bien ventilado.
ACERO INOXIDABLE (en algunos modelos) CONTROLES DE LA SUPERFICIE DE COCCIÓN NOTA: Para evitar daños a las superficies de acero inoxidable, no use estropajos que vienen con jabón, productos de limpieza abrasivos, limpiador para la superficie de cocción, estropajos de metal, paños ásperos o toallas de papel abrasivas. Podrían ocurrir daños a las superficies de acero inoxidable, aún si sólo se usa una vez o en forma limitada. Método de limpieza: Frote en la dirección de la veta para evitar que se dañe.
SOLUCIÓN DE PROBLEMAS Pruebe primero las soluciones sugeridas aquí. Si necesita asistencia adicional o más recomendaciones que pueden ayudarle a evitar una llamada de servicio técnico, consulte la página de la garantía de este manual o visite producthelp.whirlpool.com. En Canadá, visite www.whirlpool.ca. ADVERTENCIA Peligro de Choque Eléctrico Conecte a un contacto de pared de conexión a tierra de 3 terminales. No quite la terminal de conexión a tierra. No use un adaptador.
PROBLEMA CAUSAS POSIBLES SOLUCIONES El horno no funciona Hay aire en las líneas de gas. Si ésta es la primera vez que se usa el horno, encienda cualquiera de las perillas de los quemadores de superficie para despejar el aire de las líneas de gas. El control está bloqueado. Oprima y sostenga START (Inicio) por 3 segundos para desbloquear. El control está en Demo Mode (Modo de demostración).
PROBLEMA CAUSAS POSIBLES SOLUCIONES Los resultados de cocción del horno no son los que se esperaba La estufa no está nivelada. Nivele la estufa. Vea las Instrucciones de instalación. Se ha fijado la temperatura incorrecta. Vuelva a verificar la receta en un libro de cocina confiable. La temperatura del horno necesita regularse. Vea “Control de la temperatura del horno” en la sección “Controles electrónicos del horno”. No se ha precalentado el horno. Consulte la sección “Cómo hornear y asar”.
Ruidos PROBLEMA CAUSAS POSIBLES SOLUCIONES El quemador de superficie está haciendo ruidos como estallidos Quemador mojado Déjelo secar. Ruidos provenientes de la estufa a gas durante el funcionamiento de Bake (Hornear) y Broil (Asar a la parrilla) A continuación se indican algunos sonidos normales con las explicaciones. Estos sonidos son ruidos normales del funcionamiento, que se pueden escuchar cada vez que se encienden los quemadores para hornear o asar, durante el ciclo.
GARANTÍA LIMITADA DE LOS ELECTRODOMÉSTICOS PRINCIPALES DE WHIRLPOOL® ADJUNTE SU RECIBO AQUÍ. SE REQUIERE LA PRUEBA DE COMPRA PARA OBTENER SERVICIO BAJO LA GARANTÍA. Tenga a mano la siguiente información cuando llame al Centro para la eXperiencia del cliente: Nombre, dirección y número de teléfono Número de modelo y de serie Una descripción clara y detallada del problema Prueba de compra incluido el nombre y la dirección del distribuidor o vendedor SI NECESITA SERVICIO TÉCNICO: 1.