
Owner's Manual

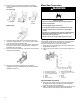
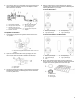

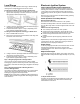
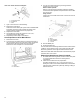

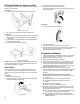

Table Of Contents
- RANGE SAFETY
- Range Safety
- RANGE MAINTENANCE AND CARE
- General Cleaning
- Self-Cleaning Cycle
- INSTALLATION INSTRUCTIONS
- REQUIREMENTS
- Tools and Parts
- Location Requirements
- Electrical Requirements
- Gas Supply Requirements
- INSTALLATION
- Unpack Range
- Install Anti-Tip Bracket
- Make Gas Connection
- Verify Anti-Tip Bracket Is Installed and Engaged
- Level Range
- Electronic Ignition System
- Warming Drawer or Premium Storage Drawer (on some models)
- Storage Drawer (on some models)
- Oven Door
- Complete Installation
- GAS CONVERSIONS
- Propane Gas Conversion
- Natural Gas Conversion
- Moving the Range
- SECURITE DE LA CUISINIERE
- Securite de la cuisiniere
- ENTRETIEN ET REPARATION DE LA CUISINIERE
- Nettoyage general
- Programme d'autonettoyage
- INSTRUCTIONS D'INSTALLATION
- EXIGENCE
- Outils et pieces
- Exigences d'emplacement
- Specifications electriques
- Specifications de l'alimentation en gaz
- INSTALLATION
- Deballage de la cuisiniere
- Installation de la bride antibasculement
- Raccordement au gaz
- Verifier que la bride antibasculement est bien installee et engagee
- Reglage de l'aplomb de la cuisiniere
- Systeme d'allumage electronique
- Tiroir-rechaud ou tiroir de remisage de qualite superieure (sur certains modeles)
- Tiroir de remisage (sur certains modeles)
- Porte du four
- Achever l'installation
- CONVERSIONS POUR CHANGEMENT DE GAZ
- Conversion pour l'alimentation au propane
- Conversion pour l'alimentation au gaz naturel
- Deplacement de la cuisiniere
- SEGURIDAD DE LA ESTUFA
- Seguridad de la estufa
- CUIDADO Y MANTENIMIENTO DE LA ESTUFA
- Limpieza general
- Ciclo de autolimpieza
- INSTRUCCIONES DE INSTALACION
- REQUISITOS
- Herramientas y piezas
- Requisitos de ubicacion
- Requisitos electricos
- Requisitos de suministro de gas
- INSTALACION
- Desembale la cocina
- Instalacion del soporte antivuelco
- Conexion del suministro de gas
- Verifique que el soporte anti-vuelco este instalado y enganchado
- Nivelacion de la cocina
- Sistema de encendido electronico
- Cajon de calentamiento o cajon de almacenamiento premium (en algunos modelos)
- Cajon de almacenamiento (en algunos modelos)
- Puerta del horno
- Completar la instalacion
- CONVERSIONES DE GAS
- Conversion a gas propano
- Conversion a gas natural
- Como mover la estufa

14
6. Place the burner caps on the appropriate burner bases.
IMPORTANT: The bottom of the small and medium caps are
different. Do not put the wrong size burner cap on the burner
base. Each round burner cap is marked with an AUX, SR, UR,
or ST to match with a letter on the burner base.
Small cap
(Auxiliary)
Medium cap (Semi
Rapid)
Large cap (Ultra
Rapid)
WARNING
Electrical Shock Hazard
Plug into a grounded 3 prong outlet.
Do not remove ground prong.
Do not use an adapter.
Do not use an extension cord.
Failure to follow these instructions can result in death,
fire, or electrical shock.
7. Plug into a grounded 3-prong outlet.
8. Slide range into final location, making sure the rear leveling
leg slides into the slot of the anti-tip bracket.
Verify Anti-Tip Bracket Is Installed
and Engaged
On Ranges Equipped with a Storage Drawer:
1. Remove the storage drawer. See the “Storage Drawer”
section.
2. Use a flashlight to look underneath the bottom of the range.
3. Visually check that the rear range foot is inserted into the slot
of the anti-tip bracket.
On Ranges Equipped with a Warming Drawer or
Premium Storage Drawer:
1. Place the outside of your foot against the bottom front of the
warming drawer or premium storage drawer, and grasp the
lower right or left side of the control panel as shown.
NOTE: If your countertop is mounted with a backsplash, it
may be necessary to grasp the range higher than is shown in
the illustration.
2. Slowly attempt to tilt the range forward.
If you encounter immediate resistance, the range foot is
engaged in the anti-tip bracket.
3. If the rear of the range lifts more than 1/2" (1.3 cm) off the floor
without resistance, stop tilting the range and lower it gently
back to the floor. The range foot is not engaged in the anti-tip
bracket.
IMPORTANT: If there is a snapping or popping sound when
lifting the range, the range may not be fully engaged in the
bracket. Check to see if there are obstructions keeping the
range from sliding to the wall or keeping the range foot from
sliding into the bracket. Verify that the bracket is held securely
in place by the mounting screws.
4. Slide the range forward, and verify that the anti-tip bracket is
securely attached to the floor or wall.
5. Slide range back so the rear range foot is inserted into the slot
of the anti-tip bracket.
IMPORTANT: If the back of the range is more than 2" (5.1 cm)
from the mounting wall, the rear range foot may not engage the
bracket. Slide the range forward and determine if there is an
obstruction between the range and the mounting wall. Changes to
the gas supply must be performed by a qualified service
technician. If you need assistance or service, refer to the Quick
Start Guide for contact information.
6. Repeat steps 1 and 2 to ensure that the range foot is engaged
in the anti-tip bracket.
If the rear of the range lifts more than 1/2" (1.3 cm) off the floor
without resistance, the anti-tip bracket may not be installed
correctly. Do not operate the range without anti-tip bracket
installed and engaged. If you need assistance or service, refer
to the Quick Start Guide for contact information.