
Owner's Manual

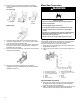
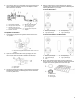

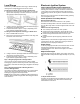
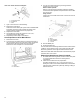

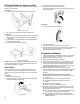
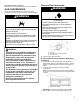

Table Of Contents
- RANGE SAFETY
- Range Safety
- RANGE MAINTENANCE AND CARE
- General Cleaning
- Self-Cleaning Cycle
- INSTALLATION INSTRUCTIONS
- REQUIREMENTS
- Tools and Parts
- Location Requirements
- Electrical Requirements
- Gas Supply Requirements
- INSTALLATION
- Unpack Range
- Install Anti-Tip Bracket
- Make Gas Connection
- Verify Anti-Tip Bracket Is Installed and Engaged
- Level Range
- Electronic Ignition System
- Warming Drawer or Premium Storage Drawer (on some models)
- Storage Drawer (on some models)
- Oven Door
- Complete Installation
- GAS CONVERSIONS
- Propane Gas Conversion
- Natural Gas Conversion
- Moving the Range
- SECURITE DE LA CUISINIERE
- Securite de la cuisiniere
- ENTRETIEN ET REPARATION DE LA CUISINIERE
- Nettoyage general
- Programme d'autonettoyage
- INSTRUCTIONS D'INSTALLATION
- EXIGENCE
- Outils et pieces
- Exigences d'emplacement
- Specifications electriques
- Specifications de l'alimentation en gaz
- INSTALLATION
- Deballage de la cuisiniere
- Installation de la bride antibasculement
- Raccordement au gaz
- Verifier que la bride antibasculement est bien installee et engagee
- Reglage de l'aplomb de la cuisiniere
- Systeme d'allumage electronique
- Tiroir-rechaud ou tiroir de remisage de qualite superieure (sur certains modeles)
- Tiroir de remisage (sur certains modeles)
- Porte du four
- Achever l'installation
- CONVERSIONS POUR CHANGEMENT DE GAZ
- Conversion pour l'alimentation au propane
- Conversion pour l'alimentation au gaz naturel
- Deplacement de la cuisiniere
- SEGURIDAD DE LA ESTUFA
- Seguridad de la estufa
- CUIDADO Y MANTENIMIENTO DE LA ESTUFA
- Limpieza general
- Ciclo de autolimpieza
- INSTRUCCIONES DE INSTALACION
- REQUISITOS
- Herramientas y piezas
- Requisitos de ubicacion
- Requisitos electricos
- Requisitos de suministro de gas
- INSTALACION
- Desembale la cocina
- Instalacion del soporte antivuelco
- Conexion del suministro de gas
- Verifique que el soporte anti-vuelco este instalado y enganchado
- Nivelacion de la cocina
- Sistema de encendido electronico
- Cajon de calentamiento o cajon de almacenamiento premium (en algunos modelos)
- Cajon de almacenamiento (en algunos modelos)
- Puerta del horno
- Completar la instalacion
- CONVERSIONES DE GAS
- Conversion a gas propano
- Conversion a gas natural
- Como mover la estufa

16
If the “low” flame needs to be adjusted:
A. Control knob stem
B. Screwdriver
C. Pliers
1. Light 1 burner and turn to lowest setting.
2. Remove the control knob.
Hold the knob stem with a pair of pliers. Use a small flat blade
screwdriver to turn the screw located in the center of the
control knob stem until the flame is the proper size.
3. Replace the control knob.
4. Test the flame by turning the control from “LO” to “HI,”
checking the flame at each setting.
5. Repeat the previous steps for each burner.
Check Operation of Oven Bake Burner
1. Remove the oven rack.
2. To remove the oven bottom: Remove 2 screws at the rear of
the oven bottom. Lift the rear of the oven bottom up and back
until the front of the panel is away from the front frame.
Remove from oven and place on a covered surface.
A. Screws
B. Oven bottom
3. You can check the burner flame by removing the flame
spreader or by using a mirror.
Remove flame spreader:
Remove 2 screws from the front tabs of the flame spreader.
Lift front of the flame spreader and pull forward to remove tabs
from rear of oven.
Using a mirror:
Insert a mirror to one side of the burner. Look into the mirror to
check flame.
A. Mirror
B. Flame spreader
C. Flame reflection
D. 2 screws
4. Push the BAKE pad.
5. Press the START pad.
The oven bake burner should light within 8 seconds. Under certain
conditions, it may take the burner up to 50 to 60 seconds to light.
Electronic igniters are used to light the bake and broil burners.
Refer to the Quick Start Guide and online Control Guide for proper
operation of the oven controls.
Adjust Oven Bake Burner Flame (if needed)
1. On models with a warming drawer, remove access cover plate
(1 screw) located at the back of the warming drawer
compartment.
2. Check the oven bake burner for proper flame.
This flame should have a 1/2" (1.3 cm) long inner cone of
bluish-green, with an outer mantle of dark blue, and should be
clean and soft in character. No yellow tips, blowing or lifting of
flame should occur.