
Control Guide
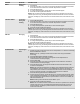
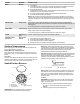
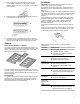

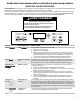
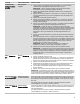
Table Of Contents
- Feature Guide_W11523786
- Surface Temperatures_GFSR_CG
- Sealed Surface Burners_W11523786
- Grates_W11523786
- Cookware_W11102912
- Home Canning_GFSR_CG
- Oven Use_W11122565
- Electronic Oven Controls_W11085354
- Sabbath Mode_W11085354
- Racks and Bakeware_W11523786
- Baking and Roasting_W11102912
- Broiling_W11102912
- Convection Baking and Roasting_W11523786
- Cook Time_W11085354
- Guide des caractéristiques_W11523786
- Températures de surface_GFSR_CG
- Brûleurs de surface scellés_W11523786
- Grates_W11523786
- Cookware_W11102912
- Mise en conserve à la maison_GFSR_CG
- Utilisation du four_W11122565
- Commandes électroniques du four_W11085354
- Mode Sabbath (Sabbat)_W11085354
- Grilles et ustensiles de cuisson_W11523786
- Cuisson et rôtissage au four_W11102912
- Broiling_W11102912
- Cuisson au four et rôtissage par convection_W11523786
- Durée de cuisson_W11085354
- Guía de funciones_W11523786
- Temperaturas de la superficie_GFSR_CG
- Quemadores de superficie sellados_W11523786
- Rejillas_W11523786
- Utensilios de cocina_W11102912
- Envasado casero_GFSR_CG
- Uso del horno_W11122565
- Controles electrónicos del horno_W11085354
- Modo Sabbath (Sabbat)_W11085354
- Parrillas y utensilios para hornear_W11523786
- Hornear y asar_W11102912
- Asar a la parrilla_W11102912
- Hornear y asar por convección_W11523786
- Tiempo de cocción_W11085354

3
KEYPAD FEATURE INSTRUCTIONS
BROIL Broiling
1. Press BROIL.
2. Press the Temp/Time up or down arrow keypad until desired temperature is reached.
A tone will sound if the minimum or maximum temperature is reached.
3. Press the Start keypad.
4. Preheat the oven for five minutes, unless otherwise recommended by recipe. Position
cookware in the oven and close the oven door.
5. To change the temperature, repeat Step 2 and press the Start keypad.
6. Press the Cancel keypad when finished.
NOTE: The convection fan will shut off when the oven door is opened. If the oven door
remains open for too long, the heating elements will shut off until the oven door is closed.
All timers, including any active Cook Time or Timed Cook functions, will continue to count
down.
DELAY START Delayed start Delay Start is used to enter the starting time for an oven function with a delayed start.
Delay Start should not be used for foods such as breads and cakes because they may not
bake properly.
To set a Timed Cook or a Delayed Timed Cook, see “Cook Time” section.
COOK TIME Timed cooking Cook Time allows the oven to be set to turn on at a certain time of day, cook for a set
length of time, and/or shut off automatically.
To set a Timed Cook or a Delayed Timed Cook, see “Cook Time” section.
CLEAN Self-Cleaning
cycle
See the “Self-Cleaning Cycle” section in the Owner’s Manual.
CONTROL LOCK
(Hold 3 sec)
Oven control
lockout
1. Check that the oven and cooktop are off.
2. Press and hold CONTROL LOCK for 3 seconds.
3. A tone will sound and a lock will be displayed.
4. Repeat to unlock. No keypads will function with the controls locked.
Surface Temperatures
When the range is in use, all range surfaces may become hot,
such as the knobs and oven door.
Baking, Warming or Storage Drawer
When the oven is in use, the drawer may become hot. Do not
store plastics, cloth, or other items that could melt or burn in the
drawer.
Oven Vent
The oven vent releases hot air and moisture from the oven, and
should not be blocked or covered. Do not set plastics, paper, or
other items that could melt or burn near the oven vent.
Sealed Surface Burners
A. Burner cap
B. Burner base
C. Alignment pins
D. Igniter
E. Gas tube opening
IMPORTANT: Do not obstruct the flow of combustion
and ventilation air around the burner grate edges.
Burner cap: Always keep the burner cap in place when using
a surface burner. A clean burner cap will help avoid poor ignition
and uneven flames. Always clean the burner cap after a spillover
and routinely remove and clean the caps according to the
“General Cleaning” section in the Owner’s Manual.
Gas tube opening: Gas must flow freely throughout the gas tube
opening for the burner to light properly. Keep this area free of soil
and do not allow spills, food, cleaning agents, or any other
material to enter the gas tube opening. Keep spillovers out of the
gas tube opening by always using a burner cap.
A. 1-1
1
/
2
" (2.5-3.8 cm) B. Burner ports
Burner ports: Check burner flames occasionally for proper size
and shape as shown in the previous illustration. A good flame is
blue in color, not yellow. Keep this area free of soil and do not
allow spills, food, cleaning agents, or any other material to enter
the burner ports.
To Clean:
IMPORTANT: Before cleaning, make sure all controls are OFF
and the oven and cooktop are cool. Do not use oven cleaners,
bleach, or rust removers.
1. Remove the burner cap from the burner base and clean
according to “General Cleaning” section in the Owner’s
Manual.
2. Clean the gas tube opening with a damp cloth.
A
B
D
E
C