
Owner's Manual


7
To Clean:
IMPORTANT: Before cleaning, make sure all controls are off and
the oven and cooktop are cool. Do not use oven cleaners, bleach,
or rust removers.
1. Remove the burner cap from the burner base and clean
according to the “General Cleaning” section.
2. Clean the gas tube opening with a damp cloth.
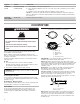
3. Clean clogged burner ports with a straight pin as shown. Do
not enlarge or distort the port. Do not use a wooden toothpick.
If the burner needs to be adjusted, contact a trained repair
specialist.
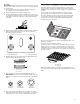
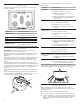
4. Replace the burner base. Each round burner base is marked
with a letter indicating the burner size. See the following
illustration for burner positions.
5. Replace the burner cap, making sure the alignment pins are
properly aligned with the burner cap.
6. Place the burner caps on the appropriate burner bases.
IMPORTANT: The bottom of the small and medium caps are
different. Do not put the wrong size burner cap on the burner
base.
7. Turn on the burner. If the burner does not light, check cap
alignment. If the burner still does not light, do not service the
sealed burner yourself. Contact a trained repair specialist.
EZ-2-Lift™ Hinged Cast Iron Grates
The grates must be properly positioned before cooking. In the
proper position, the grates should be ush and level. Improper
installation of the grates may result in chipping or scratching of the
cooktop.
Your cooktop comes with hinged grates for easier cleaning.
The grates pivot to the side for easy access under the grates.
The grates will stop once they are moved to their vertical (fully
open) position. A 20" (50.8 cm) minimum clearance from the
countertop to the bottom of the upper cabinets/appliances is
needed to fully open the grates.
Be sure to return the grates to their normal (down) position once
cleaning is complete.
The grates are removable for cleaning.
To attach the grates to their hinges, insert the grate slot over the
hinge pin on the side of the cooktop. Be sure to keep the grate
angled above the cooktop to avoid scratching the cooktop until
the grate is seated on the hinge pin. Then position the grate down
onto the cooktop.
Although the burner grates are durable, they will gradually lose
their shine and/or discolor due to the high temperatures of the gas
ame.
A. Medium (Semi Rapid)
B. Large (Ultra Rapid)
C. Oval (OV) D. Small (Auxiliary)
E. Large (Ultra Rapid)
A D
C
EB
A
B
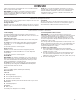
A. Incorrect
B. Correct
A
B
A. Grate slot
B. Hinge pin
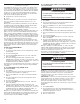
Small cap
(Auxiliary)
Medium cap
(Semi Rapid)
Large cap
(Ultra Rapid)
AUX
SR
UR