
Control Guide
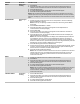
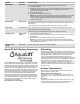


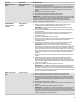
Table Of Contents
- Feature Guide_W11085354
- AquaLift Self-Cleaning Tech_GFSR_CG
- Preheating_W11122605
- Surface Temperatures_GFSR_CG
- Sealed Surface Burners_W11085354
- Cast Iron Grates_W11122605
- Cookware_W11085354
- Home Canning_GFSR_CG
- Oven Use_W11085354
- Electronic Oven Controls_W11085354
- Sabbath Mode_W11085354
- Keep Warm_W11085354
- Racks and Bakeware_W11297617
- Baking and Roasting_W11085354
- Broiling_W11085354
- Convection Baking and Roasting_W11085354
- Cook Time_W11085354
- Feature Guide_W11085354_FR
- AquaLift Self-Cleaning Tech_GFSR_CG_FR
- Preheating_W11122605_FR
- Surface Temperatures_GFSR_CG_FR
- Sealed Surface Burners_W11085354_FR
- Cast Iron Grates_W11122605_FR
- Cookware_W11085354_FR
- Home Canning_GFSR_CG_FR
- Oven Use_W11085354_FR
- Electronic Oven Controls_W11085354_FR
- Sabbath Mode_W11085354_FR
- Keep Warm_W11085354_FR
- Racks and Bakeware_W11297617_FR
- Baking and Roasting_W11085354_FR
- Broiling_W11085354_FR
- Convection Baking and Roasting_W11085354_FR
- Cook Time_W11085354_FR
- Feature Guide_W11085354 _SP
- AquaLift Self-Cleaning Tech_GFSR_CG_SP
- Preheating_W11122605_SP
- Surface Temperatures_GFSR_CG_SP
- Sealed Surface Burners_W11085354_SP
- Cast Iron Grates_W11122605_SP
- Cookware_W11085354_SP
- Home Canning_GFSR_CG_SP
- Oven Use_W11085354_SP
- Electronic Oven Controls_W11085354_SP
- Sabbath Mode_W11085354_SP
- Keep Warm_W11085354_SP
- Racks and Bakeware_W11297617_SP
- Baking and Roasting_W11085354_SP
- Broiling_W11085354_SP
- Convection Baking and Roasting_W11085354_SP
- Cook Time_W11085354_SP

7
To Set a Timed Bake Using Sabbath Mode (on some models):
1. Press BAKE.
2. Press the Temp/Time up or down arrow keypad to enter a
temperature other than the one displayed.
3. Press COOK TIME. The Cook Time oven indicator light will
light up.
4. Press the Temp/Time up or down arrow keypad to enter a
cook time length.
5. Press the Start keypad.
6. Press and hold TIMER SET/OFF for 5 seconds. “SAb” will
flash in the display.
7. Press the Start keypad while “SAb” is flashing to enter
Sabbath mode; otherwise, the entire cycle cancels out. “SAb”
will stop flashing and remain on in the display. The oven is
now in Sabbath mode and is Sabbath compliant. The Bake,
On, and Cook Time indicator lights will be displayed.
When the set cook time ends, the oven will shut off automatically
and the indicator lights will turn off, indicating the end of the cycle.
Pressing the Cancel keypad at any time returns the oven to the
normal cooking mode (not Sabbath mode compliant).
NOTE: If “SAb” does not appear in your display, the Sabbath
mode is not active. After Sabbath mode is deactivated, you must
activate Sabbath mode by completing steps 1 through 5.
To Set a Delayed Timed Bake Using Sabbath Mode (on some
models):
1. Press BAKE.
2. Press the Temp/Time up or down arrow keypad to enter a
temperature other than the one displayed.
3. Press COOK TIME. The Cook Time oven indicator light will
light up.
4. Press the Temp/Time up or down arrow keypad to enter a
cook time length.
5. Press DELAY START. The Delay indicator light will light up.
6. Press the Temp/Time up or down arrow keypad to enter a start
time.
7. Press the Start keypad.
8. Press and hold TIMER SET/OFF for 5 seconds. “SAb” will
flash in the display.
9. Press the Start keypad while “SAb” is flashing to enter
Sabbath mode; otherwise, the entire cycle cancels out. “SAb”
will stop flashing and remain on in the display. The oven is
now in Sabbath mode and is Sabbath compliant. The On and
Delay indicator lights will be displayed.
When the start time is reached, the Bake, On, and Cook Time
indicator lights will automatically turn on. When the set cook time
ends, the oven will shut off automatically and the indicator lights
will turn off, indicating the end of the cycle.
Pressing the Cancel keypad at any time returns the oven to the
normal cooking mode (not Sabbath mode compliant).
NOTE: On some models: If “SAb” does not appear in your display,
the Sabbath mode is not active. After Sabbath mode is
deactivated, you must activate Sabbath mode by completing
steps 1 through 5.
Keep Warm
NOTE: The convection fan will shut off when the oven door is
opened. If the oven door remains open for too long, the heating
elements will shut off until the oven door is closed. All timers,
including any active Cook Time or Timed Cook functions, will
continue to count down.
IMPORTANT: Food must be at serving temperature before placing
it in the warmed oven. Food may be held up to 1 hour; however,
breads and casseroles may become too dry if left in the oven
during the Keep Warm function. For best results, cover food.
The Keep Warm feature allows hot cooked foods to stay at
serving temperature.
To Use:
1. Press KEEP WARM.
2. Press Temp/Time up or down arrow keypad until desired
temperature is reached. A tone will sound if the minimum or
maximum temperature is reached.
3. Press the Start keypad.
4. Place food in the oven.
5. Press the Cancel keypad when finished (on some models).
NOTE: The temperature may be changed at any time by pressing
the Temp/Time up or down arrow keypad to reach the desired
temperature and then pressing the Start keypad.
Positioning Racks and Bakeware
Use the following illustrations and chart as a guide.
The oven has seven positions for a flat rack, as shown in the
previous illustration and the following table.
Flat Rack Position Type of Food
7
Broiling/searing meats, hamburgers,
steaks
6 Broiled meats, poultry, fish
3 or 4 Most baked goods, casseroles, frozen
foods
2 Roasted meats
1 Large roasts or poultry
IMPORTANT: If your model has a Max Capacity Oven Rack, the
recessed ends must be placed in the rack position above the
desired position of the food. See the following illustration.
A. Ends of rack in position 3
B. Food in position 2
IMPORTANT: These rack positions are for flat racks. If a Max
Capacity Oven Rack is used, the rack position must be adjusted
as shown in the previous figure.
Bakeware
To cook food evenly, hot air must be able to circulate. Allow 2" (5
cm) of space around bakeware and oven walls. Make sure that no
bakeware piece is directly over another.
Multiple Rack Cooking
Two-rack (non-convection): Use rack positions 2 and 5 or 3 and 6.
Two-rack (convection): Use rack positions 2 and 5 or 3 and 6.
Three-rack (convection): Use rack positions 2 and 7 and a Max
Capacity Oven Rack in rack position 5.