
Installation Instructions


3
INSTALLATION REQUIREMENTS
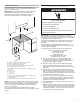
Tools and Parts
Gather the required tools and parts before starting installation.
Read and follow the instructions provided with any tools listed
here.
Tools needed
Parts supplied
Check that all parts are included.
■ Anti-tip bracket must be securely mounted to oor or wall.
Thickness of ooring may require longer screws to anchor
bracket to oor.
Parts needed
Check local codes and consult gas supplier. Check existing gas
supply and electrical supply. See the “Electrical Requirements”
and “Gas Supply Requirements” sections.
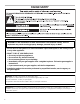
Tip Over Hazard
A child or adult can tip the range and be killed.
Install anti-tip bracket to floor or wall per installation instructions.
Slide range back so rear range foot is engaged in the slot of the anti-tip bracket.
Re-engage anti-tip bracket if range is moved.
Do not operate range without anti-tip bracket installed and engaged.
Failure to follow these instructions can result in death or serious burns to children and adults.
Anti-Tip
Bracket
To verify the anti-tip bracket is installed and engaged:
• Slide range forward.
• Look for the anti-tip bracket securely attached to floor or wall.
• Slide range back so rear range foot is under anti-tip bracket.
• See installation instructions for details.
Range Foot
WARNING
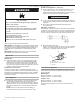
■ Tape measure
■ Flat-blade screwdriver
■ Phillips screwdriver
■ Level
■ Hand or electric drill
■ Hammer
■ Wrench or pliers
■ Pipe wrench
■ 15/16" (24 mm)
combination wrench
■ 1/4" (6.4 mm) drive ratchet
■ 3/8" (95 mm) nut driver
■ 1/8" (3.2 mm) drill bit (for
wood oors)
■ Marker or pencil
■ Pipe-joint compound
resistant to Propane gas
■ Noncorrosive leak-
detection solution
For Propane/Natural Gas
Conversions
■ 3/8" (95 mm) combination
wrench
■ 1/2" (12.7 mm)
combination wrench
■ 5/8" (16 mm) combination
wrench
■ 9/32" (7 mm) nut driver
■ Quadrex
®†
or Phillips
screwdriver
■ Masking tape
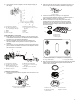
A
B
A. Anti-tip bracket
B. #12 x 1
5
⁄
8
" (4.1 cm) screws (2)
†
®
QUADREX is a registered trademark of NLW Holdings, Inc.
In the State of Massachusetts, the following installation instructions apply:
Installations and repairs must be performed by a qualified or licensed contractor, plumber, or gas fitter qualified or licensed by
the State of Massachusetts.
Acceptable Shut-off Devices: Gas Cocks and Ball Valves installed for use shall be listed.
A flexible gas connector, when used, must not exceed 4 feet (121.9 cm).