Use & Care Guide Guide d’utilisation et d’entretien Front-Loading Automatic Washer Laveuse automatique à chargement frontal Para obtener acceso al Manual de uso y cuidado en español, o para obtener información adicional acerca de su producto, visite: www.whirlpool.com If you have any problems or questions, visit us at www.whirlpool.com. Pour tout problème ou toute question, consulter www.whirlpool.ca. Designed to use only HE High Efficiency detergents.
Table of Contents Table de matières WASHER SAFETY .................................................................. 2 OPERATING INSTRUCTIONS ............................................... 3 ACCESSORIES................................................................ 3 CONTROL PANEL AND FEATURES ................................ 4 PROGRAM/CYCLE GUIDE ............................................. 6 CHOOSING THE RIGHT DETERGENT.............................8 USING THE DISPENSER DRAWER ........................
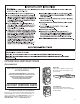
OPERATING INSTRUCTIONS Accessories INSTALLATION & MAINTENANCE ACCESSORIES Stack Kit If space is at a premium, the stack kit allows the dryer to be installed on top of the washer.
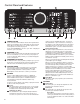
Control Panel and Features 4 3 A 1 1 2 B 9 D C POWER BUTTON PROGRAM (cycle) PROGRAM/CYCLE AREA An indicator next to each program/cycle lights up as you use the knob to scroll through the list. Press the knob when the indicator next to the desired program/cycle lights up. 4 CONTROL KNOB Turn the knob to select a program/cycle for your laundry load, change program/cycle temperature, adjust spin speed, set delay start time or dosing values, or select Other Options.
7 OTHER OPTIONS Save Time This option enables quicker washing. Only recommended for lightly soiled laundry. Extra Rinse This option helps to avoid detergent residues in the laundry by extending the rinse time. Especially suitable for baby laundry, people with allergies, or areas with soft water. Heavy Soil This option optimizes the stain-removal efficiency of additives. Ideal for heavily soiled, stained laundry.
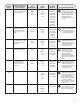
Program/Cycle Guide Settings and options shown in bold are default settings for that program/cycle. For best fabric care, choose the program/cycle, options, and settings that best fit the load being washed. Not all settings are available with each program/cycle, and some options cannot be used together. Load Size Recommendations For best results, follow the load size recommendations noted for each program/cycle. Large load: Fill the washer drum up to about ¾ full.
Program/ Cycle: Items to wash using default program/ cycle settings: Wash Temperature*: Spin Speed: Available Options: Program/Cycle Details: Synthetics Normally soiled laundry made of artificial fibers or cotton blends Hot Warm Cool Cold Max High Medium Low Off Colors TumbleFresh™ Detergent Delay Wash Save Time Extra Rinse Heavy Soil Cold Water PreWash PreWash Rinse/Hold This cycle uses highspeed extraction spins to remove the maximum amount of water.
Choosing the Right Detergent Using the Dispenser Drawer Use only High Efficiency detergents. The package will be marked “HE” or “High Efficiency.” Low-water washing creates excessive sudsing with a non-HE detergent. Using non-HE detergent will likely result in longer cycle times and reduced rinsing performance. It may also result in component malfunction and, over time, buildup of mold or mildew.
Using Your Washer First wash cycle without laundry Before washing clothes for the first time, add liquid or powdered HE detergent to the detergent dispenser. Choose the Quick Wash cycle and run it without clothes. Use only HE detergent. This initial cycle serves to ensure the interior is clean and the dispenser drawer is ready for use before washing clothes. 2. Add laundry products (if desired) 1.
6. Touch and hold Power button to turn 4. Add HE detergent* Liquid HE detergent on washer Powdered HE detergent NOTE: Do not add single-dose laundry packets, Oxi-type boosters, or fabric softener crystals to dispensers. They will not dispense correctly. Touch and hold until the indicators turn on. NOTE: To cancel a cycle, touch and hold the Power button. “rES” is displayed when the cycle is cancelled.
8. Select options, if desired 9. Setting a delayed wash, if desired † † Delay Wash ml Dosing Aid (Detergent Button): The Detergent button calculates a recommended amount of detergent in milliliters. This will be displayed after touching the Start/Pause button and the load is detected. The Detergent button also lets you adapt your washer to the dosing amounts of your detergent and the hardness of your local water. To set the washer for the detergent dosing amount: 1.
11. Select any additional options † 13. Touch Power button to turn off washer after program/cycle ends Options 3 Sec ml X-hot Max Hot High Warm Med Cool Low Cold Off Colors Rinse Hold After setting temperature or spin speed, the light above “Options” lights up. Turn the knob to select the desired option(s). As you turn the knob, the option symbols above the Options button will light up one at a time as you turn the knob. Stop turning when the symbol of the desired option lights up.
Washer Maintenance WATER INLET HOSE Replace inlet hose after 5 years of use to reduce the risk of hose failure. Periodically inspect and replace inlet hose if bulges, kinks, cuts, wear, or leaks are found. When replacing your inlet hose: Q Mark the date of replacement on the label with a permanent marker. Q Check that the old washer is not stuck on the washer inlet valve. Q Use a new washer in the new inlet hose to ensure a proper seal.
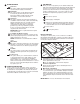
REMOVING THE DISPENSER To remove: 1. Pull dispenser drawer out until it stops. 2. Press down on the release tab and pull straight out to remove the dispenser. NON-USE AND VACATION CARE Operate your washer only when you are home. If moving, or not using your washer for a period of time, follow these steps: 1. Unplug or disconnect power to washer. 2. Turn off water supply to washer to avoid flooding due to water pressure surges.
REINSTALLING/USING WASHER AGAIN To reinstall washer after non-use, vacation, winter storage, or moving: 1. Refer to “Installation Instructions” to locate, level, and connect washer. 2. Before using again, run washer through the following recommended procedure: To use washer again: 1. Flush water pipes and hose. Reconnect water inlet hose. Turn on water faucet. 2. Plug in washer or reconnect power. 3. Run washer through Heavy Duty cycle to clean washer and remove antifreeze, if used.
CLEANING THE DRAIN PUMP FILTER/ DRAINING RESIDUAL WATER (cont.) 3. Slowly turn the filter counterclockwise until water flows out. Let the water flow out, without removing the filter. When the container is full, close the drain pump filter by turning it clockwise. Empty the container. Repeat this procedure until all the water has drained. CLEANING THE DRAIN PUMP FILTER/ DRAINING RESIDUAL WATER 1. Push the tabs located on both sides of the base panel to release it, then remove. 4.
INSTALLATION INSTRUCTIONS Optional tools: Installation Requirements Tools and Parts Gather required tools and parts before starting installation. Tools needed: Flashlight Bucket Alternate parts: (Not supplied with washer) Your installation may require additional parts. To order, please refer to toll-free numbers on the back page of this manual. Adjustable or open-end wrenches 3/8" (10 mm) and 1/2" (13 mm) Level If you have: Overhead sewer Standard 20 gal.
Location Requirements Proper installation is your responsibility. You will need: Q A grounded electrical outlet located within 5.4 ft (1.7 m) of power cord on back of washer. Q Water faucet located within 4 ft (1.2 m) of water fill valve on washer, and water pressure of 20–100 psi (137.9–689.6 kPa). Q A level floor with maximum slope of 1" (25 mm) under entire washer. Installing on carpet or surfaces with foam backing is not recommended.
Location Requirements (cont.) Closet installation (washer only): 3" (76 mm) 18" 34" (457 (864 mm) 48 in.2 min. (310 cm2) 24 in.2 min. (155 cm2) 3" (76 mm) 4" * (102 mm) 1" * (25 mm) 1"* (25 mm) *Recommended spacing. Minimum 0" (0 mm) Drain System Drain system can be installed using a floor drain, wall standpipe, floor standpipe, or laundry tub. Select method you need. Laundry tub drain system IMPORTANT: To avoid siphoning, only 41⁄2" (114 mm) of drain hose should be inside standpipe.
Electrical Requirements Installation Instructions NOTE: To avoid floor damage, set washer onto cardboard before moving it. 1. Move washer Q A 120-volt, 60 Hz., AC-only, 15- or 20-amp, fused electrical supply is required. A time-delay fuse or circuit breaker is recommended. It is recommended that a separate circuit breaker serving only this appliance be provided. Q This washer is equipped with a power supply cord having a 3 prong grounding plug.
3. Remove power cord from clips Route Drain Hose Proper routing of the drain hose protects your floor from damage due to water leakage. Read and follow these instructions. 5. Remove drain hose from washer Remove power cord from clips and place over top of washer to allow free access to back of washer. NOTE: If washer is transported at later date, call your local service center. To avoid suspension and structural damage, a certified technician must properly set up washer for relocation.
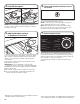
7. Place drain hose in standpipe Place hose into standpipe (shown in picture) or over side of laundry tub. IMPORTANT: Only 41⁄2" (114 mm) of drain hose should be inside standpipe; do not force excess hose into standpipe or lay on bottom of laundry tub. Drain hose form must be used. 9. Clear water line Run water for a few seconds through hose into a laundry tub, drainpipe, or bucket to avoid clogs. Water should run until clear. 10.
12. Secure drain hose Laundry Tub 41/2" 4.5" (114 mm) Standpipe 14. Rock washer to test foot contact Wall 41/2" (114 mm) 1/2" 44.5" (113 mm) (114 Secure drain hose to laundry tub leg, drain standpipe, or inlet hose for wall standpipe with cable tie. Level Washer Leveling your washer properly reduces excess noise and vibration. Grip washer from top and rock back and forth, making sure all four feet are firmly on floor. Repeat, rocking washer from side to side.
16. Tighten leveling feet Complete Installation Checklist T T Jam nut When washer is level and all four feet are firmly in contact with the floor, use a 1/2" or 13 mm open-end or adjustable wrench to turn jam nuts counterclockwise on leveling feet tightly against washer cabinet. HELPFUL TIP: You may want to prop washer with wooden block. 17. Plug into a grounded 3 prong outlet 24 T T T T T T T T T Check electrical requirements.
TROUBLESHOOTING First try the solutions suggested here or visit our website at www.whirlpool.com/product_help – In Canada www.whirlpool.ca for assistance and to possibly avoid a service call. If you experience Possible Causes Solution Error Code Appears in Display Once any possible issues are corrected, touch the Power button once to clear the code. Re-select and restart the cycle. No or not sufficient water supply because: Q Water faucet is closed. Q There are kinks in inlet hose.
TROUBLESHOOTING First try the solutions suggested here or visit our website at www.whirlpool.com/product_help – In Canada www.whirlpool.ca for assistance and to possibly avoid a service call. If you experience Possible Causes Solution Error Code Appears in Display (cont.) Failure of an electronic component. (service) Turn off and unplug the washer. Close the water faucet. See the “Assistance or Service” section to contact a service representative. F20 or F60 (service) F24 (service) All other F..
TROUBLESHOOTING First try the solutions suggested here or visit our website at www.whirlpool.com/product_help – In Canada www.whirlpool.ca for assistance and to possibly avoid a service call. If you experience Possible Causes Solution Vibration or Off-Balance Vibration, rocking, or “walking” Feet may not be in contact with the floor and locked. Front and rear feet must be in firm contact with floor, and washer must be level to operate properly. Jam nuts must be tight against the bottom of the cabinet.
TROUBLESHOOTING First try the solutions suggested here or visit our website at www.whirlpool.com/product_help – In Canada www.whirlpool.ca for assistance and to possibly avoid a service call. If you experience Possible Causes Solution Water Leaks (cont.) Water or suds leaking from door or rear of cabinet Leaking around door Not using HE detergent or using too Only use HE detergent. Suds from regular detergents can cause leaking from the door or rear of cabinet. Always much HE detergent.
TROUBLESHOOTING First try the solutions suggested here or visit our website at www.whirlpool.com/product_help – In Canada www.whirlpool.ca for assistance and to possibly avoid a service call. If you experience Possible Causes Solution Washer not performing as expected (cont.) Washer won’t run or fill; washer stops working (cont.) Normal washer operation. Door must be completely closed and latched for washer to run. Washer will pause during certain phases of cycle. Do not interrupt cycle.
TROUBLESHOOTING First try the solutions suggested here or visit our website at www.whirlpool.com/product_help – In Canada www.whirlpool.ca for assistance and to possibly avoid a service call. If you experience Possible Causes Solution Washer not performing as expected (cont.) Washer not draining/ spinning; loads are still wet (cont) Washer vibrates during spinning Using cycles with a lower spin speed. Cycles with lower spin speeds remove less water than cycles with high spin speeds.
TROUBLESHOOTING First try the solutions suggested here or visit our website at www.whirlpool.com/product_help – In Canada www.whirlpool.ca for assistance and to possibly avoid a service call. If you experience Possible Causes Solution Washer not performing as expected (cont.) Load not rinsed Check for proper water supply. Hose must be attached and have water flowing to the inlet valve. Water faucet must be on. Inlet valve screen on washer may be clogged. Remove any kinks in the inlet hose.
TROUBLESHOOTING First try the solutions suggested here or visit our website at www.whirlpool.com/product_help – In Canada www.whirlpool.ca for assistance and to possibly avoid a service call. If you experience Possible Causes Solution Washer not performing as expected (cont.) Not cleaning or removing stains (cont.) Not using correct cycle for fabric type. Use a warmer wash temperature to improve cleaning. If using Quick Wash cycle, wash only a few items. Use Heavy Duty cycle for tough cleaning.
TROUBLESHOOTING First try the solutions suggested here or visit our website at www.whirlpool.com/product_help – In Canada www.whirlpool.ca for assistance and to possibly avoid a service call. If you experience Possible Causes Solution Washer not performing as expected (cont.) Gray whites, dingy colors Load not sorted properly. Incorrect dispenser operation The transfer of dye can occur when mixing whites and colors in a load. Sort dark clothes from whites and lights. Wash temperatures too low.
HOW TO OPEN DOOR IN CASE OF POWER FAILURE (cont.) 3. After removing laundry, replace the strap by firmly turning the screw. HOW TO OPEN DOOR IN CASE OF POWER FAILURE Before opening the door as described below, refer to the failure “Door will not unlock” in the “Troubleshooting” section.
WHIRLPOOL® LAUNDRY LIMITED WARRANTY ATTACH YOUR RECEIPT HERE. PROOF OF PURCHASE IS REQUIRED TO OBTAIN WARRANTY SERVICE. Please have the following information available when you call the Customer eXperience Center: ■ Name, address, and telephone number ■ Model number and serial number ■ A clear, detailed description of the problem ■ Proof of purchase including dealer or retailer name and address IF YOU NEED SERVICE: 1.