
User Manual

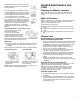


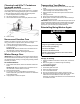
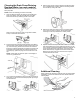
Table Of Contents
- WASHER SAFETY
- Washer Safety
- Internet Connectivity Guide
- CHOOSING THE RIGHT DETERGENT
- Choosing the Right Detergent
- Adding Laundry Products
- WASHER MAINTENANCE AND CARE
- Cleaning the Washer Location
- Water Inlet Hoses
- Washer Care
- Clean Washer Cycle Reminder
- Removing the Dispenser
- Cleaning Load & Go™ Containers (on some models)
- Nonuse and Vacation Care
- Winter Storage Care
- Transporting Your Washer
- Reinstalling/Using Washer Again
- Cleaning the Drain Pump/Draining Residual Water (on some models)
- Additional Cleaning
- INSTALLATION INSTRUCTIONS
- REQUIREMENTS
- Tools and Parts
- Location Requirements
- Drain System
- Electrical Requirements
- INSTALLATION
- Unpacking
- Connect Drain Hose
- Connect Inlet Hoses
- Level WasherComplete Installation Checklist
- Complete Installation Checklist
- SECURITE DE LA LAVEUSE
- Sécurité de la laveuse
- Guide de connexion Internet
- CHOIX DU DETERGENT APPROPRIE
- Choix du détergent approprié
- Ajouter les produits de lessive
- ENTRETIEN ET REPARATION DE LA LAVEUSE
- Nettoyage de l'emplacement de la laveuse
- Tuyaux d’arrivée d’eau
- Entretien de la laveuse
- Rappel de lancement du programme Clean Washer (nettoyage de la laveuse)
- Retrait du distributeur
- Récipients Load & Go (sur certains modèles)
- Non utilisation et entretien avant les vacances
- Entretien pour entreposage hivernalTransport de la laveuse
- Transport de la laveuse
- Réinstallation/réutilisation de la laveuse
- Nettoyage du filtre de la pompe de vidange / Vidange de l'eau résiduelle (sur certains modèles)
- Nettoyage supplémentaire
- INSTRUCTIONS D'INSTALLATION
- SPECIFICATIONS
- Outils et pièces
- Exigences d’emplacement (laveuse)
- Système de vidange
- Spécifications électriques
- INSTALLATION
- Déballage
- Raccordement du tuyau de vidange
- Raccordement des tuyaux d’alimentation
- Établissement de l’aplomb de la laveuseListe de vérification pour installation terminée
- Liste de vérification pour installation terminée
- Untitled

9
Cleaning the Drain Pump/Draining
Residual Water (on some models)
IMPORTANT: Make sure the washer is off before cleaning the
drain pump filter.
NOTE: Perform the following procedure occasionally.
1. Open the dispenser drawer by pulling on the handle at the
base of the washer. This will reveal the drain pump filter.
Remove the drawer by releasing the tab on each side.
With your finger, push down on tab on right side of drawer,
and up on tab on left side of drawer.
2. Place a broad, flat container beneath the drain pump filter to
collect the drain water. Release the black hose from the hose
clip, remove the plug, and drain the hose into the container.
Empty the container. Repeat this procedure if necessary until
all the water has drained. Make sure that the black hose is
completely dry, replace the plug, and secure the hose in the
clip.
NOTE: If water does not drain well, push in hose slightly to
remove any possible kinks.
3. Lay a cotton cloth beneath the drain pump filter to absorb any
water still in it. Then remove the drain pump filter by turning it
counterclockwise.
4. Remove large clumps of lint by hand from the filter and place
lint in a suitable waste container. Remove remaining residue
from the filter by rinsing with water.
5. Reinsert the drain pump filter by turning it clockwise. Make
sure to turn it in as far as it will go, with the filter handle
remaining as close as possible to the vertical position.
6. Replace and close the dispenser drawer. Make sure to insert
both rails simultaneously when replacing the drawer. You will
hear a clicking sound that indicates the rails have engaged. To
ensure proper placement of the drawer, pull out fully. The
drawer should be fully engaged and the rails locked in place.
Make sure the drain hose is secured in the hose clip and
tucked underneath the cutout.
Additional Cleaning
Gently pull back the rubber door seal and clean any stained areas,
soil buildup, or lint with the textured side of an affresh
®
Machine
Cleaning Wipe.