
Owner's Manual

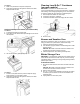

Table Of Contents
- Washer Safety
- Washer Safety
- Internet Connectivity Guide
- Choosing the Right Detergent
- Choosing the Right Detergent
- Adding Laundry Products
- Washer Maintenance and Care
- Cleaning the Washer Location
- Water Inlet Hoses
- Washer Care
- Clean Washer Cycle Reminder
- Removing the Dispenser
- Cleaning Load & Go™ Containers (on some models)
- Nonuse and Vacation Care
- Winter Storage Care
- Transporting Your Washer
- Reinstalling/Using Washer Again
- Cleaning the Drain Pump/Draining Residual Water (on some models)
- Additional Cleaning
- Installation Instructions
- Requirements
- Tools and Parts
- Location Requirements
- Drain System
- Electrical Requirements
- Installation
- Unpacking
- Connect Drain Hose
- Connect Inlet Hoses
- Level Washer
- Complete Installation Checklist
- Sécurité de la laveuse
- Sécurité de la laveuse
- Guide de connexion Internet
- Choix du détergent approprié
- Choix du Détergent Approprié
- Ajouter les produits de lessive
- Entretien et réparation de la laveuse
- Nettoyage de l'emplacement de la laveuse
- Tuyaux d’arrivée d’eau
- Entretien de la laveuse
- Rappel de lancement du programme Clean Washer (nettoyage de la laveuse)
- Retrait du distributeur
- Récipients Load & Go™ (sur certains modèles)
- Non utilisation et entretien avant les vacances
- Entretien pour entreposage hivernal
- Transport de la laveuse
- Réinstallation/réutilisation de la laveuse
- Nettoyage du filtre de la pompe de vidange / Vidange de l'eau résiduelle (sur certains modèles)
- Nettoyage supplémentaire
- Instructions d’installation
- Spécifications
- Outils et pièces
- Exigences d’emplacement (laveuse)
- Système de vidange
- Spécifications électriques
- L’installation
- Déballage
- Raccordement du tuyau de vidange
- Raccordement des tuyaux d’alimentation
- Établissement de l’aplomb de la laveuse
- Liste de vérification pour installation terminée

6
2. Chlorine Bleach Procedure:
a. Open the washer door and remove any clothing or items.
b. Open the dispenser drawer and add liquid chlorine bleach
to the Max level in both the bleach compartment and the
fabric softener compartment. Either traditional or HE
chlorine bleach can be used.
IMPORTANT: Do not use thickened, easy-pour, or no-splash
bleach as excess suds may occur.
NOTE: Use of more liquid chlorine bleach than is
recommended above could cause washer damage over time.
c. Close the washer door and the dispenser drawer.
d. Do not add any detergent or other chemicals to the
washer when following this procedure.
e. Select the Clean Washer with affresh
®
cycle.
f. On some models: Select the FanFresh
®
/Fresh Hold
®
/
Fresh Spin
™ option to help dry the washer interior after
the cycle is complete.
NOTE: The washer remembers your last option selection and
will use it for future wash cycles until you deselect that option.
g. Touch and hold Start/Pause to begin the cycle. See the
“Description of Clean Washer with affresh
®
Cycle
Operation” section.
NOTE: For best results, do not interrupt cycle.
Description of Clean Washer with affresh
®
Cycle
Operation
1. The Clean Washer with affresh
®
cycle will determine whether
clothing or other items are in the washer.
2. If no items are detected in the washer, it will proceed with the
cycle.
a. If any items are detected in the washer, “rL” (remove
load) will be displayed. The door will unlock. Open
washer and remove any garments from the washer drum.
b. Touch Power to clear the “rL” code.
c. Touch and hold Start/Pause to restart the cycle.
3. Steam models only: During the first 20 minutes of the cycle,
it will activate the steamer but the drum will not spin or fill with
water. You may see condensation on the door window during
this initial phase. If you are using an affresh
®
Washer Cleaner
tablet, it will not dissolve completely during the steam phase.
This is normal.
After the cycle is complete, leave the door open slightly to
allow for better ventilation and drying of the washer interior.
Cleaning the Dispensers
After a period of using your washer, you may find some residue
buildup in the washer’s dispensers.
For the Single-Load or Optimal dispenser: Remove the drawer
and wipe the surfaces with an affresh
®
Machine Cleaning Wipe or
a damp cloth, and towel dry either before or after you run the
Clean Washer with affresh
®
cycle. Use an all-purpose surface
cleaner, if needed.
For the Load & Go
™ dispenser: Lift the handle on the dispenser
housing and pull to remove it from the washer cabinet; then rinse
the dispenser thoroughly with running water. Wipe the outside
dispenser surface with an affresh
®
Machine Cleaning Wipe or a
damp cloth, and towel dry. Use an all-purpose surface cleaner, if
needed.
Replace the dispenser in the washer cabinet and make sure that it
is correctly seated.
IMPORTANT: Dispensers are not dishwasher-safe.
Cleaning the Outside of the Washer
IMPORTANT: To avoid damaging the washer’s finish, do not use
abrasive products.
Use an affresh
®
Machine Cleaning Wipe or a soft, damp cloth or
sponge to wipe up any spills. Occasionally wipe the outside of
your washer to help keep it looking new. Use an affresh
®
Machine
Cleaning Wipe or mild soap and water.
Clean Washer Cycle Reminder
NOTE: Not all models have the Clean Washer with affresh
®
cycle
reminder light.
The Clean Washer with affresh
®
message will flash at the end of a
wash cycle when the washer has run 30 wash cycles. This is a
reminder to run the Clean Washer with affresh
®
cycle.
If the Clean Washer with affresh
®
cycle is not run, the message
will stop flashing at the end of a wash cycle after running three
more regular wash cycles. After 30 more wash cycles are
completed, the Clean Washer with affresh
®
message will again
flash at the end of a wash cycle as a reminder.
Removing the Dispenser
Optimal Dispenser Drawer (on some models)
To remove:
1. Pull dispenser drawer out until it stops.
2. Press down on the release tab and pull straight out to remove
the dispenser.
3. Lift off cover panel by pulling straight up.