
Owner's Manual


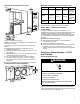

Table Of Contents
- DRYER SAFETY
- Dryer Safety
- DRYER MAINTENANCE AND CARE
- Cleaning the Dryer Location
- Cleaning the Dryer Interior
- Removing Accumulated Lint
- Cleaning the Lint Screen
- Changing the Drum Light (on some models)
- Check Your Vent System for Good Airflow
- Maintain Good Airflow
- Nonuse, Storage, and Moving Care
- Special Instructions for Steam Models
- INSTALLATION REQUIREMENTS
- Tools and Parts
- Location Requirements
- Gas Dryer Power Hookup – U.S.A. and Canada
- Gas Supply Requirements
- INSTALLATION INSTRUCTIONS
- Install Leveling Legs
- Make Gas Connection – U.S.A. and Canada
- Venting Requirements
- Plan Vent System
- Install Vent System
- Connect Inlet Hoses
- Connect Vent
- Level Dryer
- Complete Installation Checklist
- SÉCURITÉ DE LA SÉCHEUSE
- Sécurité de la sécheuse
- ENTRETIEN ET RÉPARATION DE LA SÉCHEUSE
- Nettoyage de l’emplacement de la sécheuse
- Nettoyage de l’intérieur de la sécheuse
- Retrait de la charpie accumulée
- Nettoyage du filtre à charpie
- Changement de l’ampoule d’éclairage du tambour (sur certains modèles)
- Vérification d’une circulation d’air adéquate pour le système d’évacuation
- Pour maintenir une bonne circulation d’air
- Précautions à prendre avant une non-utilisation, un entreposage ou un déménagement
- Instructions spécifiques pour les modèles vapeur
- EXIGENCES D'INSTALLATION
- Outils et pièces
- Exigences d’emplacement
- Raccordement électrique de la sécheuse au gaz – États-Unis et Canada
- Spécifications de l’alimentation en gaz
- INSTRUCTIONS D'INSTALLATION
- Installation des pieds de réglage de l’aplomb
- Raccordement au gaz – États-Unis et Canada
- Exigences concernant l’évacuation
- Planification des circuits de conduits
- Installation du conduit d’évacuation
- Raccordement des tuyaux d’alimentation
- Raccordement du conduit d’évacuation
- Réglage de l’aplomb de la sécheuse
- Liste de vérification pour installation terminée

10
GROUNDING INSTRUCTIONS
For a grounded, cord-connected appliance:
This appliance must be grounded. In the event of a
malfunction or breakdown, grounding will reduce the risk of
electric shock by providing a path of least resistance for
electric current. This appliance is equipped with a cord having
an equipment-grounding conductor and a grounding plug.
The plug must be plugged into an appropriate outlet that is
properly installed and grounded in accordance with all local
codes and ordinances.
WARNING: Improper connection of the equipment-
grounding conductor can result in a risk of electric shock.
Check with a qualified electrician or serviceman if you are in
doubt as to whether the appliance is properly grounded. Do
not modify the plug provided with the appliance: if it will not fit
the outlet, have a proper outlet installed by a qualified
electrician.
SAVE THESE INSTRUCTIONS
Gas Supply Requirements
WARNING
Explosion Hazard
Use a new CSA International approved gas supply line.
Install a shut-off valve.
Securely tighten all gas connections.
If connected to propane, have a qualified person make
sure gas pressure does not exceed 13" (33 cm) water
column.
Examples of a qualified person include: licensed heating
personnel, authorized gas company personnel, and
authorized service personnel.
Failure to do so can result in death, explosion, or fire.
Gas Type
Natural Gas:
This dryer is equipped for use with natural gas. It is certified by UL
for use with propane gas with appropriate conversion.
n Your dryer must have the correct burner for the type of gas in
your home. Burner information is located on the rating plate in
the door well of your dryer. If this information does not agree
with the type of gas available, contact your dealer or reference
the contact information listed on your Quick Start Guide.
Propane Gas Conversion:
IMPORTANT: Conversion must be made by a qualified technician.
No attempt shall be made to convert the appliance from the gas
specified on the model/serial rating plate for use with a different
gas without consulting your gas company.
Gas Supply Line
Option 1 (Recommended Method)
Flexible stainless steel gas connector:
n If local codes permit, use a new flexible stainless steel gas
connector (Design-Certified by the American Gas Association
or CSA International) to connect your dryer to the rigid gas
supply line. Use an elbow and a 3/8" flare x 3/8" NPT adapter
fitting between the stainless steel gas connector and the dryer
gas pipe, as needed, to prevent kinking.
Option 2 (Alternate Method)
Approved aluminum or copper tubing:
n Must include 1/8" NPT minimum plugged tapping accessible
for test gauge connection, immediately upstream of the gas
connection to the dryer.
n 1/2" IPS pipe is recommended.
n 3/8" approved aluminum or copper tubing is acceptable for
lengths under 20 ft (6.1 m) if local codes and gas supplier
permit.
n If you are using natural gas, do not use copper tubing.
n Lengths over 20 ft (6.1 m) should use larger tubing and a
different size adapter fitting.
n If your dryer has been converted to use propane gas, 3/8"
propane-compatible copper tubing can be used. If the total
length of the supply line is more than 20 ft (6.1 m), use larger
pipe.
NOTE: Pipe-joint compounds that resist the action of propane
gas must be used. Do not use PTFE plumber’s tape.
n Must include shutoff valve.
In the U.S.A.:
An individual manual shutoff valve must be installed within six
(6) ft (1.8 m) of the dryer in accordance with the National Fuel Gas
Code, ANSI Z223.1. The location should be easy to reach for
opening and closing.
In Canada:
An individual manual shutoff valve must be installed in
accordance with the B149.1, Natural Gas and Propane Installation
Code. It is recommended that an individual manual shutoff valve
be installed within six (6) ft (1.8 m) of the dryer. The location
should be easy to reach for opening and closing.
A. 3/8" flexible gas connector
B. 3/8" pipe-to-flare adapter fitting
C. 1/8" NPT minimum plugged tapping
D. 1/2" NPT gas supply line
E. Gas shutoff valve