
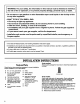
Installation guide

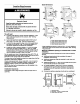
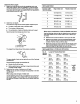


Vent Length Chart - 11 ft (3_, m) to 25 ft (7.6 m)
No. of Length of Flexible Metal Vent
turns or
elbows 11-15 ft 16-20 ft 21-25 ft
(3.4-4.6 m) (4.9-6.1 m) (6.4-7.6 m)
O 75ft 60ft 4,Sft
(22.9 m) (18.3 m) (13.7 m)
1 65ft 50ft 35ft
(19.8 m) (15.2 m) (10.7 m)
Length
2 55ft 40ft 25ft of
(16.8 m) (12.2 m) (7.6 m) Rigid
metal
3 45 ft 30 ft 15 ft vent
(13.7 m) (9.1 m) (4.6 m)
4 35ft 20ft 5ft
(10.7 m) (6.1 m) (1.5 m)
5 25ft 10ft Oft
(7.6 m) (3.0 m) (Om)
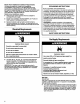
InstallVentSystem
1. (Optional) Put on safety glasses and gloves.
2. Install exhaust hood. Use caulking compound to seal exterior
wail opening around exhaust hood.
3. Connect vent to exhaust hood. Vent must fit inside exhaust
hood. Secure vent to exhaust hood with 4 in. (10.2 cm) clamp.
4. Run vent to dryer location. Use the straightest path possible.
See "Determine Vent Length." Avoid 90° turns. Use clamps to
seal alljoints. Do not use duct tape, screws or other fastening
devices that extend intothe interior of the vent to secure vent.
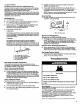
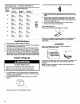
InstaULevelingLegs
3. Examine the leveling legs. Find the diamond marking.
4. Screw the legs intothe leg holes by hand. Ues a wrench to
finish turning the legs untilthe diamond marking is no longer
visible.
6,
Place a carton corner poet under each of the 2 dryer back
corners. Stand the dryer up. Slide the dryer on the corner
posts until it isclose to its final location. Leave enough room
to connect the exhaust vent.
6. Once connection is made and dryer is in final location,
remove corner poets and cardboard.
For mobile home use
Gas dryersmustbe securelyfastenedto thefloor,
Mobile home installations require e Mobile Home Installation Kit.
For ordering information please reference your "Dryer User
Instructions."
Leve]Dryer
Check the levelness of the dryen Check levelness first
side-to-side, then front-to-back.
If the dryer is not level, prop up the dryer using a wood block. Use
a wrench to adjust the legs up or down and check again for
levelness.
NOTE: It might be necessary to level the dryer again after it is
moved into its final position.
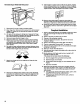
1. To prctect the floor, use a large fist piece of cardboard from
the dryer carton. Place cardboard under the entire back edge
of the dryer. See illustration.
2. Firmly gresp the body of the dryer (nct the top or console
panel).
Gently lay the dryer on the cardboard corners.
8