
Service Manual
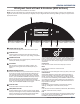
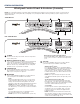

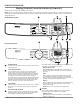
Table Of Contents
- Whirlpool & Maytag 27" Front-Load Gas & Electric Dryers
- Table of Contents
- Section 1: General Information
- Section 2: Diagnostics & Troubleshooting
- Section 3: Component Testing
- Testing - Safety Information
- Component Locations - Whirlpool
- Wiring Diagram - Whirlpool Electric
- Wiring Diagram - Whirlpool Gas
- Wiring Diagram - Maytag Electric
- Wiring Diagram - Maytag Gas
- Component Testing
- TEST #1: ACU Power Check
- TEST #2: Supply Connections
- TEST #3: Motor Circuit
- TEST #4: Heat System
- TEST #4a: Thermistors
- TEST #4b: Thermal Fuse
- TEST #4c: Thermal Cut-Off
- TEST #4d: Gas Valve (Gas Dryer)
- TEST #5: Moisture Sensor
- TEST #6: Buttons & Indicators
- TEST #7: Door Switch
- TEST #8: Drum LED
- TEST #9: Water Valve
- Section 4: Component Access
- Component Locations - Whirlpool
- Door Reversal - Round Shaped Doors
- Door Reversal - Square Shaped Doors
- Removing the Top Panel & Console/HMI
- Removing the Appliance Control Unit (ACU)
- Removing the Front Panel & Door Switch
- Removing the Drum Light & Moisture Sensor
- Removing the Belt, Drum, and Rollers
- Removing the Drive Motor
- Removing the Thermal Fuse & Outlet Thermistor
- Removing the Heater, High Limit Thermostat & Thermal Cutoff
- Removing the Ignitor, Flame Sensor, High-Limit Thermostat and Thermal Cutoff (Gas Models)
- Removing the Gas Burner Assembly Coils (Gas Models)
- Removing the Rear Panel
- Removing the Water Valve
- Section 5: Connectivity
- Product Specifications & Warranty Info

GENERAL INFORMATION
Whirlpool & Maytag Front-Load Dryers
n
1-3
Whirlpool Control Panel & Features (HMI in Door)
6
CONTROL PANEL AND FEATURES
Not all features and cycles are available on all models.
NOTE: The control panel features a sensitive surface that responds to a light touch of your nger. To ensure your selections are
registered, touch the control panel with your ngertip, not your ngernail. When selecting a setting or option, simply touch the
appropriate button.
1 3
2
6
5
74
POWER/CANCEL BUTTON
Touch to turn the dryer on or off or to a cancel a cycle.
HOME BUTTON
Touch this button and the LCD screen will show the
home screen, where you can select your cycle, settings,
and options.
FAVORITES BUTTON
Stores and accesses your favorite cycles, and also
accesses a history of recently run cycles.
LCD SCREEN
Use this screen to select cycle, settings, options, etc.
Swiping the screen gives access to ve frequently run
cycles.
1
2
4
REMOTE ENABLE BUTTON
Download the Whirlpool
®
app and follow the instructions
to connect your dryer to your home Wi-Fi network. You
may also visit www.whirlpool.com/connect. In Canada,
visit www.whirlpool.ca/connect. After having connected
to Wi-Fi, press the REMOTE ENABLE button any time you
want to use the app. Pressing this button locks out the
LCD screen and you will be prompted with a message about
the dryer waiting for input from the app. To exit this mode,
press the REMOTE ENABLE button again.
TOOLS BUTTON
Touch this button to access the Tools screen. For more
information, see page 11.
START/PAUSE BUTTON
Touch and hold to start, or touch to pause a cycle. When
the dryer drum begins to move, release the START/PAUSE
button. Continuing to hold the Start/Pause button after the
dryer has started will cause the dryer to stop.
5
7
6
7
7
Temperature
LOW
Set Auto-Drying L...
NORMAL
Wrinkle Shield
OFF
What to Dry
REGULAR
How to Dry
NORMAL
4:28
0:45
.....
3
-XO('7_5(/($6('
,QVRPH(XURSHDQIDFWRULHVWKHOHWWHU:RIWKHSDUWFRGHPHQWLRQHGKHUHLQZLOOEHDXWRPDWLFDOO\
UHSODFHGE\WKHQXPEHUHJ:EHFRPHV
Not all features and cycles are available on all models.
NOTE: The control panel features a sensive surface that responds to a light touch of your nger. To ensure your selecons are
registered, touch the control panel with your ngerp, not your ngernail. When selecng a seng or opon, simply touch the
appropriate buon.
POWER/CANCEL BUTTON
Touch to turn the dryer on or o or to a cancel a cycle.
HOME BUTTON
Touch this buon and the LCD screen will show the home
screen, where you can select your cycle, sengs, and opons.
FAVORITES BUTTON
Stores and accesses your favorite cycles, and also accesses
a history of recently run cycles.
LCD SCREEN
Use this screen to select cycle, sengs, opons, etc.
Swiping the screen gives access to ve frequently run
cycles.
REMOTE ENABLE BUTTON
Download the Whirlpool® app and follow the instrucons
to connect your dryer to your home Wi-Fi network. You
may also visit www.whirlpool.com/connect. In Canada,
visit www.whirlpool.ca/connect. Aer having connected
to Wi-Fi, press the REMOTE ENABLE buon any me you
want to use the app. Pressing this buon locks out the
LCD screen and you will be prompted with a message
about the dryer waing for input from the app. To exit this
mode, press the REMOTE ENABLE buon again.
TOOLS BUTTON
Touch this buon to access the Tools screen.
START/PAUSE BUTTON
Touch and hold to start, or touch to pause a cycle. When
the dryer drum begins to move, release the START/PAUSE
buon. Connuing to hold the Start/Pause buon aer
the dryer has started will cause the dryer to stop.
1
2
3
4
5
6
7
13
12. Touch START/PAUSE button
to begin cycle
Touch the START/PAUSE button to start the cycle.
To pause a cycle in progress, touch the START/PAUSE button
once, then touch again to continue the cycle. To cancel a
cycle, touch the “X” on the touch screen to the right of the
estimated time remaining.
Once you touch the START/PAUSE button, you will hear
the door lock. The washer/dryer door will remain locked
during a wash cycle.
14. Remove garments promptly
after cycle is nished
After a wash-only cycle, promptly remove
garments after cycle has completed to
avoid odor and rusting of metal objects on
garments. When unloading garments, pull
back the door seal and check for small items between the tub
and the washer/dryer drum.
If you will be unable to remove the load promptly after a wash-
only cycle, use the Tumble Fresh
™
option (see Step 10, page 12).
After a wash and dry cycle or a dry-only cycle, promptly
remove garments after cycle has completed to reduce wrinkling.
If you will be unable to remove a load promptly, use the Wrinkle
Shield
™
option (see Step 10, page 12).
NOTES:
■
The door will remain locked while the T
umble Fresh
™
option
is active after a wash-only cycle. To cancel the Tumble Fresh
™
option and unlock the door, touch the “X” on the touch
scr
een to the right of the estimated time remaining.
■
This washer/dryer has a tight seal to avoid water leaks.
To avoid odors, leave the door open to allow the washer/dryer
to dry between uses.
■
If a dry cycle is interrupted and the load removed befor
e
the cool-down period at the end of the cycle, the load will
be very hot.
11. Use Tools button to change
other settings, if desired
The Tools button gives access to many other settings, utility
cycles, preferences, and information. Touch the TOOLS button
to access the Tools screen, which contains the following
(you will need to scroll down with your nger to access
all of the selections).
Load & Go
™
Dispenser 1
Press this icon to access:
Load & Go
™
Status Dispenser 1 and choose between:
■
Active
■
Disabled (1 Cycle)
■
Off (Permanently)
Deter
gent Concentration Dispenser 1 and choose between:
■
2X
■
4X
■
6X
■
8X
Load & Go
™
Dispenser 2
Press this icon to access:
Load & Go
™
Status Dispenser 2 and choose between:
■
Active
■
Disabled (1 Cycle)
■
Off (Permanently)
Load & Go
™
Content Dispenser 2 and choose between:
■
Softener
■
Detergent
Once set at Deter
gent:
Set Concentration Dispenser 2 and choose between:
■
2X
■
4X
■
6X
■
8X
Control Lock
Pr
ess this icon to lock the controls. Swipe up to unlock.
Mute
Press this icon to mute or unmute sounds.
Utility Cycles
Press this icon to access the following utility cycles: Spin, Drain,
Rinse & Spin, and Clean Washer with affresh
®
cycle. Touch the
utility cycle you wish to use and follow the screen prompts.
Preferences
Press to access Times and Dates, Sound Volume, Display
Settings, and Regional. Follow the screen prompts.
WiFi
Press to access Connect to Network, SAID Codes,
Mac Address, and WiFi. Follow the screen prompts.
Info
Press to access Service & Support, Store Demo Mode,
Restore Factory, WiFi Terms and Conditions, and Software
Terms and Conditions. Follow the screen prompts.
13. Touch POWER button to turn off
washer/dryer after cycle ends
Tools
The Tools buon gives access to many other sengs, ulity
cycles, preferences, and informaon. Touch the TOOLS buon
to access the Tools screen, which contains the following (you
will need to scroll down with your nger to access all of the
selecons).
Control Lock
Press this icon to lock the controls. Swipe up to unlock.
Mute
Press this icon to mute or unmute sounds.
Ulity Cycle
Press this icon to access ulity cycles: Rinse, Spin, Drain, Clean Cycle.
Steam Refresh
Select Steam Refresh to reduce odors and light wrinkles in
dry loads consisng of wrinkle-free coon, coon-polyester
blends, common knits, and synthecs. If you will be unable
to remove a load immediately, touch WRINKLE SHIELD to add
up to 150 minutes of periodic tumbling. You may select the +
Steam seng to add a short steam cycle aer 60 minutes to
help smooth out wrinkles.
Preferences
Press to access Times and Dates, Sound Volume, Display
Sengs, and Regional. Follow the screen prompts.
WiFi
Press to access Connect to Network, SAID Codes, Mac Address,
and WiFi. Follow the screen prompts.
Info
Press to access Service & Support, Store Demo Mode, Restore
Factory, WiFi Terms and Condions, and Soware Terms and
Condions. Follow the screen prompts.