Use and Care Guide Guide d’utilisation et d’entretien Electronic Dryer Sécheuse électronique Para obtener acceso al Manual de uso y cuidado en español, o para obtener información adicional acerca de su producto, visite www.whirlpool.com. If you have any problems or questions, visit us at www.whirlpool.com. Pour tout problème ou question, consulter www.whirlpool.ca.
Table of Contents DRYER SAFETY........................................................................2 ACCESSORIES.........................................................................4 CHECK YOUR VENT SYSTEM FOR GOOD AIRFLOW.............5 CONTROL PANEL AND FEATURES..........................................6 CYCLE GUIDE...........................................................................7 USING YOUR DRYER...............................................................9 ADDITIONAL FEATURES.........
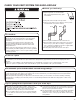
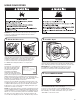
WARNING: FIRE OR EXPLOSION HAZARD Failure to follow safety warnings exactly could result in serious injury, death, or property damage. – Do not store or use gasoline or other flammable vapors and liquids in the vicinity of this or any other appliance. – WHAT TO DO IF YOU SMELL GAS: • Do not try to light any appliance. • Do not touch any electrical switch; do not use any phone in your building. • Clear the room, building, or area of all occupants.
ACCESSORIES INSTALLATION & MAINTENANCE ACCESSORIES FACTORY CERTIFIED PARTS – these three words represent quality parts and accessories designed specifically for your appliance. Time tested engineering that meets our strict quality specifications. FACTORY CERTIFIED PARTS 15" Pedestal Color-matched pedestal raises the dryer to a more comfortable working height. The large drawer provides convenient storage.
CHECK YOUR VENT SYSTEM FOR GOOD AIRFLOW Maintain good airflow by: n Cleaning your lint screen before each load. n Replacing plastic or foil vent material with 4" (102 mm) diameter heavy, rigid vent material. n Using the shortest length of vent possible. n Using no more than four 90° elbows in a vent system; each bend and curve reduces airflow. Good Better Good airflow Along with heat, dryers require good airflow to efficiently dry laundry.
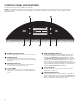
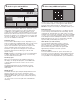
CONTROL PANEL AND FEATURES Not all features and cycles are available on all models. NOTE: The control panel features a sensitive surface that responds to a light touch of your finger. To ensure your selections are registered, touch the control panel with your fingertip, not your fingernail. When selecting a setting or option, simply touch the appropriate button. 5 2 4:28 ..... What to Dry REGULAR Temperature LOW 1 1 3 POWER/CANCEL BUTTON 0:45 How to Dry NORMAL Set Auto-Drying L...
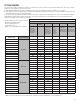
CYCLE GUIDE Your dryer has a unique user interface to help you select the best cycle you need for your load. The “What to Dry” “How to Dry” layout guides you to the optimal cycle in two easy steps: 1. First determine what items are in the load that you are trying to dry. Use that to guide your “What to Dry” selection. 2. Then determine how you want the dryer to dry them by selecting the appropriate “How to Dry” selection. Modifiers are preset for the items being dried, but can be changed if desired.
How do you want to dry? For best fabric care, choose the cycle that best fits the load being dried. R – Recommended Cycle a – Alternate Cycle Blank – Cycle is available but not optimal What do you want to dry? Cotton Undergarments White Napkins Whites Colors Colored Napkins Dish Cloths Towels Towels Regular Automatic Sensor Cycle stops when dryness level is reached. Heavy Duty High Heat longer cycle Automatic Sensor Cycle stops when dryness level is reached.
USING YOUR DRYER WARNING: To reduce the risk of fire, electric shock, or injury to persons, read the Important Safety Instructions before operating this appliance. 1. Clean the lint screen 2. Load the dryer Clean the lint screen before each load. Pull the lint screen straight up. Roll lint off the screen with your fingers. Do not rinse or wash screen to remove lint. Wet lint is hard to remove. Push the lint screen firmly back into place. For additional cleaning information, see “Dryer Care.
4. Select cycle and modifiers 5. Select any additional options 4:28 0:45 What to Dry REGULAR Temperature LOW How to Dry NORMAL Set Auto-Drying L... NORMAL Wrinkle Shield OFF From the home screen, touch the Options icon (at upper right of screen) and the Options screen will show Static Reduce, Damp Dry Signal, and/or EcoBoost™ (depending on cycle). NOTE: Not all options and settings are available with all cycles.
6. Use Tools button to change other settings, if desired The Tools button gives access to many other settings, utility cycles, preferences, and information. Touch the TOOLS button to access the Tools screen, which contains the following (you will need to scroll down with your finger to access all of the selections). Control Lock Press this icon to lock the controls. Swipe up to unlock. 7. Touch and hold START/PAUSE to begin cycle Touch and hold START/PAUSE to begin the cycle. 8.
ADDITIONAL FEATURES USING THE DRYING RACK Use the drying rack for items that you do not want to tumble dry, such as sweaters and tennis shoes. When you use the drying rack, the drum continues to turn, but the rack remains stationary. The drying rack is intended for use with the Timed Dry cycles only. The drying rack cannot be used with automatic cycles. USING THE DRYING RACK (cont.) 2.
DRYER CARE CLEANING THE DRYER LOCATION Keep dryer area clear and free from items that would block the airflow for proper dryer operation. This includes clearing piles of laundry in front of the dryer. CLEANING THE LINT SCREEN Every-load cleaning The lint screen is located in the door opening of the dryer. Clean the lint screen before each load. A screen blocked by lint can increase drying time. To clean: 1. Pull the lint screen straight up. Roll lint off the screen with your fingers.
NON-USE, STORAGE, AND MOVING CARE Steam models only: Install and store your dryer where it will not freeze. Because some water may stay in the hose, freezing can damage your dryer. If storing or moving your dryer during freezing weather, winterize it. Non-Use or Storage Care If you will be on vacation or not using your dryer for an extended period of time, you should: 1. Unplug dryer or disconnect power. 2. Clean lint screen. See “Cleaning the Lint Screen.” 3. Turn off the water supply to the dryer.
TROUBLESHOOTING — CONNECTIVITY First try the solutions suggested here or visit our website at www.whirlpool.com/owners (in Canada www.whirlpool.ca/owners). If you experience Dryer is not connected to home Wi-Fi router: Possible Causes Solution The dryer may be in standby mode. Touch the POWER/CANCEL button on the dryer. The dryer has never been connected to the home Wi-Fi router. See the Whirlpool® app. Lost connection to home Wi-Fi router.
TROUBLESHOOTING First try the solutions suggested here or visit our website at www.whirlpool.com/owners (in Canada www.whirlpool.ca/owners) for assistance and to possibly avoid a service call. If you experience Possible Causes Solution Dryer Operation Dryer will not run Door not closed completely. Make sure the dryer door is closed completely. Start/Pause touched with fingernail. Touch START/PAUSE with pad of finger. Household fuse is blown or circuit breaker has tripped.
TROUBLESHOOTING First try the solutions suggested here or visit our website at www.whirlpool.com/owners (in Canada www.whirlpool.ca/owners) for assistance and to possibly avoid a service call. If you experience Possible Causes Solution Dryer Results (cont.) Drying times are too long and clothes are not getting dry (cont.) The dryer is not level. Clothes not contacting the moisture sensors during automatic cycles. See “Level Dryer” in the Installation Instructions.
TROUBLESHOOTING First try the solutions suggested here or visit our website at www.whirlpool.com/owners (in Canada www.whirlpool.ca/owners) for assistance and to possibly avoid a service call. If you experience Possible Causes Solution Dryer Results (cont.) Odors Load too hot Recent painting, staining, or varnishing in the area where your dryer is located. Ventilate the area. When the odors or fumes are gone from the area, rewash and dry the clothing.
TROUBLESHOOTING First try the solutions suggested here or visit our website at www.whirlpool.com/owners (in Canada www.whirlpool.ca/owners) for assistance and to possibly avoid a service call. If you experience Possible Causes Solution Dryer Displaying Code Message or Indicator Is Lit (cont.) Check Vent pop-up screen is displayed The lint screen or vent is clogged; the vent is crushed or kinked or has too many turns. The dryer will continue to run when this pop-up screen is displayed.
Connected Appliance Regulatory Notices Federal Communications Commission (FCC) Compliance Notice This equipment has been tested and found to comply with the limits for a Class B digital device, pursuant to Part 15 of the FCC Rules. These limits are designed to provide reasonable protection against harmful interference in a residential installation.
Connected Appliance Regulatory Notices (cont.) Open Source License Usage The following statements refer to the portions of this software based in part on FreeRTOS v7.0.2, http://www.freertos.org. The use of this software is governed by the terms of GNU General Public License v. 2, which is available at: http://www.gnu.org/licenses/gpl-2.0.html. A copy of the source code may be obtained by written request for the software by name to opensource@whirlpool.com, along with the address for delivery.
WHIRLPOOL® LAUNDRY LIMITED WARRANTY ATTACH YOUR RECEIPT HERE. PROOF OF PURCHASE IS REQUIRED TO OBTAIN WARRANTY SERVICE. Please have the following information available when you call the Customer eXperience Center: n Name, address, and telephone number n Model number and serial number n A clear, detailed description of the problem n Proof of purchase including dealer or retailer name and address IF YOU NEED SERVICE: 1.
Assistance or Service Before calling for assistance or service, please check “Troubleshooting” or visit www.whirlpool.com/owners. It may save you the cost of a service call. If you still need help, follow the instructions below. When calling, please know the purchase date and the complete model and serial number of your appliance. This information will help us to better respond to your request.