
Installation guide


8
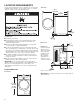
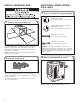
2. Screw in leveling legs
INSTALL LEVELING LEGS
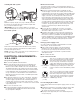
To avoid damaging oor, use a large at piece of cardboard
from dryer carton; place under entire back edge of dryer.
Firmly grasp dryer body (not console panel) and gently lay
dryer down on cardboard.
NOTE: Residual water from factory testing may drain when
dryer is laying on its side.
1. Prepare dryer for leveling legs
Using a wrench and tape measure, screw leveling legs into
leg holes until bottom of foot is approximately 1/2" (13 mm)
from bottom of dryer.
Now stand the dryer on its feet. Slide the dryer until it is
close to its nal location.
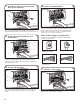
ELECTRICAL INSTALLATION –
U.S.A. ONLY
Remove hold-down screw and terminal block cover.
1. Choose electrical connection type
Power supply cord 4-wire receptacle
(NEMA Type 14-30R).
Go to “Power Supply Cord Connection.”
3-wire direct connection:
Go to “Direct Wire Connection.”
4-wire direct connection:
Go to “Direct Wire Connection.”
Power supply cord 3-wire receptacle
(NEMA Type 10-30R).
Go to “Power Supply Cord Connection.”
NOTE: If local codes do not permit connection of a
cabinet-ground conductor to neutral wire, go to “Optional
External Ground for 3-Wire Connection.” This connection
may be used with either a power supply cord or a direct
wire connection.
2. Remove terminal block cover
Before you start, disconnect power.