
User's Manual


Installation Requirements
Tools and Parts Needed
Assemble the required tools before starting installation. Read and %llow tile instructious provided with
any tools listed here.
• Screwdriver • Tape Measure
• Pliers
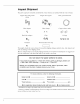
If using Soldered Copper Pipe
• Tubing cutter • Lead-free solder and flux
• Propane torch * Emery cloth, sandpaper or steel wool
• Misc. copper pipe fittings
If using Threaded Pipe
• Pipe cutter or hacksaw • Pipe joint compound
• Threading tool * Misc. threaded pipe fittings
If using CPVC Plastic
• Pipe cutter * Solvent cement
• Hacksaw • Primer
• Adjustable wrench • Misc. CPVC pipe fittings
If using Other
• Other pipe and fittings suitable %r potable water supply as required by piping system
manufacturer and local codes and/or ordinances.
Location Requirements
Consider all of tile %llowing when selecting all installation location for tile water softener.
• Do not locate the water softener where freezing temperatures occur. Do not attempt to
treat water over 120°E Freezing, or hot water damage voids the warranty.
• To condition all water in the home, install the water softener close to the water supply
inlet, and before all other plumbing connections, except outside water pipes. Outside
faucets should remain on hard water to avoid wasting conditioned water and salt.
• A nearby drain is needed to carry away regeneration discharge (drain) water. Use a floor
drain, laundry tub, sump, standpipe, or other options (check your local codes). See "Air
Gap Requirements" and "Valve Drain Requirements" sections.
• The water softener works on 24 volt-60 hz electrical power only, supplied by a direct
plug-in trans%rmer (included). Provide an electrical outlet in accordance with NEC and
local codes.
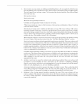
• Always install the water softener between the water heater and water inlet. Any other
installed water conditioning equipment should be installed between the water softener
and the water inlet (see Figure 1 below).
cold t_ '_
water heater_
water softener I I
optional
sediment
filter
I
waterinlet
Figure 1