Model WHESFC How to install, operate and maintain your Water Conditioner PRODUCT AND WARRANTY REGISTRATION Register your product online to validate and extend your warranty. See warranty page for details. www.whirlpoolwatersolutions.com If you have any questions or concerns when installing, operating or maintaining your water conditioner, call our toll free number: or visit 1-866-986-3223 whirlpoolwatersolutions.
TABLE OF CONTENTS Page Specifications & Performance Claims . . . . . . . . . . . . . . . . . . . . . . . . . . . . . . . . . . . . . . . . . . . . . . . . . . . . . . . . . . . . 3 Water Conditioner Safety . . . . . . . . . . . . . . . . . . . . . . . . . . . . . . . . . . . . . . . . . . . . . . . . . . . . . . . . . . . . . . . . . . . . . 4 Before You Start . . . . . . . . . . . . . . . . . . . . . . . . . . . . . . . . . . . . . . . . . . . . . . . . . . . . . . . . . . . . . . . . . . . . . . . . . .
Specifications & Performance Claims SPECIFICATIONS Model Code Model WHESFC LLFC Rated Softening Capacity (Grains @ Salt Dose) Rated Efficiency (Grains/Pound of Salt @ Minimum Salt Dose) Water Used During Regeneration @ Minimum Salt Dose Total Water Used Per Regeneration @ Maximum Salt Dose 11,000 @ 2.6 lbs. 24,700 @ 7.8 lbs. 31,100 @ 13.4 lbs. 4,230 @ 2.6 lbs. 4.3 gal. / 1,000 grains 54.7 gallons Rated Service Flow Rate 8.0 gpm Amount of High Capacity Ion Exchange Resin 0.98 cu. ft.
Water Conditioner Safety Your safety and the safety of others are very important. We have provided many safety messages in this manual and on your appliance. Always read and obey all safety messages. This is the safety alert symbol. This symbol alerts you to potential hazards that can kill or hurt you and others.
Inspect Shipment The parts required to assemble and install the water conditioner are included with the unit. Thoroughly check the water conditioner for possible shipping damage and parts loss. Also inspect and note any damage to the shipping carton. Remove and discard (or recycle) all packing materials. To avoid loss of small parts, we suggest you keep the small parts in the parts bag until you are ready to use them.
Installation Requirements LOCATION REQUIREMENTS PLUMBING CODES Consider all of the following when selecting an installation location for the water conditioner. All plumbing must be completed in accordance with national, state and local plumbing codes. = Do not locate the water conditioner where freezing temperatures occur. Temperature of the water supply to the conditioner must be 40-100°F. Do not install on hot water. Freezing temperatures or hot water damage voids the warranty.
Installation Requirements VALVE DRAIN REQUIREMENTS 1/4” NPT Thread Barbs for 3/8” I.D. Tubing Using the flexible drain hose (included), measure and cut to the length needed. Flexible drain hose is not allowed in all localities (check your plumbing codes). If local codes do not allow use of a flexible drain hose, a rigid valve drain run must be used. Purchase a compression fitting (1/4 NPT x 1/2 in. minimum tube) and 1/2" tubing from your local hardware store. Plumb a rigid drain as needed (See Figure 5).
Dimensions 3-3/4” 19” IN 18” OUT IN – OUT 47-7/8” 41-1/2” 39-1/2” FIG.
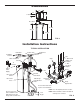
Installation Instructions TURN OFF WATER SUPPLY Nozzle Venturi Assembly 1. Close the main water supply valve, located near the well pump or water meter. Top Cover Brine Tank Overflow Elbow Nut Ferrule 2. Open all faucets to drain all water from house pipes. NOTE: Be sure not to drain water from the water heater, as damage to the water heater elements could result.
Installation Instructions COMPLETE INLET AND OUTLET PLUMBING Measure, cut, and loosely assemble pipe and fittings from the main water pipe to the inlet and outlet ports of the water conditioner valve. Be sure to keep fittings fully together, and pipes squared and straight. Be sure hard water supply pipe goes to the water conditioner valve inlet side.
Installation Instructions ADD WATER AND SALT TO THE SALT STORAGE TANK RINSE OUT CARBON FINES Small particles of carbon filtration material are generated during manufacturing and shipping, which will exit the media tank with the first water flow. These carbon “fines” are not harmful, but give the water a gray color and should be rinsed down the drain before any water from the conditioner is directed to the home’s faucets or water heater.
Installation Instructions SANITIZE THE WATER CONDITIONER / SANITIZE AFTER SERVICE TEST FOR LEAKS To prevent air pressure in the water conditioner and plumbing system, complete the following steps in order: 1. Slide open the salt lid, remove the brinewell cover and pour about 90 ml (6 tablespoons) of household bleach into the conditioner brinewell. Replace the brinewell cover. 1.
Programming the Water Conditioner Display SET SALT LEVEL button TANK LIGHT button UP button SET SALT LEVEL TANK LIGHT STATUS LIGHT (see below) OPERATING (Steady) PROGRAM PRESS TO SCHEDULE LOW SALT (Flashing) RECHARGE button HOLD TO START RECHARGE DOWN button STATUS LIGHT = = = = FIG.
Programming the Water Conditioner SET WATER HARDNESS NUMBER Salt Type allows you to choose between sodium chloride (NaCl), which is regular softener salt, or potassium chloride (KCl), which is an alternative to sodium chloride. KCl (potassium chloride) may be used if the user of the water conditioner is on a sodium restricted diet and is concerned about the amount of sodium in the water supply. 1. Press the PROGRAM button once again to display a flashing “25” and the word “HARDNESS”.
RECHARGE Customizing Features / Options SET SALT LEVEL The RECHARGE button is used to initiate an immediate recharge. The water conditioner has a salt monitor indicator light to remind you to add salt to the storage tank. 1. Press and hold the RECHARGE button until the words “RECHARGE", “SERVICE" and “FILL" flash in the display. RECHARGE initiated NOTE: You must set salt level each time salt is added to the water conditioner. To set this monitor system: 1.
Customizing Features / Options SALT EFFICIENCY CLEAN / CLEAR WATER IRON REDUCTION This feature is beneficial on water supplies containing ferrous (clear water) iron. The default setting is OFF. When this feature is set to ON, an additional backwash and fast rinse cycle will occur first, preceding the normal regeneration sequence. This provides extra cleaning of the resin bed before it is regenerated with the salt brine.
Customizing Features / Options CLEANSING FEATURE 1. Press and hold the PROGRAM button until the screen in Figure 29 is displayed. Once in this display, press the PROGRAM button four times and the display in Figure 30 is shown. The cleansing feature keeps larger particles of sediment from entering the home’s plumbing system. As water passes through the softener, the larger sediment particles are collected in the integrated basket and then rinsed to the drain before each regeneration.
Customizing Features / Options WATER FLOW INDICATOR POWER OUTAGE MEMORY Whenever the conditioner has water flowing from the outlet port, the display will show water droplets scrolling down the right hand side of the screen (See Figure 32). The faster the water flow, the faster the droplets will flash. If electrical power to the water conditioner is lost, “memory'' built into the timer circuitry will keep all settings for several hours.
ADDING SALT Routine Maintenance CLEANING THE NOZZLE & VENTURI Lift the salt lid and check the salt storage level frequently. If the water conditioner uses all the salt before you refill it, you will experience hard water. Until you have established a refilling routine, check the salt every two or three weeks. Always add if less than 1/4 full. Be sure the brinewell cover is on. NOTE: If using potassium chloride (KCl), do not fill above level 4 on the brinewell scale.
Troubleshooting AUTOMATIC ELECTRONIC DIAGNOSTICS 3. Symbols in the display indicate POSITION switch operation (See Figure 36). This water conditioner has a self-diagnostic function for the electrical system (except input power and/or water meter). The water conditioner monitors electronic components and circuits for correct operation. If a malfunction occurs, an error code appears in the display. Switch is open (Cam not rotating) Switch is closed (Cam rotating) FIG. 36 4.
Troubleshooting RESETTING TO FACTORY DEFAULTS 2. After observing fill, press the RECHARGE button to move the conditioner’s valve into the brine position. A slow flow of water to the drain will begin. Verify brine draw from the brine tank by shining a flashlight into the brinewell and observing a noticeable drop in the liquid level. This may take 15 to 20 minutes. To reset the electronic controller to its factory default for all settings (time, hardness, etc.): 1.
Conditioner Exploded View Valve Assembly See Pages 24 & 25 for parts 15 121 14 27 1 17 123 2 4 6 3 5 7 16 8 18 19 12 9 20 24 10 8 21 22 7 6 5 13 11 23 25 26 28 22
Key No. Conditioner Parts List Part No. – 7112963 Distributor O-Ring Kit (includes Key Nos. 1-3) 2 á O-Ring, 13/16” x 1-1/16” 1 3 á á 4 7077870 6 7265025 5 – 7 8 9 10 11 12 13 14 15 16 ¢ 7105047 7331177 á á 7247996 0502272 7301619 7124415 7310202 7327568 7351054 7335163 7346588 7346067 Key No. Description 7332131 Salt Lid (order decal below) 18 7305299 Rim 19 O-Ring, 2-3/4” x 3” 20 Top Distributor Repl. Bottom Distributor Filter Screen Clamp Section (2 req.) Repl.
Valve Exploded View 100 101 102 144 103 143 104 105 142 106 141 140 139 138 110 111 wear-strip 118 126 135 113 134 121 114 133 132 115 119 131 129 123 120 127 130 122 117 cross-section view 136 108 112 seal 137 109 107 116 125 128 24 124
Key No. 100 101 102 103 104 105 – 106 107 108 109 110 Valve Parts List Part No. 7224087 7286039 7231393 0900857 7171250 7283489 7331169 á á á á á – 7185487 112 á 111 113 114 115 116 117 118 – 119 120 á á á á á 7174313 7185500 7342712 á á 121 7337589 122 7342704 Key No. Description Screw, #8-32 x 1” (2 req.) Part No. 123 7337597 Screw, #6-20 x 3/8” (3 req.) – 7290931 124 á Cam & Gear 126 7309811 Motor (incl. 2 ea. of Key No.
EXTEND YOUR WARRANTY: Use Whirlpool® WHE-WSC Water Softener Cleaner and register at whirlpoolwatersolutions.com The factory warranty for your water conditioner is shown below. The two year full warranty period on parts and labor can be extended to ten (10) years from the date of purchase if you use Whirlpool® WHE-WSC Water Softener Cleaner on your system, and register your purchase of Whirlpool® WHE-WSC Water Softener Cleaner at whirlpoolwatersolutions.com.